Dave,
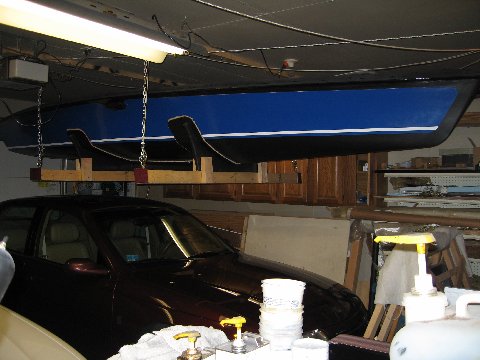
I have a four point lift setup in the garage.  When I wanted to fit  the
dagger board in the trunk, I lifted the boat off of the cradle with some
tie-down
straps hung under the hull between the winch lines.  I raised the  hull high
enough to allow the dagger board to extend to the full down position  and
positioned saw horses with carpeted 2x4 timber braces clamped to them to
support
and steady the hull.  My saw horses are fairly tall at 36 inches,  so that
helped to provide a strong enough platform for me and the boat.  I  was then
able
to trace a line around the dagger board where the deck and  hull plains met
the board.  The top of my dagger board was still  squared off at this point, so
I used the top of the board to trace the opening  onto the lower block and
cut out the holes with an electric jig saw, being  careful to cut the hole
inside of the line.  The cutout was fine tuned  with a rasp and spindle sander.


The hull opening is fairly perpendicular to the trunk, but the deck side is
angled down toward the transom, so the upper block cutout hole is angled to
match.  Therefore, I cut off the top of the dagger board on a parallel line  to
the traced line for the deck intersection and used the top of the dagger
board to trace the upper opening onto the top trunk block.  To determine  the
position of the lower opening on the upper trunk block, I place the block  onto
the trace line marking the deck intersection and marked the bottom of the
block where the block intersected the fore and aft edges of the dagger  board.
Using these marks, I positioned the top of the dagger board onto  the bottom of
the block to trace around the blade, marking the lower  opening.  I used a
hand jig saw to cut the upper block hole so that I could  match the angle on
the
fore and aft ends.  With the reference lines drawn  on the dagger board, I had
an easy test jig to check the fit  and dry-fit the treaded rods, inserts and
barrel nuts at the correct  angle.

With the hull up on the saw horses, I had room to climb underneath to drill
the mounting holes in the upper block for the threaded rods from below, using
a  18" long Irwin drill bit.  I cut and shaped the openings for the  blade
bigger than needed so that I could seal the wood with  epoxy/410 and get a
better
fit for installation in the trunk.  By  assembling the rods, nuts and blocks
on the dagger board and lining them up with  the reference lines traced onto
the dagger board, you can epoxy the inserts into  the lower block and fill the
gap between the dagger board and the blocks with  the epoxy/410 to get a even
fit.  I wrapped mylar around the board and  taped up the bottom of each block
to prevent leakage.  Bram now recommends  Spar-Tite to fill the gap for the
final fit.

I hope that this gives you some ideas to use in fitting your trunk  openings.
 Let me know if you have any questions regarding the above.

Bill Scheumann
USA020 and USA040
This is the Swift Solo mailing list. For unsubscribe instructions, visit here: http://catzooks.com/swift-solo/ |
