Pouring Spartite
posted 2008 March 24
I finally poured the Spartite this week. But first, there was a lot of preparation.
First, I picked up some 1” velcro and tested the
fit on the deck-side fitting. The board didn't fit. My first attempt to fix this was to shave some of the black epoxy/carbon off the surface of
the board (it serves no functional purpose anyway: I might as well shave it off). This didn't help,
and it took around ten scrapes before my blade was so dull it couldn't scrape butter. (I had to flip
the blade to get a new sharp edge for the other side of the centreboard.) Scraping didn't help, so
it was back to the rasp to take out more of the inside
of the insert. After a good while, it fit. Finally.
I also removed a bit more from the hull-side insert, and then re-sealed the inner edges. Insert the velcro, and the top fitting is ready to go, and
even provides some friction (so the board won't float
out).
With both the top and bottom fittings cut to size, it was time to pour the Spartite. Directions:
- Put the board in so it sticks out of the deck side by 3”.
- Draw a line around the board.
- Tape all the way around the board, 1” below
the line.
- Place the insert, and apply clay all around.
Bram had suggested surgical tubing as the sealant layer, but I found that it was too hard to get
it in place - and there's no way I would have been able to make it work with the board covered in
vaseline and ensuring the insert didn't touch the board. So back to clay.
- Do the clay again. When I first placed the clay,
the insert was crooked vertically, and so it was closer to one side than the other. So, take all
the clay off, insert spacers to keep the board and insert in position, and repeat.
- I put a thin line of clay around the inner edge,
and tried to wedge it up a bit into the gap. While this doesn't seem to cause a better seal, it
does make it easier to place the insert on the clay correctly when the board is covered in
vaseline. Then put a thick layer below that, and press up against the bottom edge of the insert.
- Pull the insert off, and coat 4” toward the tip from the clay with vaseline (I used a spreader to get an even coat).
- Slide the hull insert down over the vaseline,
very carefully -- not touching the inner edges of the insert to the board. It took me about three
attempts to get this - each time, pull it off, clean the jelly off the insert with acetone,
re-spread the jelly on the board, and try, try again.
- Slide the board in place, and press it down so
the insert is flush (because the clay touches the edges). I also taped some plastic to the inside
of the box at the front and back - with the insert in place, you can see the front post of the
trunk, and the Spartite would (if unimpeded) touch the posts. That wouldn't be good.
- From the bottom, push the bottom insert in place,
and support the bottom of the board. I placed the board in the trunk about three times before I
was satisfied with it's position - it's very tight against one side of the hull insert. The first
time I put it in, I had an assistant hold the insert in place while I pushed the board down. That
didn't matter; it's easy to put the board in and then push the block on, as the board can't swing
enough in the trunk to touch the sides of the insert. I built a stand for the board to rest on,
because otherwise the only thing holding it in place is the grip of the clay between the board and
the insert.
- Prepare the Spartite. The instructions say shake
the square container, then pour it all into the round one. Forget that; I want some extra unmixed
so I can try, try again. So I weighed the two containers: 900 grams and 260 grams. So I figure
about a 3:1 mix ratio (which, in retrospect, seemed to work quite well). I used a syringe to suck
up the constituent parts, as well as one for the mixed stuff; the mixed one has a straw to help get the Spartite down to where the clay
is, since the gap is so narrow.
- Deep breath. Suck the parts from the cans, mix, pour into the syringe, and squirt into the gap. This stuff kicks in a few minutes,
so you have to work fast. Because the gap I had was so narrow, I had to keep sliding the straw in
and out to move it along; and that pulled some vaseline up, and made blobs, and got the blobs in
the middle of the insert. Drat.
One side of the board sucked up a lot more than the
other, and I became convinced that the clay floor had dropped away or the seal wasn't good, and
Spartite was running down my board and bonding the entire thing into the boat (OMG OMG OMG I'll
have a board bonded to the hull OMG OMG OMG). And I freaked. And I pulled the board out far enough
to verify that everything was kosher - some good luck. As it happens, pulling the board out was a
decent idea - you can confirm things are ok, and as long as you do this before the Spartite has
really kicked (in the first few minutes), it's fine to do.
Of course, on he side which had "sucked up" a bunch, there was a lot of room in the top. So I
needed to mix another batch of spartite (a mere 40 minutes later), and fill in the top edge to
remove the gap.
I slept terribly. I was incredibly nervous that the Spartite would dribble down the board, or
that the vaseline got wiped away, or that some other calamity would result. Would I be able to remove the board? A bit of tapping and... Whoohoo! Of course, the fact that the insert and the
board were so close together meant that the pour had air
pockets; I'll have to fix those up. And the vaseline did blob up, but I don't know that it's worth fixing those -
they're in the middle of the surface.
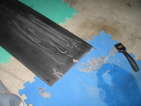
To fix the air pockets, I cleaned up the insert with acetone, coated a sheet of flashing metal in vaseline, mixed some
more Spartite, syringed it into the right spots, and clamped.
Once the Spartite was cured, I cut it out and sanded/filed off the excess. It's super hard - not
as hard as epoxy, but still very stiff. With a bit of work, it slides past the line on the board - but I still need to
put it in the hull to see how it fits there.
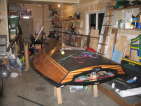
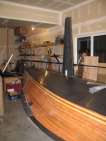
Because I didn't need the boat upside down anymore to fit the inserts in place, I put the boat on the dolly (the cradle should indeed be made to fit
over stations 6 and 10, otherwise it would be too far forward to fit behind the dolly handle).
Next up: fit the mast base. I levelled the spreaders so the tang could be perfectly
vertical; that way there's no twist. Clamp with shims
when it's right.
I also contact cemented the velcro for the front of the spin sock in place.
Tape off the top edge,
cut the velcro to shape,
coat everything, and
press together.
Finally, I coated a few pieces with epoxy/407 for UV protection:
tiller extension block,
mainsheet cleat base holders,
outhaul rack,
mast track, and mast base.
Spartite summary: I'm pretty ambivalent about the Spartite. It's expensive
($100 for the can), it goes bad quickly (the round can begins to oxidize as soon as you open the
can; it doesn't keep), it's hard to use, and the cured result is still super hard. I considered
using just epoxy instead - Bram points out that then you would have an exact point load along one
edge of the board, and that would cause a break; the slight give of the Spartite is enough that it
is a 1/16” edge to stop the breaking. If I were to do it again, I would wrap the board in a
thin, 4” wide piece of mylar. Hold the mylar in place with double-side tape running
vertically, and add a couple extra strips right at the trailing edge. If the inside edge of the
insert isn't flat (as mine aren't), use vaseline between the bottom of the mylar and where the clay
sticks. Also, be sure to wipe off the excess Spartite that collects on top of the insert - removing
it afterwards is a pain (I had to use a file).
Another possibility would be to make the entire trunk an extra 1/4” wide. The Spartite
would be perfect if only there was a bit more width to get it in place; for me, with not quite a
1/8” gap, it's just too narrow.
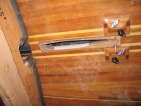
Cutting the top centreboard insert
posted 2008 March 17
This week, I cut the hole in the deck insert block. It's amazing to me that these take so long,
but they do take forever...
First, last Sunday I called in an assistant (my neighbour across the street) and we flipped the boat (and rearranged the garage).
I completed the tiller extensions - I cut off the foam at the end, used a punch to get the end pieces off, and re-wrapped the entire thing. Then shrink wrap with a paint stripper as the heat source, and
they're done. (Aside: the heat shrink is branded
"Young Fastener Products, Polyelefin Heat Shrink 50% Shrink, 1”". Finding it seems to be a
challenge - there are a bunch of links online for heat shrink, but not at that large size.)
With the extensions complete, I have no "background" task - I just have to cut the insert and get
it in, I can't work on anything else. So, onward. I screwed the block in place with playdough on the underside, then fit the board in from the top. This took quite a while to do. The hull is
horizontal, and I need to make sure the board is as well. When I first put it in, it was too far
over to one side - so I had to pull the block out, flatten out the playdough, and try again. I did
this about five times before I was satisfied - and even now, the hole I wound up cutting is too far on one side (drat). Once positioning was
complete, I put the board back in place on the playdough, cut the excess off, and drew a nice red line around what was left.
Now, cut. I got smart this time; I drilled holes at
the front and back. Then, to accommodate the in the inward tip of the saw blade, I can saw up one
direction, and back down the other. Done, and indeed
that tip is important. Rasp. An hour later, I had my first fit, although I know the head of the board is
slightly narrower than the body of the board. Fit
again, at least now it's poking through. Again.
Again. Finally I need a shim to stop the board from slipping through.
That's enough to do the epoxy work - so I coated the inside edge. This layer will get sanded down (eliminate
fuzzies) and another coat will go on. Note that during this entire process, I also took out the
bottom fitting and re-filed away some material - particularly around the trailing edge, to give it a
bit more room. Hopefully that will make for a good fit all around.
Cutting the lower insert
posted 2008 March 10
I took Friday off work this week and spent the day working on the boat. I cut the lower insert,
built shims for the dolly, pulled halyards, and wrapped the tiller extensions.
Finished the rudder box: I levelled
the boat, and checked out how vertical the rudder was; I'm in the money. I picked up some 2” wide velcro, although I probably only needed
1” wide. I cut a strip to length, and then glued
in place by removing part of the sticky back, positioning, and pressing. To get a tight fit
in the trailing edge, I pressed it in with a screwdriver.
Once that was done, the board was *very* tight in place - so I added a handle to the top, and removed about 3” of velcro
from both sides along the top edge; with that, it fits fairly well, and with a bit of time it
should be perfect.
Cut the bottom insert: I used the tried-and-true method of play-dough to position the board - put the block in, slide in the
board, remove the block, tada. The only thing I should have done in retrospect was ensure that
the board was exactly in-line with the hull (it's good, but not perfect). Once the block was out
of the hull, I put the board on top of it again, cut away all the playdough, and marked it with
a marker - ready to cut.
I wanted to ensure I always cut in one direction - the jigsaw cuts on a slight angle, and I
wanted to avoid removing too much material. I cut on the
line - which after two solid days of rasping I probably could have gone a bit further out. Finally fits.
Block cut, I glassed the bottom edge (hadn't done
that yet) and coated the inside. At the same time, I filled holes on the deck and top
insert. I'm using a method for these where I fill them up, wait for them to stop absorbing
epoxy, drain, and then pull a rolled up paper towel through to remove all excess.
Build shims for the dolly: I needed something to keep the cradle from floating
off the dolly. I cut two sheets of metal along with some spacer plywood, and drilled and bolted them in place.
Pull halyards: this took way longer than I expected it to. First, I drilled the
exit hole for the spinnaker halyard, and smoothed the
edges of that hole (as well as the main and jib halyard holes at the base of the mast). The halyard
puller is a thick metal tape - in reality a plumber's helper - and worked very well. I slipped my
metal tape down the mast - as long as it doesn't flip over, it won't tangle up with anything else in
there. Pull the spinnaker halyard through first, and tie (very) tight with a trucker's hitch to keep it out of the way.
Next, pull the main. Both spinnaker and main should go on the mast track side of the post that
goes across the mast at the spreaders. To get this, the mast track should be down - the tape will
fall down to the bottom after going in a few feet. To stop the tape from twisting over and catching
all the other halyards (which it really wants to do), I fed it in at the mast tip and kept the
remainder of the tape directly below the tip of the mast, so it had no place to flip to.
After pulling the main halyard all the way through and tying a ball at the end, I discovered that the halyard
wasn't quite long enough to go to the tip. So I cut the halyard loop off from the tail, and spliced
a new one, long enough to go from the mast track to the
tip of the mast plus 18”. Splice a 3” loop in the bottom (with a single ladder locking
loop, like in the righting line system), and splice the tail into the loop as well.
Next up, pull the jib halyard, and use a paperclip to fish around in the sheave to pull out the tail (a pain, to say the least). Once that's
done, put everything through the masthead, and call it
a day.
Wrap the tiller extensions: I spent most of the weekend on this seemingly easy
task. Each extension takes enough cork tape to cover 1 1/2 bicycle handles (so 1 1/2 boxes of cork
tape per tiller extension). Cut off the grip at the
end, and push out the pin at the attachment point -
with that, you can wrap the extension in cork tape and fit the shrink tubing on easily. (Attempts
one and two didn't take in to account the size of the heatshrink tubing and how to get it on the
extension...)
I also tried my hand at splicing two 1/4” double-braid ropes together; attempt one, attempt two. There's supposed to be a hole the width of
the line in the middle; I think the small rope makes that hard to do. This splice relies quite a
bit on having slack in the outer braid to push over the core; a very tight slip knot is required so
the slack doesn't escape into the line.
Cutting the Centreboard
posted 2008 March 3
Did a few things this week:
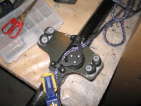
- Finished rigging the boom: screwed the big
ratchet block onto the boom (which I swear is cursed - I put one of
the end pieces on backwards, and then the bolt got stuck in the
locknut. I had to cut the bolt through to get it apart). Installed
the cam cleats on either side with their shims. Ran the mainsheet.
- Strung the shroud tensioners: That's 10’ of line, and the
ends are five feet apart. Glad I gave myself 3’ of extra (the
rough measurement was 7’). I went with a straight
right-left-right approach to the winding direction, so the line
wouldn't rub (or at least would have minimal oppourtunity to).
- Cut the daggerboard: I (along with an
assistant) tipped the boat up on it's side and slid the daggerboard
in, and then drew around
the edge. To verify that was the correct angle, I dropped a right angle into the box
and transferred that to
the board. As it happens, the first measurement was perfect - so I
cut. I sanded down the
rough edge; all that's left now is to drill the holes for the
handle.
- Build a new spinnaker halyard: since my last
attempt at this halyard used 5/16” (which was too large to
pull through the lightning rope), I bought some 1/4”
ultralight to try, try again. Pulling the core out was easy (having
learned my lesson last time - make sure the knots on the end are
tight, so you don't loose a line in the middle). The hardest part
of all this is getting it started - getting the head of the
lightning rope into the centre of the sheath takes some work. But
it went through successfully, and the tail went through the
lightning rope easily
as well. Then push the lightning rope up tight and cut off 1/4 of the
strands. Move down an inch, cut off another 1/4. Trim, move
down another 1”,
remove another 1/4. Then pull the sheath down, and trim off
whatever is left. Whip, and voila. As it happens,
when I mentioned this to Bram, he said the ultralight isn't the
right type of line - it's too hard to grip. Better to get something
else which is easier to grab hold of.
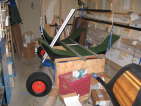
- Build the dolly: Seitech dollies are pretty
sweet - easy to assemble and very well thought out. I followed a
pretty detailed build,
but it turns out the initial assembly doesn't have to come
completely apart to make the dolly transportable - it's designed to
come apart quickly after a regatta. The only open question is if
I'll have to remove the vertical pieces on either side to allow room
for the cradle.
Page 5 of 62
« First
…
«
3
4
5
6
7
»
…
Last »