Rigging the mast and boom
posted 2008 February 25
With the mast tang bonded in place, I drilled the
hole for the spinnaker halyard, and also ground in a bit of rocker on the base. I also had to fill in a couple dimples on the shroud tensioners - pity I didn't do this
the first time around. Once that had cured, I drilled the hole for the shroud and bevelled the edge so there's a nice smooth spot for the
shroud to sit.
Next, I built up the deck-side blocks in the same
way as the shroud-side blocks from last week. Just a lot of drilling (and making bits dull - I need
to get a new set). I also built some for the forestay.
Wednesday evening, I spent the night building up the spinnaker halyard. This involves pulling lightning rope through the sheath of a piece of Sampson
line. (And this wasn't easy either - the ends pulled
apart while the lightning rope was in the middle of the sheath, and I had to get it back together
again... Ug.) But I won't recount that adventure here, because I used the wrong Sampson line.
Damn.
On the weekend, Bram (a wizard with a splicing wand) came over again, and we rigged up a storm.
What we accomplished:
- Mast head crane: instead of putting tangs on either side of this to hold the
caps, the new style is to put the caps through the
mast head. Thus, I drilled the hole at 1/4”, put divits on either side, and then pulled the
line through. The line uses Bram's patented line-end technique: you make a cover out of the end
of the line, and then splice the cover tail back into the line itself. This way, the chafing is
on the cover, nothing is loose, and you (greatly) reduce weight aloft. Pull the line through (to
the point where there is only a single width of rope), tie a knot, put the splicing wand through
and pull the other side through, tie the other side, and then pull both into position (which
requires quite a bit of force).
- We also elongated the hole for the strap to fit through - a bit of pressing the drill bit into
the side, and making sure it fit. Once it slipped through, I screwed the Harken block in place
(the Harken is preferred because it's smaller than the Ronstan).
- Installed the trapeze system: similar to the cap shrouds, splice the line
ends, pull the trapeze lines through the mast, tie
stopper knots, and pull them taunt.
- Vang arm assembly: The vang arm uses 10-24 weld nuts as bushings around which everything rotates. Drill the
holes, make sure there's enough clearance for the weld nuts to actually act as bushings, and bolt
together with a screw.
- Splice the mainsheet: Bram spliced the mainsheet, and then covered the splice in heatshrink tubing.
- Trapeze assembly: Bram spliced and assembled the trapeze assembly.
- Caps and primaries: I bolted the tangs in place with a 1/4” bolt and
nylock nut, and Bram spliced the caps and primaries and installed them (after puzzling out how
long they should be - the manual gives two different numbers for the raw and finished numbers, and
they don't agree. Also, ignore the PBO references - that's old skol.)
- Trim the tiller end: I carved
down the tiller end, ready for drilling and installing the shock cord (see here).
- Grinding the boom end: I ground the aft end of the boom down, so it has a
slight rake aft. I also re-ground the curve in the end (last time) - the objective here is to allow the floppy
block which is placed there to flip about 60° up from straight down on either side.
- Drilling the boom: I drilled the holes for the floppy block at the end of the
boom. I started from the top - drop the base of the block into the outhaul rack, space it about
1/8” from the end of the boom, and drill from the top down. Then flip the boom over, and drill the second one so the two
holes are correctly aligned. The screws go down, so the nut is on the inside of the boom (and the
ends of the bolt are cut flush).
- Rigging the boom: With that done, we installed the floppy. We also drilled and installed the
small block on the bottom aft of the boom, and carved the hole on the bottom front of the boom for the mainsheet exit block,
and drilled holes for the side floppy block. With all that done, we slipped the mainsheet
through, and had a rigged boom!
- Splice main and jib halyard: Bram also spliced the main and jib halyards, and
explained how I need to run them in the mast when the time comes.
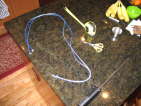
Building the shroud tensioners
posted 2008 February 18
Built the righting line ladder, mast tang & base, and shroud tensioners this week.
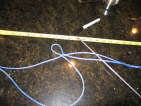
Righting line ladder: This is a line doubled up on itself, and then each side is
threaded straight through the other side to make a weave. At each "rung" there are at least three
weaves (I did four). This isn't a splice, it just runs straight through. Once one side is through, move up the
line about 1/8” and pull the other side
through. Make sure to put the splicing wand through the centre of the line. You get a nice
interwoven ladder-like effect. Each ladder "rung" is about 9” apart, enough room for a booted
foot to fit in.
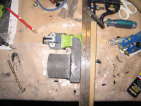
Mast tang: Bram's tang is about 4 1/2” long, and I measured the correct
depth for my mast track to be (a rough cut of) about 1 1/4” deep. Bram left me his raw plate, which I scribed with the right dimentions; his carbon plate is
1/8” thick and the hybrid plate is 1/4” thick. (It looks like he's building vang arms
from this stuff (and it's heavier than what I have, hope that's ok). With three pieces of that cut,
I needed a bit of extra width to fit nicely in the mast track, so I cut a piece from my stock of glass/hybrid plate. Rough the edges, mix epoxy/silica, and bond with a layer of glass tape between (all but one)
layer. I was going to put the glass tape in all three spots between layers, but I knew from the dry
runs that it would make it tight in the mast base - and I didn't want to risk it. Two out of three
should be good.
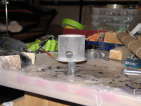
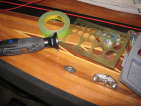
Bond the outhaul rack in place: I prepared the end of the boom to bond the outhaul rack on.
The boom is 89” long overall and 87 3/4” to the centre hole of the outhaul rack (the
more important measurement). I also roughed up the inside of the rack, and drilled the holes - one
centred, the other two 1 1/4” out from the middle (and as straight through as I could manage).
Then bond and clamp.
Mast base: With the tang bonded and cleaned up, I began working on positioning it on the base. The base of the mast is
positioned 75 1/2” back from the bow. Due to the
placement of my mast track and where the flare starts up and the hole for the pin, my mast base is
going to have to be about 3/4” forward of that. Not a problem - I'm light. After a bunch of
measurement, I drilled three holes in the base,
1/4” in from the inner wall, and through into the centre of the tang and to the right depth
for the screw. The spin halyard block should be offset 10° to starboard. I cut out a small paper wedge so I could estimate the 10° place the
paper in, place the block in, align it up, and drill the
holes from the inside, with a drill bit that just fits the holes on the block. I then flipped
it over and re-drilled the holes from the outside, so
the weld nuts would fit in place. That done, grind the
weld nuts down so the tang will fit correctly, and scrape up the sides of the weld nuts so
there's some "grip" for the epoxy.
Now, epoxy everything up with some silica/graphite, fill the screw holes in the tang, screw the
tang on, wipe away the excess epoxy from the inside, epoxy up the sides of the weld nuts, insert in
place, and clamp. Good to go.
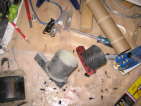
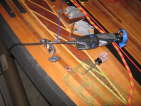
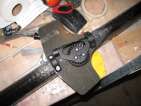
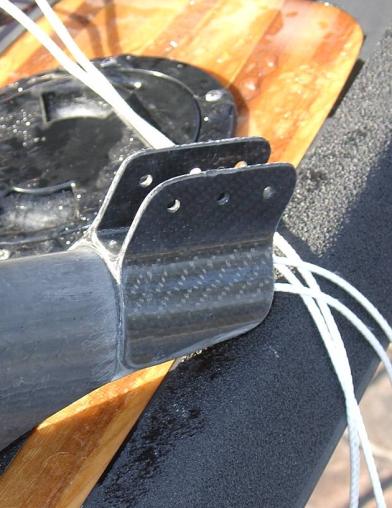
Shroud tensioners: These are based on the instructions in the adjustable
forestay PDF. To do this:
- Remove the pins.
- Drill out the rivets with a 3/16”
(tungsten) bit. Be sure to have an extra bit.
- Hammer out the divit on the plates, so they're
flat.
- Reassemble. The picture is of the chainplate
side, and it will need a bit of refinement for it to be done: the becket isn't required, and the
side with three tubes gets a different becket which connects onto the chain plate.
- Build the shroud side. Be sure the plates fit
tightly in the carbon piece.
- Insert the retaining rod through the holes in the
carbon wrapper. It should sit flush against the bottom side. I used a screw, but a 3/16”
stainless steel rod would probably be better.
- Drill holes for the cleats, and tape up the
blocks.
- Tape the bottom and fill. I filled this entire
thing in with a syringe, trying to get plenty under the threads and then pulling the entire pully
system tight against the bottom. I hope that works. Getting epoxy into all the nooks and crannies
is tricky.
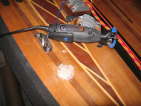
Bram's outhaul fitting - notice the slight inward rake.
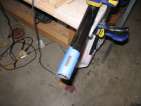
Bram's new shroud adjusters.
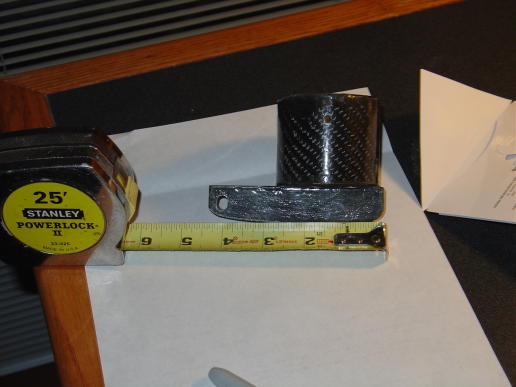
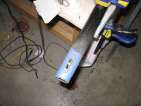
The correct length of the mast tang.
[Update 2008 Feb 25: A couple more points on the size of the mast
tang. It should be wide enough to fit comfortably in the track. It should be about 1/8”
taller than the mast track, and when tipped back it needs to clear the high part of the mast track.
I used #8 flat-head wood screws to mount the mast base to the tang.]
Little bits
posted 2008 February 11
Did a bunch of little things this week:
- Inserted the fairleads for the righting system. To do this, I scratched the right size hole on the deck that I needed
to rout out; I centered it slightly to the inside of the boat, since the angle of the deck isn't
exactly 90° to the chainplate. Then, using the dremel, I routed the hole to the correct size
(using tape on the surface of the deck or router to
protect the varnish). Clean out the hole with the grinder bit, drill pilot holes for the screws, and
install a drip-catcher. I then filled the holes up
with epoxy and allowed it to sink into the deck. Once it was in the grain, I let all the epoxy
drain out, rolled the screws in some of the excess, and screwed them in place.
- Next up, I had to clean out the fairleads
in the launcher throat. I drilled these through (and down through the bottom skin of the
throat), and gently sanded out the bottom edge to remove rough edges. Then I threaded a line through both leads; to pull it through, I had to
use a (broken) bit of whipping twine. This should be good for installing the blocks.
- I installed another strip of 2” clear (light traffic) non-skid on the wings. Where the screws go
into the deck, I used a hole punch to make the right
size hole for the bolt. I also installed smaller patches above the spin blocks, to stop the block from
scratching the deck when you're kneeling on it.
- I drilled and dremel'd a tennis ball so I could place the straps in place.
Getting the inner strap in place took a bit of
futzing. I eventually ground the holes to be slightly oblong with the dremel - still tight, just a
bit oval. That complete, I screwed them down, and installed the block.
- I sawed off the remainder of the chainplate
bolts. I used my dremel with the diamond disk - but it still took a good long time,
and you have to be careful of heating things up. When it smokes, you've gone too far, take a
break. Eventually I just started using the clamping pliers to rock the end of the bolt off (which
works very well).
- I tied the inspection ports on. Drill a 10-24 hole in the middle of the
cap. Cut a screw to length. Put silicone around the edge of the screw. Then screw through the
plate, wrap the line around a couple times, add a washer and a nylon lock nut. Done. Do the same thing on the other side, but here there are two lines into the boat -
one goes to the other side, and one goes to the bung. That way, I can just pull one side to get the bung
in place.
Rigging the boat
posted 2008 February 4
This week was spent preparing the spin pole, and Bram came over on
Saturday with a number of parts and we begin rigging the rest of the
boat.
First, I cut the hole in the pole. This followed the same pattern
as the mast - place tape to outline the hole.
The hole itself should be 1” from the tip of the tube, which
places the rivet 3/4” from the tip. I aligned the tape
lengthwise as well as I could. Then drill a few pilot holes, stick
the grinding bit on the dremel, and grind away. This went *much*
faster than the mast hole - as it happens, the dremel bit I used to
cut the hole was exactly the right width for the hole. I filed down
the edge of the fitting that goes in the mast, and it worked
perfectly. Then drill the hole for the rivet (being careful not to
get too greedy - the drill bit should do the work, not pressure on the
drill), epoxy the filed
part of the fitting (which is in the tube), and rivet in place.
For kicks, I screwed down part of the mainsheet block with
through-bolts and lock-nuts. I had to remove it later, but it was
fun. ;-) I also filed down the epoxy in the end of the tube, so there's
a nice flat surface for the block that goes there.
Next up was to prepare the hole for the through-tube in the boom.
As before, mark with an
awl, pilot hole and dremel (checking tube fit
periodically), and bond.
Let that cure, and then file away the edges.
I figured that while that was curing, I would move on to the spin
sock - I had hoped to complete it this week. I unwrapped it and found that
everything seemed upside down or backwards - but then I realized that
it was inside out. Once that was corrected, it seemed to be
positioned correctly - although the lip which goes on the spin throat
may be a bit too long. We'll have to see how to fix that.
On Saturday, Bram came over and we spent the day rigging. We
accomplished a number of things:
- Pull the shockcord through the rails. Slide the shockcord up the
rail and pull it out of the block, through the fairlead, and use a
skiff knot to tie it on to a bullet block. Then run it around the
boat to check for length.
- Screw nylon lock-nuts onto the chainplate bolts, then cut the ends off with the
dremel diamond disk.
- Glue and screw the mast base into place. This is put on a bit
differently - the mast base has a piece of duct tape running down
the middle, covering the entire base except the outer 1/4”.
Mask the deck off with blue tape, paint on epoxy/silica/graphite,
and place the base in and screw it down. In this
way, if the base breaks, you only have to grind out the outer
1/4” instead of the entire base.
- Drill the holes in
the launcher throat for the new
launcher throat system, and insert the fairleads. The leads go
all the way through the throat, and have a 3/16” opening.
When the initial two holes are drilled, only drill through the top
layer of the thoat, each fairlead 1” off centre, and big
enough that the tube of the inserts fits in. Then use a drill bit
to pull out all the blue foam, including between the two holes.
Fill with epoxy/silica/graphite. Put a piece of blue foam in the
insert hole of the fairlead. Push one fitting in, and make sure
there is enough epoxy that it forces the epoxy over to the other
side. Put epoxy in that side, and insert both fairleads in and tape
down (they will want to pop out).
- Rigging the spin pole. One line goes through the side of the
pole and is held in place with a small ball. This then goes to the
large block beside the
pole saddle, through a small bullet block/large
block with becket, and to the dead eye beside the throat. It has slight slack when fully
retracted (pole up against the mast base).
- The second line goes to the tip of the pole, back to
the mast base, where
there is a loop tied on to a strap. This is tight when
the pole is fully launched. The other strap is for tying the jib track down.
- Filled the end of the tiller; Bram says he has a
new method that doesn't eat up the shock cord nearly as much.
- Expoy the forestay
pin in place, with the shackle necessary for the forestay.
- Drill holes in the
tennis balls for the spin sheets, and place them.
- A custom block I'll
have to build to tighten the forestay and sidestays. Each of these
takes four Harken 312 blocks -- at $30 a pop. Not cheap. You take
the blocks apart, slip them into the carbon fitting, put a bolt
through, fill in the entire inside with epoxy/silica, and then drill
and file out a hole along the top for the top line to go around.
Bram also brought over the mast step, mast base, an outhaul rack,
and the shroud parts. All in all we got a lot done. Perhaps not as
much as I'd hoped, but now I have my marching orders for the next
couple of weeks.
Page 6 of 62
« First
…
«
4
5
6
7
8
»
…
Last »