Bonding bonding flanges
posted 2006 Apr 30
I've been busy bonding the bonding flanges in place - one of the
last tasks before I bond deck to hull. Mostly, this task is limited
by the number of clamps I have - I need a clamp every 6 inches or so,
and so I can only two one or two bulkheads at a time.
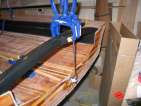
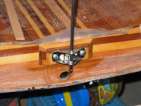
I started out by taping the flanges in place,
perhaps a touch more than 1/4” down from the top of the
bulkhead. Don't forget to sand both flange and bulkhead. I intend to
do this on all the vertical areas in the hull (including mast step, tee-soldiers), to soak up
the excess epoxy when they press together.
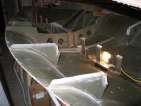
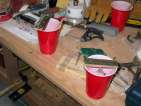
Next, lay down a bead of epoxy/cabosil (thin cream) with a syringe
right in the groove where the tape meets the bulkhead/flange, and then
clamp so the flange is
being pressed in to the bulkhead. I ran out of clamps - and wound up
using the metal ones.
These don't clamp the bottom, but instead ensure that the flange is
being pulled inwards the right amount.
Getting the centre
bulkheads ready took quite a bit of work. The cured flanges are
rough and have ridges in them, and when I sand them down to prepare
them for bonding, the ridges get sanded off and the flange turns into
two pieces.
I also took a bunch of pictures of backing plates (for future
reference).
Bonding chainplate backing
posted 2006 Apr 23
This week I completed mounting the lower rudder gudgeon, and bonded the
chainplate backing in place.
The chainplates required sealing the wedges as well
as the holes in the chainplates - these latter
chainplates soaked up a *lot* of epoxy, about three squirts worth.
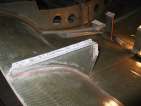
While that was soaking in, I shaped a wedge to fit on the mast
step to meet up with the deck. The stern edge isn't quite as tall as
the bow edge, so I screwed a screw into a length of wood, and slowly
sanded down the edge which needed to be lower. The finished piece
wanted to cup away from the hybrid backing - when I bond it in place,
it will require a lot of weight to keep it flat.
Once the seals on the chainplate blocks cured, I re-drilled the
holes for the bolts, and bonded the backing plates in place. I
greased up my carriage bolts very well, then slid them through the
backing plate, wedge, and small wedge. They needed a tap with a
hammer to go all the way in, but after that looked pretty good. I tightened
them into place with fender washers and nuts (of zinc - I'll remove
those later).
With the excess epoxy - a mix of cabosil and 404 - I bonded the
wedge into place on top of the mast step.
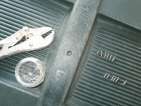
Once the chainplates had cured, I went back and began removing the
blots. I had hoped that I could simply tap them with a hammer and
have them pop right out - I should be so lucky. It took the vice grip
and a soldering iron to get them out, and even then I could only twist
them out. All the way to the
tip. When I re-drilled the holes, I pulled out lots of
epoxy/grease sludge - so it's a good thing I greased those bolts.
I also started cutting down pieces for the insert blocks. This was
(once again) cut from excess bulkhead material -
it’s worth making a lot of extra of this, because it is used for
all kinds of things. I wound up making another small board to use as filler
pieces between the bulkhead material - that way I'll always have
wood-hybrid/glass-wood, and not wood-hybrid-hybrid-wood layers. It
also means I can build four inserts instead of just two.
I also did another (final!) fitting. This just
validated that the mast step is now tight. From that I sanded
down a wee bit on station 7 port and station 8 starboard. I'm getting
close - many areas are 3/16” at most, and
mostly 1/8”.
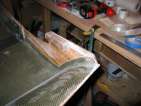
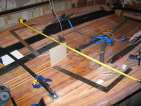
I decided I wanted to figure out exactly how off my centreboard
trunk was. I taped a
paper measuring tape to the centreboard trunk, then lowered the deck in
place. The centreboard trunk is out by about 1/8” (which I think
is PRETTY DAMN GOOD). Of course, this may just mean that the entire
thing is shifted port or starboard by 1/8”, or that the top edge
is port 1/8” and the bottom starboard 1/8”. But getting to
1/8” seems pretty good to me. (Of course, I didn't manage to
leave enough room to fit the centreboard block between the bevel
blocks. So life isn't perfect.)
Bonding in chainplate blocks
posted 2006 Apr 16
This was the week Tamara was in NYC. It was a pretty good run...
I started out by drilling pilot holes for the screws to mount the
inspection ports. I then ground off the tips of the
screws so they wouldn't be pointy and hurt your fingers when reaching
into the hull. (I didn't actually mount the inspection ports, because
I couldn't reach my arm in with them in place. I'll do this once the
deck and hull are joined.)
I also spent most of the week making bonding flanges, and working
out how to make them curved to correctly fit
bulkheads 6 and 8, and the transom.
Eventually I just weighted the PVC pipe down with a strap and a bag of
gravel.
Now that the chainplates had been drilled properly, I bonded them in place. One
wanted to slide into the hull, so I stapled it so it wouldn't
move. With the fillets there, I came back and taped on 1” tape,
just like the bulkheads. Once everything cured, I checked the fit of the
chainplates, then drilled
through the hull.
Still had plenty of time, so I mounted the lower rudder gudgeon as
well. It turns out the upper gudgeon tapers inwards slightly - which
means I'll have to shim it so it's vertical. But that does mean that
with enough pressure on the clamps, the lower gudgeon
would stay in place. To ensure the rudder pin was perfectly vertical,
I ensured the hull was level and then used a level on the rudder pin;
I used two pieces of cedar down the centreline to make sure it
was centered; I aligned the centre bolt hole of the gudgeon with the
centre of the transom (easy to find); and I used a level up against
the transom to verify it was vertical. All in all, I think it looks
about right. I won't
drill the top holes until the rudder and rudder box are built, so I
can ensure they're dead on.
Once that was all done, I cut a hybrid backing plate, and
drilled the holes in the gudgeon. All ready to drill everything and
mount it all together. I want to do this with hull touching deck, so
I can put the rudder pin in place to ensure all the pieces have the
right orientation w.r.t. each other - there's a slight amount of play
which can allow the pin to move around a bit. Once bonded, that play
will disappear.
Meanwhile on the chainplate backing blocks, I carved out a small
additional shim from some
bulkhead material lying around, since the chainplate blocks currently
tip upwards a bit.
Bonding chainplates, drilling the bung hole
posted 2006 Apr 9
This week was devoted to preparing to bond deck to hull. I've
(more or less) given myself permission to start on the next steps - I
think I'll want to check the fit a few more times, but overall I think
I'm within the 1/8” limit.
First, I trimmed down a spot immediately under the aft edge of the
centreboard trunk. This took down around 1/16” of extra
material.
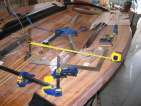
I determined the right position for the centre chainplate bolt
hole. This is a controlled measurement, so it has to be pretty
accurate. I measured from the centre to the wings, but then decided
to measure once across the entire width of the deck;
proved to be about 1/4” more accurate (which matters). The tape
is supported in the middle to reduce flex of the tape, and the square
is taped to the deck so it won't move, and then I just ensure it's
vertical relative to the deck. I drilled small pilot holes through
the deck at the exact point, and into cardboard taped to the bulkheads
on the underside. Then put a pencil through the resulting hole, and
move a square in to touch the pencil. Then manoeuvre the chainplate
under the square, and mark the point for the centre hole. In this
way, I can exactly determine where to drill the hole in the
chainplate.
Once that was complete, I transferred the position to the bottom
side of the chainplate block, and drill from the bottom to the
top. The bottom has a slight bevel, and this will make the bolts point
towards the top of the mast ever so slightly. I will also mount the
chainplates at around 80°, pointed slightly towards the mast.
Just to keep things interesting, I drilled the hole for the bung.
This went through a bunch of layers, and the bit jumped all over - but
it turned out rather
well.
[Update 2007 Jul 09: At this point, I
probably should have poured a bucket of water into the bow to see how
it actually drained out. I realized this considerably later, when I
was wetsanding the deck...]
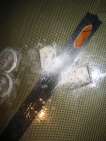
Next up was to create bonding flanges. This is done by draping
2” glass tape on a bar of 1” PVC tubing. I put plastic on
both the underside (so the tape won't stick to the PVC) and top (to
ensure the tape stays tight to the curve of the pipe). Paint with
epoxy, wait to cure, and voila.
Page 28 of 62
« First
…
«
26
27
28
29
30
»
…
Last »