Bonding deck to hull
posted 2006 May 31
Did the final cleanup for the big day: I put a protection patch on
the back of the one screw I'd drilled out. This is now the most
easily-running bolt - perhaps I should have drilled everything
out. ;-)
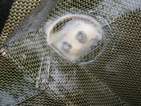
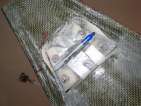
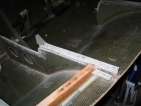
Some of the excess epoxy I used to fill in the narrow hole around
the straw. I realised at about this point that I should have sanded
the exterior of the straw - better grip. I hope there's enough to
keep it in place...
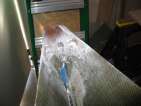
Then, the very last thing to do - clean the horizontal surfaces in
the hull (these are the very dirtiest). It was pretty gruesome too -
I used a scotch brite pad and water, and worked my way around. A
mustard-gas-like yellow-green liquid was the
result. Ew. I went back around and wiped up whatever was left with a
sponge. Glad I cleaned
out this mess.
After everything had dried, I sanded down any extra
1” tape that was sticking out, and a couple spots where foam had
come off the foam roller and embedded itself in the epoxy on the hull.
I was also looking at all the small divits in the carbon fibre running
down the centreline, and decided that I didn't want to have water
sticking in there for long periods of time. So I went back and filled them with
epoxy/cab-o-sil.
And that's pretty much it. Then it was time to
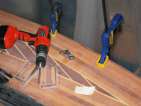
Max, Bram and I started out at about 10 am. The Pro-Set comes in
two tubes, blue and yellow, and you use a special gun to dispense
them. As they pass through the gun, they mix together and turn green.
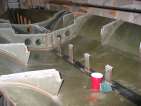
One person worked the gun and filled in all the bonding flanges, and a
second person followed along and smoothed out the result with a
popsicle stick. End result: lots o' green. We bonded
every flange, with extra on the tops of the soldiers (even with the
top edge of the flanges) as well as the vertical parts of the
bulkheads. We put a bead along the outer edge, from station 6 to the
transom. We filled in the bow piece. The top of the
mast step had slightly less than elsewhere. Overall, we used three tubes of Pro-Set.
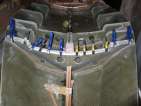
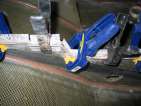
Once that was complete, we lowered the deck, aligned it using the
chainplate holes, screwed the chainplates into place. I then inserted
the bolts in the transom holes, and using Quick-Grip clamps clamped
at all the stations. I couldn't find nuts for the transom bolts - I
tried drilling out the nylon on nylon bolts, but that didn't work, so
we clamped the transom in place (with the bolts still there, to hold
the transom correctly positioned fore/aft).
Once all that was clamped, we put paint cans down the
centreline to ensure a tight fit. I should have put down a bag of cat
litter on top of the mast step - this area is critical and could have
used the extra weight to compress it in place. (Although it's
important to use weight which conforms to the shape of the deck -
don't want point loading.) Max also cleaned up parts of the transom
and forced excess the Pro-Set back into the gap. I went around the
outside edge of the hull and wiped away any excess from
the joint.
After having looked around the outside edges and taken a few
pictures of the inside, a
few things are apparent. Plenty of excess squeezed out the righting
line holes when the chainplates were screwed down. The extra Pro-Set
on the soldiers helped a lot, some squeezed out. On the
transom and at a couple spots on the bow piece, there are voids - I
will have to go back and dig around in there (to rough it up) and then
inject some epoxy. Inside the hull, I can feel that station 12 had
plenty of excess squeezed from it near the gunwale, but not a lot next
to the step. The pictures of bulkhead 8 show only very
minor excess - which makes me wonder if they were pressed down enough,
or if enough Pro-Set was on there. And of course, forward of station
8 is a mystery. Once I carve the hole for the insert block, perhaps
things will become clearer.
In hindsight, I should have 1) ensured I had all the parts easily
available. I spent 20 minutes looking for the chainplates, and I
didn't have stainless nuts for the bolts in the transom. 2) used the
cat litter. If I wasn't so flustered about (1), I may have spent more
time thinking about this. Another thing I could have done was put a
bunch of weight forward of station 6 along the centreline - I had a
bag of crushed rock sitting around, this would have done it. Then the
forward tee-soldiers would have been tightly clamped in place.
And all done in May, as I had hoped. ;-)
Final touches
posted 2006 May 28
This week, I completed
(1),
(1a),
(5c),
(5d),
more of (6),
(7),
(8),
and (10). Not much
left to go.
Most of these were pretty elementary. While working on (6), I couldn't remember if
I'd sealed the bottoms of the tee-soldiers, so I pulled out a brush
and sealed up as much as possible underneath the edges. I also
re-sealed the bottoms of the drain-holes at stations 6 and 8, just for
kicks.
For the breather
straw, I rolled it in the thickened epoxy, then drew it through
the hole, and sealed the bottom edge with the excess epoxy. The
manual says this straw should be 3” or 5” long... but I never
actually measured. Oh well.
I also screwed all the screws which are going to touch Pro-Set so
they were flush with
their backing plates, and then greased the tips. I want to
ensure that once the deck and hull are bonded, I can remove these
screws - it would be bad to have done all this work and then have them
stuck in there.
Finally, I was cleaning up the screws on the jib track, and
determined that the inner bolt on the port backing block was too
tight. I must have gotten some epoxy into the threads, and it was
causing the threads to flatten on bolts, and heads were popping off.
After a lot of indecision, I decided that having to deal with this for
the life of the boat wouldn't be good, so I decided to replace it. I
drilled out the tee-nut,
heated and popped out the
plate, re-drilled the
hole for a new tee-nut, and inserted a new nut with plenty of
grease this time.
Getting ready to bond
posted 2006 May 25
I'm starting to research Pro-set, the
preferred bonding solution for the deck and hull. 175/275
is the preferred concoction. Three
sets is the predicted amount required. You have 75
minutes of working time (that should be plenty). Composites One sells
Pro-Set cheaply
(much less than Fisheries).
You may also be interested in the difference in physical properties
between Pro-Set
and West
System epoxy. (Hint: not a lot.)
While we're at it, I'm thinking about my mast track. I bought my
mast from Bram - I have to remove the track and re-attach it with
Plexus. From ~Mail/inbox-2005-09-06:
 | On Thu, Nov 11, 2004 at 09:54:24AM -0500, BDally6107@aol.com wrote:
 | |    Also, Forte sent me a new mast a couple of months ago but they put it in
 | |    the tube before the track adhesive had set up.  When it arrived, the track
 | |    was twisted a bit for the top 8 feet and I didn't have time to mess with
 | |    it so I told them to ship me a new one.
 | |
 | |    They are now willing to sell this mast for $600.  It would take about 8
 | |    hours of work to remove the track for the top 8 feet, clean off the
 | |    adhesive, and re-bond it.  Let me know if you are interested in this mast.
 |
 |    The adhesive is 5200 and I'd have you talk to Tony from Forte about
 |    removing it (508) 991-4828.  A new mast is $810.
After I had bought the mast, the entire class switched over to
using Plexus - the track came
loose. Bob Lewis confirms.
Greg's
instructions.
Finally, there's a small sailing group called Neptune Sailing which runs an
outfit out of Kirkland which looks like a great place to get Tristan
involved.
Stay on target...
posted 2006 May 21
Things were getting a little slow over the past two weeks. On
weekdays, after work I'm tired and I'd rather veg out in front of the
TV than build boats. On the weekend, chasing two young kids around
leads to the same result in the evenings.
So, to try and give myself a sense of purpose and accomplishment, I
made a list of all the things I had to complete before bonding deck to
hull. (I'm also hopeful I can complete the bonding before the end of
the month.) Here it is:
- drill the holes in the deck for the chainplate bolts
- seal them
- drill the holes for the transom bolts
- drill the hole for the righting line
- seal them
- bonding flanges for the chainplates
- spin pole:
- s-glass backing on the nuts on the spin pole
- bonding flanges for the spin pole
- cut the spin pole nuts to length
- drill holes through deck and hull into the bowpiece
- check there's no exposed wood in the interior
- paint the top of the bulkheads with epoxy
- sand the mating surfaces on the underside of the deck
(including chainplate blocks)
- make sure the drainhole plug fits snugly
- insert the breather straw
- wash the inside of the hull (it got rather grimy hanging from
the ceiling for a year)
Lots of little things in this list, but overall they will probably
take a couple week's worth of effort.
This week, I accomplished
(2),
(3),
(3a),
(4),
(5a),
(5b),
parts of (6),
and (9). A number of
these are can't-go-back steps - once you take one, that's it, it's the
way it's going to be. Drilling the righting line holes and the
transom bolt holes are both like that. So I tackled them first.
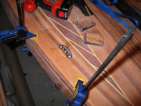
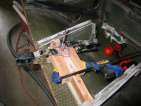
My strategy for both was to put 2x2 blocks next to the pieces to be
drilled, and use the blocks to ensure my drill jig drilled vertically
into the wood. This was easy for the chainplate righting line hole, I had
scrap to do this. But it wasn't as easy for the transom - I had to
buy a piece of cedar (it's cheap and straight, pine isn't), then shave
it in the middle to go around the rudder gudgeon. Once that
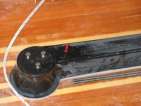
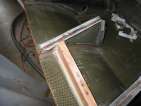
was done, drilling the holes was easy. On the transom bar, they are
slightly closer to the transom (the inside wood isn't as thick as the
bar), and about 1 1/2” from the top edge of the step (and should
be about 2”). Drill as deep as possible - pull your drill bit
out a touch - so it goes into the backing block as far as possible.
Once the hole was drilled, I shaped the cedar backing block so that a
nut would fit in place, and I could screw from the top into the nut.
I also installed the bonding flanges for the bow backing plate.
This took taping a pen to
the back of the plate, seeing how far down into the hull the pen went,
drawing in the line and
then bonding the flanges
in place. In the event, I should have made the flanges go down a bit
further toward the bow - once they cured and I lowered the deck, it
mashed the flanges.
More flanges
posted 2006 May 14
Kept on plugging away at bonding flanges this week (although I only
really did one evening's worth of work). I completed the bonding of
flanges on bulkhead
eight, sanded down the mess at the bow piece, added s-glass on
top of the original layer of epoxy on the sides of the chainplates, and finally,
sealed the top edges of the daggerboard trunk.
More bonding bonding flanges
posted 2006 May 6
Kept on plugging away on bonding the bonding flanges in place. Station 6 was prepped up,
and I also prepared station
8 and the transom.
The trick with much of this preparation is to ensure the angles are
correct (flange, flange,
tape, tape), and that the tape sticks tightly. Tight tape leads
to a smooth joint on the bottom edge.
Next up, did the wings of station 8, and the trunk end
of the centreboard trunk. Also bonded the three transom pieces in place.
While all that was bonding, I fixed up the bow piece a bit. I had
gone almost all the way through the hull at the sides, so I put some
filler in, and two layers of s-glass. Wrap in plastic and clamp in place.
Then, I went all the way around the edge of the hull and painted on
a layer of epoxy. I'll do this once more (I think) to make sure
everything is sealed. It would be bad if after deck is bonded to hull
water managed to seep into some spot on the inside of the hull...
Oh, and I'm already breaking flanges. Great.
Page 27 of 62
« First
…
«
25
26
27
28
29
»
…
Last »