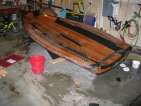
First coat of varnish
posted 2007 July 30
Last week was getting the final coat of black ready. This week, I
actually got to the point of varnishing.
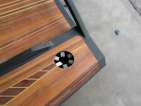
First off, I wet
sanded the entire boat down with 220-grit. It's somewhat
surprising how much "softer" this makes the surface feel - it goes
from being quite rough to being quite smooth. There are still a few
spots where I can see
through the black, but I think after seeing all those boats on the
water last week I'm more inclined to just get on with it and varnish
and get the deck rigged.
Although if I have a free afternoon, I might as well put on a single layer of black in a
few spots.
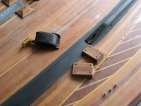
Next, I sanded down the black I had added, and then wiped
everything down with acetone. I'm using an old sock as my acetone rag
- it leaves a lot of dust, and collects a lot of black. It's pretty
much a one-use thing.
I then wiped the deck down with a tack cloth to get rid of as
much dust as possible. It's not all the dust, but it does make a
noticeable difference.
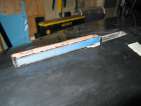
And it's time to varnish. The first batch was almost 150ml, and that lasted all
the way to the end of the centre rail. Tip: do the
underside of the launcher throat before doing the deck under the
throat. I worked my way along by staple hole rows: first do one side
from the middle out, then switch to the other side. If there is a
block or something in that row, I would do the block first then go
back and do the deck. Overall this process worked pretty well, I
could keep a wet edge as I was going and not run into too many
problems. It's worth doing this during the day - I had to sight down
the deck to try and detect any thin spots or spots I missed, and
without the light that's a lot harder. (It would have been even
better to be doing this in June, because then I could do it in the
evening, stay up until 10, and still have light. Not to mention I
might have been able to sail at Jericho.)
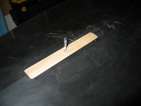
Next round was 40ml,
which finished the deck
but I still had to do the transom. Mix *another* 40ml and it's all done.
I used a foam brush for this entire coat - and by the end, the
brush was starting to fall apart. Even worse, bits of foam were
dropping into the wet varnish on the deck. Doing the deck is a
two-foam-brush job.
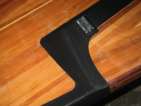
One other interesting bit is how much less fair the deck is
compared to the hull. I
was a bit surprised by this, but I guess I didn't spend as much time
fairing the deck as I did the hull. It's also a lot harder to fair
this surface as you can't easily reach into the middle and get a good
grip on it. Doesn't matter as much though - it doesn't make you go
fast.
Swift Solo 2007 National Championships
posted 2007 July 27
I just returned from a 5 day trip to Vancouver to partake in the
2007 Swift Solo North American Championships (or as one of the race
committee guys called it, the "Swift Solo Intergalactic
Championships"). All in all, it was a great time.
It took place at the Jericho
Sailing Centre (map)
in Vancouver. It was a fabulous facility in a fabulous location in
one of my favourite cities (did I mention I had a great time?). The
centre itself is a public marina, on the south side of English
Bay; it catered to small dinghies, sailboards and sailing schools.
There were three sailing schools operating out of the centre - every
day we were there, a gaggle of kids would assemble and take out
windsurfers, Optimists, Lasers, Escapes, and a bunch of other dinghies
while being chased around by their instructors. Upstairs were a few
meeting rooms, a members lounge, a public grill (serving hamburgers
for dinner and eggs for breakfast - prepared in more ways than you can
count). And the club fronted the bay with a nice sandy beach to
launch from, spectacular mountains across the bay, and the Vancouver
skyline in the distance. It was just incredible. After experiencing
five days of this, I kinda wish I had had such a great place to sail
from when I was a kid.
I stayed in the Jericho
Beach Hostel. Jericho beach (and park) is a converted military
site - the hostel is the former barracks, and the sailing centre was
the hanger. (And all the extra space was put to good use as well -
the fields in front of the hostel were Ultimate Frisbee fields every evening.)
It had been a while since I slept in a hostel - I'd forgotten about
the one a.m. revellers arriving in their bunks (noisily), the two
a.m. fights, and the five a.m. early departures for tour buses. I
didn't sleep particularly well, but I did recall all my hostelling
sensibilities Tamara taught me oh so long ago (carry a lock, sleep
with the key in your sleeping bag, be wary when you're showering, take
flip-flops, etc.)
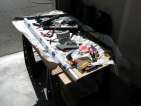
The regatta was split into two parts: a clinic, and the regatta
proper. Everyone showed up for both, and during the clinic everyone
brought their boats out and began reassembling them after their trip,
rigging them, and getting them ready. Bram gave a (brief) tutorial on
the basics of sailing the boat and how to tack and gybe and things to
look out for. A couple of guys - Keith and Dave - had their boats
not-quite-ready, and everyone spent a couple days pitching in and
getting their boats completed, rigged, and ready for the water.
Keith's boat was not much further along than mine - he had varnished
the deck, had the deck hardware mounted, and had the mast drilled, but
other than that we were at about the same spot. In three days, he
went from a not-ready-to-sail boat to getting it wet (if not
completely "done"). It was a push - but he made it on the water the
afternoon he had to leave.
Dave Lindsey (a Vancouver local) saw how far along Keith's boat was
and decided to bring his boat in so it could benefit from the class's
collective knowledge (and manpower). I spent an afternoon driving out
to New Westminster and helping him pack his boat up, get it on the
trailer, collect all the parts, and drive it back to Jericho for
rigging.
The Swifties I met were great:
- Bram was there of course.
- Ron Radko, a former Microsoftie who is now the Musto rep for
North America (we had a long conversation on why he left and the
nature of the Microsoft corporate environment these days; he's also a
Waterloo graduate).
- Keith Deller, an architect from Calgary (who lives in Mount
Royal) - we went for coffee in the mornings. Keith brought his
almost-done boat all the way from Calgary and spent the clinic getting
it ready to get wet (and he did sail it just before he left on
Wednesday). Keith also has a cabin in Nelson, B.C., which sounded
like a great get-away. He flew the airplane he had built in his
garage (!) there.
- Ron Watt, a Boeing guy, who sails USA002 and is an excellent
sailor (he won many of the races on race day).
- Robert Harper, class VP; he drove from Utah with his family.
He sails FUGU on Great Salt Lake.
- Keith Concell, who drove all the way up from Alabama. He was
sailing the first VMG boat.
- Mark White - he drove a RV and every morning could be found
with a mug of coffee. His boat was incredibly well built - easily as
nice as a VMG boat. He also had a number of smaller improvements on
the overall design of the rigging on the boat - all very innovative
and well thought out.
- Mike Jocelyn, a local - he was sailing CAN001. He was an
easy-going guy and wore the loudest shorts in the fleet.
- David Lindsey, another local - he had built his boat from the
ground up (unlike many of the others above - they had bought their
boats from VMG or other builders). He could only attend the first
clinic day - he was giving a talk at a conference early next week.
- Roger Wright. Roger used to live in Calgary (where I bought a
bunch of parts from him) - he now lives in Nanaimo as a business
process consultant and sails out of Jericho.
- Karl Schulmeisters, another ex-Microsoftie. Karl will be a
builder soon; his part of this regatta was to do some coaching and
videotape and comment on what people were doing well and not-so-well
at. (He also offered to come by and assist with the standing and
running rigging, when I get to that point.)
The best part of being around this group was how everyone was
engaging, friendly and helpful. The first couple days it was raining
lightly, and so we all stood around and rigged the boats that needed
rigging, ran through manoeuvres, and talked shop. Everyone pitched in
a hand, gave their time to help out, taught and talked concepts. It
was a week-long immersion course in active relaxation via sailing.
(It's good to get away from the Microsoft corporate culture and ensure
that there really are environments out there which are friendly,
non-backstabbing, egalitarian).
The sailing was good. Vancouver is known as a light-air venue, and
lived up to its reputation. Wednesday, the first race day, a westerly
picked up and we got 15-20 knots; other than that, it was mostly quite
light, around 5 knots.
I took Ron Watt's boat out on Tuesday. I managed to sail out of
the launch (while Bram and Ron went off and found the chase dinghy),
and capsized three times, each time while trying to tack or do some
manoeuvre. Righting the boat is the most tiring part of the entire
thing - the sailing is active (always playing the tiller and mainsheet
to ensure the boat stays level) but not demanding. It was
exhilarating.
All told, I took about 700 pictures. A lot of these were digital
pictures of rigging (so I have some idea of what to do when I make it
to that point on my boat; also to capture some of the ideas others had
on how to rig the boat). A lot of these were sailing. And after two
full days chasing boats on the water, I began to feel like I'd taken
enough. Not being able to get out there and sail myself, I decided to
head home before the end of the regatta and put a coat of varnish on
my boat.
Overall the week was a great success. It was great to roll out of
bed at the crack of dawn, walk across a dew-laden field from the
hostel to the parking lot where (almost) everyone else had slept in
their cars, and immerse myself in Swift building, rigging and sailing.
It made the boats more real - it brought them to life as a thing which
could be sailed, instead of just something taking up room in the
garage. It was refreshing to be around a group of friendly people
with no hidden agendas (well, none that they wore on their sleeve,
anyway). It was awesome.
[Update 2007 Sep 2: Finally posted
the pictures as well as the
rigging pictures.]
Sanding black
posted 2007 July 16
I was sick this week, so not much happened. I just sanded down the
black applied last week.
I wanted to be fairly certain that I wouldn't have to come back and
coat everything in black again. To achieve that end, I did a few
things:
- I didn't sand hard in the middle (I didn't aim for fair, I
aimed to cover things up)
- I sanded the edges down so the black flowed together, and then
sanded the middle lightly
- I used 120 paper for everything.
Overall it seems to have worked well. I don't think I sanded
through anywhere (although I still have to wipe down or wetsand to
verify). And I'm that much closer to getting the deck varnished.
More black
posted 2007 July 9
Two things this week: did a bit of rigging the mast, and wetsanded
much of the deck.
Bram came over on Thursday and we rigged (part of) the mast. This
was a bit of a bust - I was missing a *bunch* of parts from the
rigging kit, and as a result we couldn't make as much progress as I'd
hoped. But despite that we managed to rig the entire base of the
mast, so at least we made good use of his (giant) rivet gun...
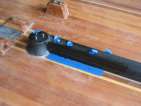
The first step was to cut the "mast map", tape it to the base of
the mast with double-sided tape, and then punch all the important
points. Then drillone of
the holes for each block. Remove the map, then referring closely to
it, use the block itself to drill the second hole. Rivet the block in
place. Doing this, we managed to place the sail track feed and the halyard rack (although my
rack has a defective top tooth - I'll probably dremel it off). There
are two holes cut in the mast for t-balls, and we drilled and
shaped those and then riveted the backing plates on the inside of the
mast. (To get these in place, we wrapped a wire around a screw, fit
that through the plate, then fed the wire up through the hole. Hold in
place, rivet, and all's well.)
The sliding collar we fitted in place, but the "slippery" plastic
on the inside made it a bit too wide and so I removed both
sliders. The gooseneck needed to be sanded down to fit the radius of
the mast, but a piece of paper on the mast made short work of it.
We also riveted the spreaders in place. These
have to be perfectly centered. To do this, we slid them on, and made
sure the collar was equidistant from the track, then marked the points
with an awl. Drill the holes in the spreaders, slide them back on
again, pinch the spreader ends together so they're tight (and the
collar is tight around the mast), and drill the holes into the
mast. Rivet, and all done. (We talked about bonding the collar in
place with plexus, but what's the point if easy removal in case of a
break is the reason for the collar in the first place?)
After Bram had departed, I spent some time ensuring the different
pieces actually fit into the spots they were supposed to fit. I
sanded about 1 cm off the bottom of the vang cheeks, and then bonded
a straw into the vang
cheeks, to provide a pilot hole for the mounting pin.
I also sanded out the inside of the mast base so it would fit
correctly (it looked like Greg had filled the inside with some
filler). I also filed down the mast head to fit in the top
of the mast. I also (lightly) sanded the inside of the mast, and that
would make marks on the high spots - so I knew where to hit next.
Next, it was time for a bit of wetsanding. Just as with the hull, I marked everything with a
sharpie to ensure that I sanded everything down. Then, sand. It's hot, sweaty
work. I should have done this in April. Stern half done.
Of course, I sanded through some black, so I'll
need another layer of that. One other problem has become apparent:
there are white areas
which aren't sanding off, which (I'm afraid) is due to overworking the
epoxy when laying it out. In this particular area, I spent a bunch of
time trying to work out little bubbles of air. Those bubbles probably
would have been better than this white mess. Sigh.
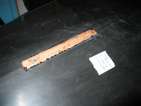
Finally, things are starting to look ready for varnish. I tagged
and cleaned up a few shiny spots, and then
applied a layer of black: one, two, three. While I was at it, I
put down two coats of epoxy/207 on the
vang arm assembly and mainsheet block base.
[Update 2007 Aug 29: As he walks by
the boat on the way to the car, Tristan has taken to saying: "I really
like your boat Daddy except for the white splotches on it, and I don't
like those. I think you should re-do those." Great. Just what I
need, a five-year-old critic. ;-)]
Final coat of varnish
posted 2007 July 2
...on the hull, anyway.
I started out this week completing the fit of the hull insert block - getting
it down to perfect. The block itself is very straight (easy to
determine with a straight edge), and the hull hole needed a bit of
sanding. To find the high spots, I slid a piece of paper between
block and boat to determine which areas are tight and which are loose
- and thus can always sand down the high spots.
Next up, I taped the edges of the block, so I can
sand the inverted-V on the block to match the V in the hull. Done - slowly and carefully
on the belt sander.
After doing that, I decided that there was a gap in a couple spots
in the slot which was too wide - about 1/2 mm (which is way more than
perfect). Since this area sees tons of force, having the block flush
against the hull skin at all points is best. So I filled the gap with a bit of
epoxy/high-density filler, and sealed the rest of the hole. This
should be perfect once it's shaped.
On the varnishing front, I applied my final coat on Tuesday. This
finished off my first can
of varnish, which seems like a lot - hope I didn't overcoat the hull.
I also varnished the spreaders and rudder box.
Once I saw that "final" coat in the light, I wasn't completely
satisfied with it - still a few drips. So I sanded it down, got a nice
bite out of the varnish,
cleaned it up with the tack
cloth, and applied a last, final coat. This final coat
took all of 80 mL for the entire coat - a very thin application, and
so little likelihood of drips. I went to a system of only dipping the
brush in a few millimetres, then brushing in the middle and pulling
the varnish up and down from there with horizontal strokes. And
always pull from the already-complete area to the unfinished area.
Slowly I'm getting the hang of this varnish thing. (Another factor
has been the brushes. The foam brushes from Fisheries have a plastic
backbone running down the middle of them to 1cm from the tip of the
brush. The brushes from Orange Borg don't have this backbone. That
makes the OB brushes much more difficult to control - they want to
bend way back and not let the edge touch the surface, which makes
getting an even coat much harder. There you go, differentiation in
foam brushes.)
Page 13 of 62
« First
…
«
11
12
13
14
15
»
…
Last »