Applying non-skid
posted 2007 September 24
Now that varnishing is done, it's time to apply some non-skid. I'm
going with a fairly simple pattern; I'm going to model it after Mark's
boat, here, with three
strips on the wings and four on either side of the centre rail.
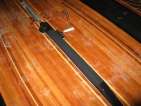
I started out with the centre rail. This was a
4-inch wide piece with the corners trimmed off. I made a template of
an end - a 2-inch wide piece of mattboard with the edges trimmed to a
circle, that I'll use with the main non-skid on the deck. But I used
the edges of the template to determine what to remove from these
pieces. Once stuck, I rolled it on tightly with a craft roller - there
were lots of bubbles, and they popped out with the roller.
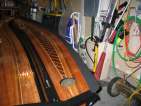
On the gunwales, I trimmed an inch off of my 4-inch black (now I
have 1-inch strips I could use for something...). Each side is
8’8” long, 3” wide, corners trimmed off. I started
at the aft end and pasted
the deck edge down, lining the non-skid up with a line of cedar on the
deck. Because I was working solo, I took some of the (removed)
backing paper and re-stuck it against the
glue, not too close to the pivot point. Then I worked from the centre out to the ends,
pulling the backing paper out as I went. This method works fairly
well, the non-skid is pretty tightly applied. You can't just push it
over the edge; you have to pull it down and against the part that's
stuck to the deck, otherwise you get too many bubbles at the pivot.
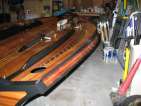
I then flipped the
boat, cleaned it up, and applied non-stick near the chainplate
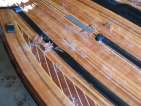
holes. I made up a pretty complex cutting pattern (I was after the
look shown here, although
I don't think I got it). On the forward end, the black is 2
3/4” wide. On the aft end, the black is 3” wide. The max
point is 22 1/2” from the front end, and is 3 1/4” wide.
To get a gradual curve, I bent a long piece of steel between the
points, marked it, and then used a straight edge to actually cut the
curve - it curved slowly enough that a straight edge would work.
Actually applying these pieces was tricky - getting it into the lip
along the edge is tricky, and making sure it doesn't buckle along the
top edge is hard. Lots of rolling and stretching seemed to help
(some).
[Update 2007 Oct 13: Bill had a good
idea on how to get the non-skid to bend easily: "If you warm the tape
with a heat gun, it bends more easily. When you find bubbles in the
applied tape, use a sharp needle to pop the bubble and roll out with a
wallpaper seam roller. That's a trick I learned from applying vinyl
wallpaper." This would have helped on the hull.]
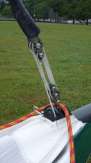
Swift Regatta rigging
posted 2007 September 22
While at the regatta, I took a bunch of pictures of boats and ideas
on how others had rigged their boats (among other things). All
tolled, there were 178 pictures. Here's a selection.
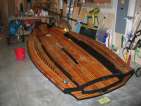
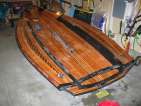
Varnish coat 7: the coat to end all coats
posted 2007 September 17
I had a day off this week - we were moving offices - and so it was
time to do the 7th, and final, coat of varnish.
The night before moving day, I sanded down the deck - first by
using a used sheet of 400-grit to sand down the fittings (that takes about
30 minutes), and then sanding down the flat surfaces on the deck with
my sanding pad (another
30 minutes). Rinse & wipe with a sponge, rinse with the hose, and let'er dry.
On moving day, I ran out to Fisheries in the morning and bought can
#4 of varnish (somewhat surprisingly, you can make it all the way to
Fisheries and back to my office in just over 60 minutes at 9 in the
morning...). In the early afternoon, I started. Acetone, tack cloth, and the first 150ml, which made it to the
middle/end of the centre rail. I then backed down to a 60ml mix
(since can #3 was still holding out), which made it to the end of the
deck. With the very last
dregs of the can, I finished the transom.
I made one stupid mistake - I went back into a tacky/dry spot to
try and re-apply a bit of varnish (which probably didn't need it
anyway) - and left some visible lines. But you really do have to be
looking for it, so I don't think I care. You can also see dust on the finished surface
- I suppose I should have vacuumed the night before and varnished
naked. But I don't care. Varnishing is done. Sweeeeet.
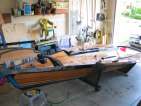
Varnishing, coats 5 and 6
posted 2007 September 10
Up to six coats of varnish now
(one
two
three, four
five
six).
First sand with
wet/dry 400. I use a 1/4 sheet for all the small parts or rounded
parts (the rails, launcher throat), and then do most of the deck with
a half-sheet on the sanding pad. I haven't been using the sanding
foam much - using the 1/4 sheet works just as well (and is much
cheaper). The sanding leaves a white mess - if this dries,
it turns into a very fine powder (which I'm sure can't be healthy).
Then rinse. I wiped
the hull down with a sponge (I need a new one - my sponge is shedding,
which just makes more work). Once the wipe is complete, I re-rinse
with the hose and just hose it down. Then a clean with acetone (I
forgot this on layer 5 - but it shouldn't make a difference), then wipe with a tack cloth, then
varnish. 150ml makes it to somewhere in the centre rail. Another 80ml
finishes the deck and
transom.
Repeat for layer six. Sand. I always wonder if I
remove just a wee bit too much when I sand. I can still see plenty of
not-roughed up parts, though. When I tip off, the brush leaves very
tiny ridges (barely noticable), and when it's been sanded again, the
"valleys" haven't been touched for the most part. I suspect that this
means I'm just building up. Clean with acetone. Clean with tack cloth. My
old socks which serve as the acetone rag leave quite a bit of dust
behind. 150ml goes to the
middle of the centre rail. Finished. My intent was to
put two coats on during this one day, waiting for the first one to get
tack-free; but I'm running low on varnish (the third can used up), and
I missed the timing - I waited a bit too long.
Even worse, I missed a few places in coat six. When I saw it in the
diffused light of the afternoon (i.e. the sun not shining directly on
the deck), I missed some
spots under the launcher throat and in front of the
transom. Drag. So I had to use some of the excess from that coat and
paint in a bit of extra with a foam brush. And that means
there are parts where it's clearly evident that the varnish didn't go
on in one coat - the brush marks didn't disappear. Thus the
requirement to always work from a wet edge, never go back into a
previously completed area. Sigh.
I also varnished the vang
assembly - two coats, one, two. Putting the varnish on
really does give these parts a lustrous finish, much more than plain
epoxy.
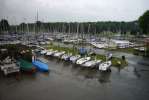
Swift Regatta 2007
posted 2007 September 2
Pictures of my week-long trip to Vancouver (and the Swift regatta).
Don't forget to look at the rigging pictures as well.
Page 11 of 62
« First
…
«
9
10
11
12
13
»
…
Last »