More varnishing
posted 2007 June 25
Did a bit more varnishing this week.
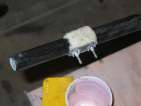
But first, I did a bit of work on the insert block on the hull. I
cut it to fit, and sealed
the edges. (I also did a second seal of the leading
and trailing edges of the hole, since the cedar sucked the epoxy in.)
I built shims and bonded them in place. While
I was at it, I also covered the tiller extension plates with a layer
of epoxy/graphite.
On the varnish front, I started out by wetsanding down last week's
coat. This was to ensure the next couple layers went on fine, and to
remove some of the drips I'd created. I ran into troubles - the edges of the sanding block
touch the deck, but not the middle. To fix this, I cut a new sheet of
400-grit (half a sheet for both sides), and I sanded in a slightly
different direction - at an angle, like the vertical in a Z, so that
the block went top to bottom as I worked my way along. This improved
pattern made a world of
difference.
Sanding complete, I cleaned the spreaders and wings with acetone. I also
repositioned the tape at the bow to have a more sweeping
pattern - more attractive.
Next, I ran over everything with a tack cloth, and then it was time
to varnish. I coated the spreaders, and with a bit of
the extra I did the rudder
box (despite the fact I hadn't cleaned it).
The hull itself was easy
to coat. The entire thing took about 40 ml, substantially less
than the previous applications took. I think this was because of the
sanding - the brush doesn't stick to the prior layer of varnish, and
so doesn't drop its dollop of varnish in place. Because of the
sanding, it's easy to see where the varnished part ends and the
unvarnished begins as you're working along. I used the same
up-down/left-right procedure as before, and it worked well.
Three hours later (just after midnight), I came back and applied another coat. This coat
took considerably more varnish than the last application - ~60 ml -
enough that dribbles formed. The previous coat was tack free, but the
foam brush still wanted to stick to the last coat, and that made
applying a thin, even coat pretty tricky. While painting the varnish
on, it's also a lot harder to tell what's been varnished in this coat
and what hasn't been yet, because everything is shiny (no dull sanded
areas). I was pretty much reduced to determining what was uncovered
by working by feel - the vertical strokes would stick, and as I was
doing the horizontal strokes, if they were still sticky the varnish
wasn't in place. Because the only way to know things were good was
the brush didn't stick, there's a strong incentive to add more varnish
in - which means you're much more likely to have dribbles. Looking
back over the area, you can see spots which aren't smooth - and those
are invariably spots which I didn't coat horizontally. (Also note that
this coat took forever to dry, because it's only 14°C outside.)
So, after all that, I wetsanded again. I wasn't
intending to do this - I figured I would just put on three coats
back-to-back and call it good. But the second coat caused drips, and I
didn't want to get up at 4 am and put on another one (and leave the
garage door open all night), and the sanding seemed to help the
varnish anyway. And a little wetsanding never hurt anyone, after all.
I used the patented Zed motion, and got a really nice surface. (This is just
doing the verticals, plus a pass with 400-grit foam.)
I'm also starting to think that the up-down/left-right process
isn't perfect either - you can see in the sanding places where the
up-down is clearly visible. For the final coat, I think it's
horizontal direction only, and the first brush (with all the varnish
on it) goes on in the middle, not the top (less drips).
[Update 2008 Feb 25: Bram mentioned
that applying acetone to varnish wasn't a good thing to do,
particularly before it's had a month or two to cure solid. Alas, how
to clean then?]
Eliminating runs
posted 2007 June 22
I was searching for solutions to my varnish run woes, and found
this article. Not sure it works, but I did sand out the runs I had
with 400-grit.
When applying varnish, the idea is to get a full smooth coat. Every
effort is made to lay it on with no sags or runs, but guess what? They
happen. Sanding them out is a real effort to bring it flush to the
surrounding varnish surface. The varnish stays soft and gummy in the
sag for quite a while and loads up the paper. Preventing runs and sags
is better than trying to resolve them. But, by the time you recognize
one has begun, the varnish has already started to set up unless you
thin the varnish with 5 -10 per cent Interlux 333 Brushing thinner. It
lengthens the time the varnish holds a wet edge and brushing out a run
or sag can be done even 10 - 15 minutes later in slower drying
conditions. If a run or sag does escape your attention, it can be
easily sanded out but with a little help from denatured alcohol and
400 grit sandpaper the next day. Wet a paper towel with the alcohol
and rub it over the run. Immediately sand the run with the sandpaper
on a hard rubber sanding block. Take it easy when you sand because the
alcohol causes the varnish to temporarily change allowing rapid
removal. When the alcohol flashes off and the run still isn't all
gone, wipe alcohol over it again and carefully sand. Soon the run will
be gone from gentle sanding and you can go on to the next coat of
varnish. Be more careful on the next coat.
Holes and varnish
posted 2007 June 18
This week I accomplished two big feats and one small one: cutting
the hole in the bottom of the hull, varnishing the bottom of the
hull, and bonding the tiller extension mounting plates.
The tiller extension plates were... ok. I drilled the holes in the
tiller the correct distance apart. I then mixed up all the
epoxy/silica, and proceeded to mount the plates in place. Alas, I
neglected to do a dry run - and the screws didn't quite fit through
the far plate. So, with rapidly curing epoxy, I had to widen the
holes in the tiller so the bolts would fit through and into the plate
on the far side. And the shavings got into the epoxy. And epoxy got
on the drill bit. Not my finest moment. But in the end, I did get it
mounted and looking good.
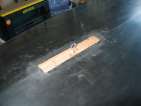
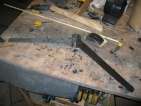
Next up, I cut the hole in the bottom of the hull. This required a
bit of garage
re-arrangement. I then tipped the hull up on its side, resting on the box
of foamies from the tiller blanks (thanks Greg!). A bit of precautionary strapping to
the wall (and a bit more
a little later), and it was time to work.
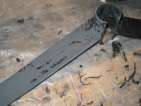
First, I cut a strip
out with the jigsaw inserted into the holes I drilled back in 2004. Based on my
experience cutting the hole in
the deck, I was much more rigorous about this one. I slipped a
plastic ruler inside the thin hole and measured the distance from the
trunk wall to the edge, and transposed that to the outside. Then I placed tape about 1 cm in
from the trunk wall. This is the "don't go past" line, and it's
straight, too.
I cut to the line,
removed the interior
shims (from back when
I thought I'd route out the hole), and then re-checked the tape to
ensure it was perfectly parallel with the trunk and each other.
Next, I moved the tape back so there was 5 mm between the trunk
wall and the edge, verified everything was parallel, and taped the forward and aft
positions. Bottom edge
cut. Top edge cut.
Remove the tape, and it looks
sweet. I also started cutting the insert block.
That complete, I re-arranged again, and
vacuumed up as much dust from the floor and hull as I could. And let
it be overnight, so the dust can settle again and I can pull it up
once more.
With the hull upside down, I painted the cedar on the
outside of the hole, to seal it. I also put a line of epoxy between the
trunk and the hull - there was a gap of about 1 mm. I used the straw
trick - I cut a straw to about 1”, flattened one end, pressed it
on to the syringe, and then put the flat end into the gap. Worked like
a charm.
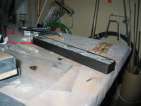
Time to varnish. I vacuumed once more, then ran a tack cloth along
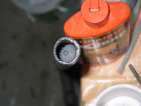
the wood. I taped the chine. I measured out the
varnish (using my syringes -
although the 3-part syringe is sticking too much in the cylinder and
the rubber top is popping off. I need to find a better solution for
this part, anyway). Then Bam! and there's a coat of
varnish. I waited for this coat to get tacky - 90 minutes, perhaps
not quite enough - and applied the second. The
third I started after two
hours. Each application takes about 40 minutes to apply, and in my
case (~17°C) two hours to cure.
By the time I worked my way to the chainplates, the bow was already
tacking up - so there's not a lot of open time once the varnish is
applied. Each side of the boat took 2x 3+1 squirts (and I've
measured, each squirt is ~10 ml).
The varnish isn't as blemish-free as I'd like - although dust
doesn't seem to be a big problem. I want to have at least five coats,
so between this application and the next two I will wet-sand with 320
or 400 (per the Strip-Built Sea
Kayak, this is the best strategy). I did have problems with
dribbles. On the third go-round, I think I found the best way to
apply the varnish (for me, anyway). Dip the brush (I'm using 2”
foam brushes). Paint along the chine line for between 6 and 8 inches.
Then paint vertically all the way down to the gunwale, covering the
entire "stripe". Come back and paint horizontally to tip off and
ensure everything got covered. Move over to the next strip, repeat.
[Update 2008 Feb 25: Note that the
tiller extension plates should be 4” back from the tip. I also
noticed recently that they aren't perfectly square with the world;
pity, but too late to change.]
Tiller extension mounts
posted 2007 June 11
This week was devoting to preparing the tiller extension mounts,
and cleaning up the garage a bit.
But first, a bit more spreader work. This should be the
last sanding - I only
sanded through in one
spot so I think I'm ready to go on.
I covered up that one
spot (along with a spot on the tiller box). With the
excess epoxy/graphite, I bonded my shims on to the underside of
the block - I'll come back later and sand those to fit.
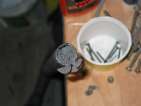
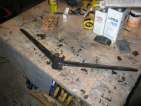
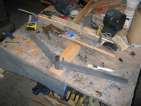
To get ready for varnishing, I decided to clean up the workbench
(and the mess on the boat). This was just busywork:
And you're all ready to build.
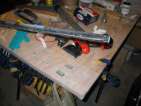
On the tiller front, I had filled up the end of the tiller with
some extra epoxy/graphite, and then didn't take a picture. If I only
had - I would have realised that the epoxy had filled the tiller too full, and I needed to
remove some. So drill it
out with the largest flat-tip spade bit that would fit through the
opening, a 7/8” bit.
Once that was done, I drilled the hole for the
shock cords. I used a 7/16” bit for this, and the advice was to
drill in at as sharp an angle as possible, and when the bit popped
through come back from the other side. Given that, I probably could
have used a slightly smaller drill bit. Check the fit, then clean up
the edges (so they don't cut the shock cord).
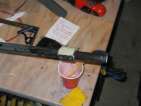
Next up, I cut the extension mounting plates, I decided
to go all out and make them from full layers of hybrid/glass. I
marked, awled and drilled the holes for the tiller extensions, then
positioned them on the tiller so I could bolt through them. The
advice here was "if you err, err on the high side". The plates are
exactly the width of the extension, so I placed them flush with the top edge of
the tiller, which is about 1/8” above the centreline. (Of
course, I still had to ensure that the tiller was flat and the tiller handle
was correctly level...)
[Update 2008 Feb 25: Actually, later on I filled this
back in again. In this way, the shock cord doesn't chafe on the end
of the tiller extension.]
More on the spreaders
posted 2007 June 4
Not a lot this week - sick. But did do a bit of work on the
spreaders and the centreboard block.
First, I sanded down
last week's epoxy application. That one application wasn't quite enough, and I sanded
through to the trailing edge and the carbon tape on the leading edge.
Time for another layer of epoxy/407/graphite, top and bottom.
I also spent a (brief) amount of time fitting my centreboard block
into the hole in the deck. I got it to the point where it is about
1/8” above the surface of the deck. Bram indicated 1/4”
was perfect, so I've gone a bit far. When I was working on this it
tended to get quite wedged in there - and if I screw it in per the plans, then
it's going to be next to impossible to get out. So I built a few shims with some of the
leftover epoxy that I'll bond to the bottom and shape to rest on top
of the posts in the centreboard trunk.
Since the insert fits quite well, I sealed the outer edge. I
also chatted with Bram about the insert. I'll have to round down the
top edge, so there's no chance of cutting myself on it - no sharp
edges on the boat!
Page 14 of 62
« First
…
«
12
13
14
15
16
»
…
Last »