Bonding the mast track
posted 2007 May 29
Bonded the mast track to the mast this week, and cleaned up the
spreader assembly. The mast track was particularly fun - it involved a
new chemical (Plexus).
Bonding the mast track
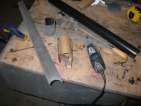
First, I cut tape to wrap around the mast and track at six inch intervals. Then I
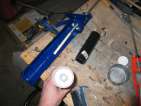
prepared my plexus gun.
There is supposed to be an actual gun you use to apply this stuff -
but Swifties being Swifties, Mark invented
a new one. I cut down my dowel and PVC pipe to fit
into the holes in the end, then duct taped the tube into the
large caulking gun. Open up the valve and dispense.
My plexus container didn't have a mixing nozzle on the end -
there's supposed to be one there, mine was missing. So I had to mix
the two liquids together (I did this in a spent tuna container), take
the mixed goo and put into an empty caulking tube (WEST sells them),
and then apply to the mast.
Mixed plexus is nasty. It's like very supple bubble-gum - sticks
to bloody everything, extremely stringy if you try and pull it apart,
gets on everything within 10 inches of it.
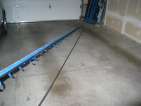
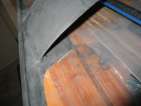
I put a bead down the mast between my two strips of guide tape,
bead diameter a bit over 1/4”. I then had my faithful assistant
(who said "<cough> this smells *exactly* like what they used to
bond my braces in place!" - probably - another comment I heard was it
smells like what they used to bond crowns in place with.) hold the far
end of the track in the air aligned above the mast, while I worked my
way down from the tip and pressed the track into the plexus.
The 1/4” bead was *way, way* too much. While the mast track
doesn't have exactly the same diameter as the mast at all points (and
thus you have to rely on the gap-filling properties of the plexus),
the 1/4” bead was just too much and plenty squeezed out. I used
a little more than 3/4 of the tube - and I probably could have gotten
away with just half the tube. I wound up trying to scrape some of the
excess away along the bottom
half of the mast, but it was just too gooey.
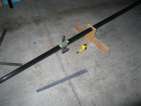
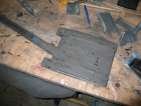
After about 45 minutes, the plexus had started to gel. I came out
and ripped off the tape on either side, removing (most of) the
excess. This was tricky - I slid a square tipped mixer stick (a putty
knife would have worked well too) along the track to release the goo,
while pulling the tape up and away. In a number of places the goo or
the tape escaped and I got some on the track or mast. The stuff is so
sticky I went through three pairs of gloves just getting it all off.
Were I to do this again, I would definitely put tape on the mast
track as well. I got enough plexus on the track that it doesn't look
pretty any more, and getting it off now that it's cured is next to
impossible. Sigh.
[Update 2007 Aug 1: Bram did indeed
recommend putting tape on both the mast and the track, so the excess
plexus could be easily removed.]
[Update 2007 Aug 1: A note about the
caulking tube. I mixed up a couple of batches of plexus, and the
caulking tube has a plug in the end to press out the contents.
Getting that plug out was a chore, but I wound up pushing a rod
through the tip and into the plug, and all the way out. That way I
could reuse the tube for multiple plexus applications, that day at
least.]
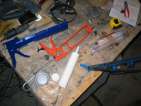
Spreaders
I also cleaned up the spreaders a bit. Sanded the fillet. After a
chat with Bram, I decided they were a bit too long, and took another
1/2” from either tip. Now 32 1/2” shroud tip to
tip.
Once that was complete, I applied a coat of epoxy/graphite/407 and
let cure. Most of that
dripped off, so repeated, this time with the spreaders on their side.
When I cut off the tips, I discovered that one of the tips wasn't
full, and the cut took off all the filler I had put in place - so now
there's a hole that needs filling. So this time I used the straw trick - which worked
*perfectly*.
Building spreader assembly
posted 2007 May 21
Time to actually build the spreader assembly. The rigging
manual (volume 2, page 11) describes what has to be done.
- Draw a long line and another perpendicular line on your work
area (the garage
floor).
- The spreader tips touch the ground 2 3/8” below
(toward the base of the mast) the attachment point. (They bisect
the angle made by the shrouds going from the chainplates to the
tip of the mast.)
- Sand the wide end of the spreaders to fit on the collar. I
did the rough shaping with the belt sander, then tried the dremel
tool (not effective). Then I found a sturdy paper tube of about the
right diameter, and used that (along with a piece of PVC pipe).
- The spreaders should touch both front and back, and have
a slight (7°) negative angle of attack - so that when the mast
is bent back, they are level with the ground.
- I marked a few alignment marks so I
could position everything correctly: centred, positioned 87
3/4” down from the tip of the mast, centred left-to-right.
Once everything was shaped, it was time to fill in the ends. I
drilled out the blue foam as far in as my drill would drill - 2
1/2” (although Bram indicated only 3/4” was necessary).
Once both spreaders were hollowed, fill with epoxy. Bram had a good
trick to get into the deep void and avoid bubbles: use a straw - put
straw deep in the void, put syringe in the end of straw, fill up void.
Unfortunately, I didn't have the right diameter straw handy. I just
kept poking at them with a paperclip to free any bubbles.
With the wide end complete, it was time to trim the narrow end to
length. Slowly, to avoid my
last mistake. I cut them to 20”, an inch longer
than the rigging manual's suggestion (19” along the longest part
of the leading edge). At 19”, the spreaders are way too wide - shroud point
to shroud point is about 38”. Another cut and we're down to
19”. No further. Shape the ends, drill them out, fill them up.
With this, the shrouds will be 34” apart - a bit wide
according to Bill's recommendation, but in the ballpark. I'll have a
slightly soft mast (probably the right way to lean).
While I was at it, I also lowered the mast jig by 1”;
according to the rigging manual, it should be 5” from the
surface to the mast track (and the mast track is about 3/8”
tall). I ultimately changed my mind and raised it slightly - 5 3/4” to the mast
track.
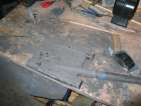
Now it's time to bond things together. I mixed up some
epoxy/silica, put a bunch into the wide end, and mushed them onto
the collar. Then I found the biggest washer I could and shaped fillets around the
spreaders. Put blocks at the tips of the spreaders, ensure everything
is aligned, and wait until it's tack free.
At that point, I added on the additional carbon. I used a 8” long piece
of 3” uni-carbon, then two pieces of 14” long 1 1/2”
wide uni-carbon. It's supposed to be two pieces of 2” - so I
overlap a bit and things will be fine. I pus some additional
epoxy/silica on the fillets, then applied the tape. Next I
placed three pieces of
peel-ply over everything, to hold it all tight and probably more
importantly to give a surface I could work later. Weight it down, and it's
ready to go.
Varnish
posted 2007 May 7
My objective this week was to have something curing in the garage
every night of the week. I didn't do too badly either: first
application of varnish, and more work on the rudder cassette.
Monday was all about sanding the
rudder
box, rough-sanding the
spreaders, and sanding
the ends of the boom.
But once that was done, I coated the rudder in
layer three of
epoxy/graphite, and filled the
handle with some
of the excess.
Tuesday morning, I put another fill in the handle (but
didn't work in the evening).
Wednesday, I did my first bit of varnishing. Of
course, before that, I sanded off Monday's epoxy. That
complete, it was time to varnish. I'm using Interlux
Perfection two-part linear polyurethane, and the first problem was
how to accurately measure out the 3:1 ratio required between the two
parts. I tinkered with a couple different ways, but Bram had the best
idea: use syringes. I cut the tips off two and wrapped tape around
the ends - both to differentiate them and to mark a max-amount point.
I sanded down the spars, then wiped them down
with acetone. I mixed up a three full syringe/one full syringe mix,
and used a 1” foam brush to paint the boom, the spinnaker pole,
and the mast base. I did
this in the (closed) garage. I think it was Bram who said "when you
get to this step, send your family out for the weekend - varnish
stinks. It will take a day or so for the smell to filter out." Man o
man, does varnish stink. The vapours can cause flash fires. It's
ridiculously stinky. I took a shower. I washed my clothes. I (had
to) open the garage. I turned off the furnace. I slept on the couch
to ensure that the fumes went down, and wouldn't have to open the
garage up again at midnight to let another blast of fresh air in.
(No, it seems that the fumes are worst right when painting and at
initial curing; after that they go down pretty quickly.)
Just to ensure the garage was really stinky, I also applied layer
four of black to the
rudder box. For this one, I only mixed two squirts of epoxy/207, then
painted the tiller handle, and mixed in half the regular amount of
fillers (on the assumption that painting the handle would take 1/2
squirt of epoxy). Seemed to work out ok.
Thursday, I put layer five of black on the rudder
box, on both sides - I suspended the cassette and coated both sides.
This turned out pretty well - the underside began to form drips, but
nothing that a bit of sanding won't cure.
Then it was nothing until Sunday. First, I
cleaned up the rudder
box, which is finally looking presentable (although I did sand through on the trailing
edge - another layer required). Then, I did another layer of varnish.
First, I sanded the
previous layer of varnish to allow the new layer sometime to grip. (I
did this with 120; apparently
varnish is happy with 220 or even higher). I rested the tip of the
mast on a clamp on my
workbench, so the other end wouldn't be sticking out of the garage. I
mixed up one batch for the boom/spin pole/mast base (again), and a
second batch for the mast itself. And this time, I did the entire
thing with the garage door
open (which made a giant difference).
Page 15 of 62
« First
…
«
13
14
15
16
17
»
…
Last »