Screwing down fittings
posted 2007 October 29
The past two weeks have been all about screwing things on to the
deck.
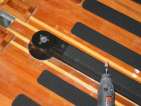
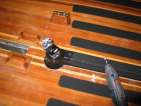
First, I started with the swivelling block on the centre rail.
When I first screwed this fitting in place, it was very tight and
didn't rotate easily. So I took it apart and sprayed it with McLube,
and I also hollowed out
the top surface of the epoxy rail. This goes through to the purple filler but not into
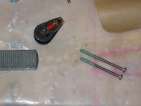
the cedar itself. Once that was done, I screwed it in place; I didn't
have long enough Robertson pan head machine screws, but I did dig up
some Phillips screws. They required grinding - not quite 2 1/2”
long.
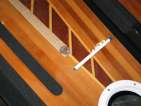
Next up were all the small blocks on the bevel blocks. Because
it's a 2-series block, they require #6 machine screws - very
thin, and it's important to not screw them through and into the
bulkheads underneath. (As I've learnt, it's easy to twist the heads
right off.)
One, two, three, four. (Compare to Mark's boat and Bram's boat. At first I
thought I had the inner blocks forward, when they should have been
back - but after orienting myself correctly I figured out I was ok.)
I measure the depth of these by poking a paperclip with a hook on the
end through, and seeing where it sticks (and how far in it goes). Then
cut/grind the screw to length, roll in grease to get an even layer
that covers the threads, and screw in place.
A number of the holes have accumulated gunk in them. For the holes
in the bevel blocks, I used my drill with the bit going backwards; but
that drives the goop in, and packs it in there. To resolve this
problem, I used a drill bit that would fit through the nut at the end,
and hand-drilled that in. This worked perfectly. To clear the
wood/epoxy part of the hole (and not the metal threads), I use a drill
bit of the correct diameter and hand-drill it into the hole. This
pulls out a lot of the goop.
Next up was screwing the jib track in place. The deck has "sagged"
just a tiny bit, and so I had to enlarge the holes ever so slightly
outwards, so the screws would fit through. Once the holes were
enlarged, I checked that the shock cord would fit through, and made a
small divit in the
correct spot. I mounted
the screws once, but then
realized that there was a sharp edge on the outside of the track - so
I sanded & filed down the outer edge, and then screwed the rail
back down. The screws here (like everywhere on the boat) are fairly
tight - it's clear that some epoxy has gotten into the threads and
made them tough. The only exception is the one special nut. I'm using
2 1/2” square-head screws for this; notice how Mark used allen-head bolts.
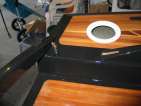
Next up was the forestay fitting. It looks somewhat out of place - grey in a sea
of deep black - and I should probably coat it, but I can't figure out
how to stop the epoxy from getting in the holes yet. (wax? tape?)
The four bolts for this part I fit when I was setting the fitting, and
I kept them apart, so it was a matter of not mixing up their proper
holes, cleaning out the fitting hole, and screwing it down.
That complete, I screwed down a strap which isn't used in
the current rigging system; I decided (long ago) that I would add it in
anyway. Why not.
Finally, I installed the spin lock cleat. But notice
how the cleat is a wee bit too far back.. which sucks. It's
amazing to me that drilling
and installing so carefully
can be so far from the truth.
And it's slightly askew as well. What a drag. (After pondering
this for an evening, I decided I could make a 1/8” thick
stainless or epoxy/glass shim which would move it forward 1/4”
or 1/2”. Perhaps if it's a problem I'll do this. It still
sucks, though.)
Applying non-skid
posted 2007 October 15
Tamara took the kids up to Grandpa's on Saturday (making Christmas
cards) - and so I had the entire day to work on the boat. I started
at 11am, and worked non-stop until 7pm. It was glorious.
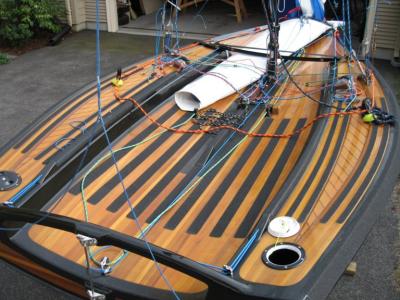
First up was to continue putting the non-skid on the deck. I
decided on the same layout as Bill had - I was going to use Mark's design, but Bill
points out that Mark built the outer edges of his wings wider than the
inner ones (hmmm... somthing to consider next time?). So I'll just go
with two 1” strips on the outer edge and one on the inside.
Bill's non-skid pattern
I found that the best way to determine the curves on the ends of
the strips was to trace a
quarter. I couldn't find my circle template sheet, but this
worked out perfectly - I rather wish I had done that for the pieces on
the gunwales, because they have a larger arc which doesn't look quite
as good.
I cut all the
remainder of my non-skid into 2” wide strips; I did this on the
garage floor, which worked better than working on a table; I could put
my shoes or knee down on the non-skid & ruler to ensure that it didn't
slip around. (On the table, the ruler slid and I mis-cut a piece.)
Then place the
2” wide strips on the centre part of the deck. The outermost
1” strip goes all the way back to the staples for station 13. I
put a right angle on the gunwale and aligned it with the end of that
strip, and then carried the line in toward the centre of the boat -
giving the effect of the strips getting shorter as you get to the
middle. The measuring tape is the edge I clip them at (and the bottle
of cleaner fluid is my centre marker). I did the same sort of thing
at the forward end. Overall it looks pretty sharp.
For what it's worth, I'm using "3M Safety-Walk
Medium Duty Resilient Tread 7738, 4 in x 60 ft, Black Bulk Roll",
which I could only find on 3M
Canada. Apparently it's been renamed into the "300
series" (not the general purpose stuff, which is more abrasive).
If you want clear, it's available in Heavy Duty (sandpaper) grade, as
well as Light Duty, now known as Fine
Resilient/200 grade. One provider is floormat.com.
I also started screwing cleats on to the deck, starting with the bevel blocks on the wings.
For these blocks, I had intended to grind screws to the right length,
but then I put the cleats up against the block - and
found that a 3/4” a 1 1/4” screw were pretty much dead on,
and I didn't have to worry about it. The most concerning thing here
was a loose screw - on starboard side, forward cleat, the outboard
screw is spinning in it's hole. I'm not sure why - I'm positive they
all had t-nuts in there. Perhaps I'll have to bond the screw in with
epoxy?
While I was working on this, I also did a couple other things:
- I ran a piece of mason's twine through the hull between the
two inspection ports, and looped it through the bung.
- I (re-)drilled holes for the bung and inspection port mounting
holes. I made these a bit larger than the shaft of the screw, but not
quite wider than the threads, so the epoxy would have somewhere to
sit.
- I epoxied and screwed the inspection ports and drain
bung in place. The inspection port screws I had previously ground so
I didn't have a sharp point sticking out in the hull.
- I filed out a bit of excess epoxy & varnish from the exit
scheve holes, then coated them with epoxy, then epoxied and screwed
the scheves in place.
- I couldn't help but screw a few blocks in place. I measured
the length of the screw necessary using a paperclip with its end
folded over, greased the tip, and then screwed them in (making sure
that any grease that didn't make it into the hole I wiped away before
the block touched it).
- I also screwed in the spin pole dead eye and trapeze shock
cord blocks.
- ...and the forward
spin block. This one is supposed to have a really large backing
block (mine doesn't,
really). It sees a huge load. Robert ripped his out and had to drill
another inspection port to install a new backing block.
Finally, I also made some progress on the centreboard trunk. I
bought a piece of aluminum tubing at a hobby store; 10-24 threaded rod
fits nicely inside of it. I cut it to length to fit the forward
and aft lengths of the trunk. Sand one side, then use some of the extra Plexus to bond the tubes into the
trunk itself. It probably would have been easier to do this while the
trunk was under construction... but I didn't have the Plexus then. ;-)
These tubes are to guide the threaded rod into the correct position in
the bottom block.
Waxing
posted 2007 October 8
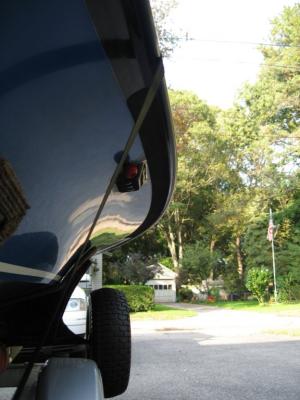
I waxed the hull (or at least the varnished part of the hull) this
week.
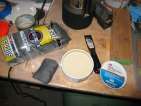
For this, I used #000 grade steel wool (Bram advised that #0000 was
too fine). I also picked up some expensive 3M Marine Ultra Performance
Paste wax, although pretty much everyone I've talked to has said that
a basic floor wax will work just as well.
I dipped the wool in the wax, picked up a bit, and then worked it
over the sides of the hull, making circles as I
went. Overall I pressed quite hard (tired hands) and ensured the
entire flare was coated. Repeat for the other side and the transom. I managed to get
wax into the non-skid on the underside of the wing - it's hard to get
out, too. Not sure how to avoid that problem.
After a couple hours, I returned and wiped it all off with a rag.
This turned out to be not long enough for the wax to dry - pretty much
the entire coat of wax came off. So I repeated the entire application
process again on the entire hull, working it back in place, and then
left it for a couple days to dry out. On the entire hull, you can see
the swirls made by the
wax application, but there's no "clouding" visible - the layer of wax
is sufficiently thin that it hasn't really clouded up. Perhaps I'm
doing something wrong or I should have put on a thicker layer - not
sure.
After two days of drying time, I came back and wiped everything down. The
swirls are difficult to eliminate, and ultimately I decided to just
leave it on there (since the boat is going to spend the winter in the
garage anyway - an extra layer of protection, I guess).
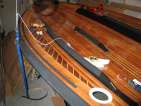
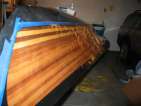
All tolled, with the protective tape removed, it's starting
to look pretty nice. And with the wax finally in place, I could move
the boat back into the garage and park my car back in (finally!).
[Update 2007 Oct 13: Bram mentioned
a few things about waxing:
- dip #000 steel wool in the wax & polish
- buff a bunch to get it polished
- when dry, wipe the wax off with a towel.
Also, one layer is generally enough (I've read on the net that a
couple of layers is sometimes a good idea...). Waxing should be done
every 6-12 months. Bram doesn't remove his fittings when he waxes the
deck.
Bill also sent along his procedure; he used Butcher's Bowling Alley
Wax: "I used a terry cloth applicator and applied multiple thin coats,
hand buffing inbetween. Your troubles may be due to applying too much
wax and letting it dry too long. The paste wax contains carnauba and
other fine waxes in turpentine and mineral spirits, which can bond to
the varnish. Your marine wax may have the same composition."]
For waxing perfection, you need only look as far as Bill's incredible finish.
[Update 2008 Feb 26: I found a link to an article in Fine Woodworking a while back on using
steel wool.]
Page 10 of 62
« First
…
«
8
9
10
11
12
»
…
Last »