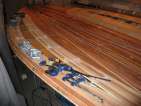
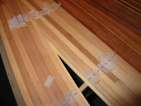
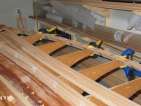
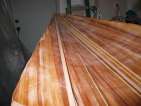
More strips on the gunwale
posted 2005 Mar 27
Some further refinements on technique:
- Move the vertical quickclamps along 6 inches every time, and rest
the washer on the bottom jaw of the clamp when you screw it in. For
the bottom strip, this makes sure the screw bites into a thick
enough piece of cedar to avoid cracking the cedar.
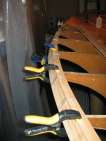
- You need a ton of clamps. By the last strips, I had every
clamping device in the garage on the strip I was installing. I
could have used another 10 C-clamps. This is the time to borrow
clamps from friends & family.
- The screws don't have enough hold to keep the strips in place very
well, and thus all the clamping is required. In particular, clamp
the top edge of the strip tight to the one above it, since it's the
one that wants to pull away from the cedar gunwale strips (because
the strip is forming a compound curve).
- I pulled the washers off with a staple remover at first. I wound
up gouging out little bits of my knuckle (trying to get the edge
under the washer), and little bits of the mahogany (the glue really
goes glue). In the end, I put my ruler edge-on to the washers, and
tapped the ruler with a hammer. This popped the washers off with no
injuries to me or the boat. Getting the clamps, screws and washers
off for a single strip takes about a half hour.
Second strips on the gunwale
posted 2005 Mar 20
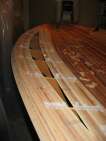
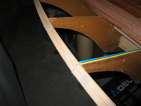
First thing this week was to install the 1/4" accent strips along
the inner edges of the eyebrow hole in the wings. This was easy - I
had some 1/4" strips with cove & flat edges left over from cutting
the accent strips down the centre of the deck. Cut those up, glue,
and tape, and we're ready
to go. I installed these strips with a different pattern - both edges
have the same angle.
It's definitely harder to strip this way - glad I didn't do it for the
whole boat. The trick is to get a rough angle sanded down, then touch
it up gradually with the sanding block. And the lines you sand may
appear to be straight, but because of the curvature of the strips,
don't count on it.
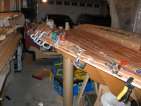
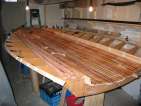
Next up, now that I've cut and scarfed all those mahogany
strips, it's time to actually install them on the gunwales. I used
Titebond II for these instead of regular wood glue - Titebond II is
waterproof, and I had some lying around.
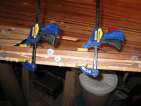
The best way I found to install these mahogany strips was to
progressively glue and clamp as you move along. I would glue up the
top edge and the gunwale strip for about two feet from where the
current clamp was, then move my two quickclamps forward to clamp the
next foot in place, and screw it down about every 6-8 inches. The
quickclamps are vertical,
since that's the direction the wood wants to escape. Repeat. Each
strip takes about 1 1/2 hours to put in place; and because I use my
entire collection of clamps for each strip, it's a one-a-night
exercise.
Half way through doing this I bought another nine C clamps - glad
I did, it made a difference. Even so, I'm going to have to go back
with epoxy and fill holes.
The second strips were a bit too short, and as a result I
had to install filler
strips. I just took these from the previously installed strips.
Too bad I didn't realize this earlier, I could have scarfed them in
place.
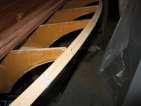
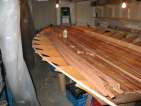
Stripping the step
posted 2005 Mar 13
Starting installing the strips on the inner and outer edges of the
step. I wanted to do a bunch at once, to ensure the outermost one was
flat, as well as being able to get good clamping between strips. The
top edges of both the step and the gunwale had to be cleaned up a bit
as well; the top edge of the step seemed to wave by around 1/8" up or
down from where the strongback said it should be.
Once I got to the point of installing the first outer strips of the
step, I could basically only install one side at a time - plenty of
taping and clamping was required, and I ran out of clamps. For each
strip, I wound up taping it to the previous one to try and reduce the
number of glue lines. I don't like putting strips over tape, so I had
to wait for the glue to dry, which slowed down progress. I've also
been scraping the excess wet
glue from the strips immediately after installing them. Hopefully
that will get rid of glue lines...
Somewhat different from previous spots, I set up both inner and
outer strips to have the bead toward the hole. This was primarily
because I had yellow cedar strips with a cove cut in them with the
right width. But it does make applying glue easier, and doesn't seem
to affect how things look or fit together.
Getting the strips to bend, especially around the outer rim, takes
some force. Each time I drive a staple in, I press the strip as hard
as I can into the adjacent one; even then I occasionally have to come
back and re-staple once the rest of the strip is in place. The bottom
edge of the cove presses against the bead of the already-installed
strip, and so it's hard to get everything tight together. It's worth
setting things up so the last strip goes in on the inner edge.
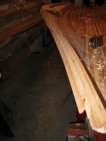
Stripping the gunwales
posted 2005 Mar 6
Added the next two strips to the gunwale, to get it to the required
height of 2 3/4". I put the glue down the cove, then at around
station 10 used a quick-clamp to hold the strip next to the gunwale
while I worked the strip at the bow. Staples hold the second strip in
place. At one station I unscrewed the top strip so the gunwale would
be a bit more fair; it was out by around 1/8". One side effect of this
seems to be that the bottom strips don't flare out as much as they
should.
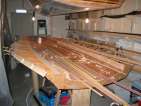
Once you get to installing the third strip of the gunwale, there
isn't much (or any) strongback for the strip to rest against. This
meant that I used a flat piece of cedar scrap as a backing and then clamped the strip tight (and
flat). The strip also requires plenty of tape to ensure it's tight
against the previous one. All this clamping and taping pretty
much means it's a one-a-night exercise.
I also cut the holes
for the front edge of the step, and prepared strips for the top of the
step. I wanted enough that I could install a bunch all at once - I
want to ensure the outer strip is flat compared to those a bit further
in, since the ones further in rest directly on strongback and not on
strongback/strip combinations.
[Update 2006 Aug 19: The instructions
on page 68 actually say "The gunwale is two layers thick and you'll
need 3-3/4” strips high." In my notes, I've written down "total
height should be 2 1/4” high" - i.e. 3 x 0.75. I built them to
be about 2 3/8”. Now that I have the hull and deck joined, I
know they should have been taller - at least another 1/4”, to 2
5/8”, and probably better at 2 3/4”. On the VMG boats
I've seen, you can fit the first knuckle of your middle finger between
the hull and the edge of the gunwale - and all that gunwale is useful
when you want to roll a turtled boat over.]
Installing the first gunwale strip
posted 2005 Mar 1
I think Bram stripped his foredeck slightly differently - it looks
like he alternated strips along the outer edge, then the inner side,
etc. creating a kind of V pattern. Mine are just straight. Shouldn't
matter any. Although - when the forward edge of the step ends, it will
have a V pattern like this. If you used Bram's method, the strips on
the forward part of the deck could continue the line of the step
strips forward...
[Update 2005 Jul 28: I've also seen a picture
of a deck where he installed all the strips straight with the
centreline, no alternating between the step and the middle. That
looked sharp too.]
I then attached the first gunwale strip. I planed off the cove of
a single strip. It works best if you just leave the edge as a right
angle and not put any slope on it - a right angle fits best under the
foredeck, except forward of station 1. Once the strip is in place,
come back with the plane and add the bevel for the wing strips.
I applied glue to the strip, screwed it to the station, then
clamped the foredeck to the station. This way the strip is flush
against the bulkhead and doesn't tip inwards or outwards according to
the angle on the top edge of the strip.
Page 41 of 62
« First
…
«
39
40
41
42
43
»
…
Last »