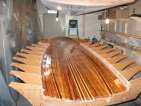
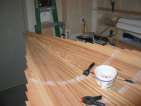
Sealer epoxy coat
posted 2005 Feb 27
Did a few things in the past two weeks. First, I put a sealer
coat over the inner part of the deck, and sanded it down.
Second, I prepared the front edges for trimming. I did this the
same way I trimmed the hull
- drill holes from the bottom up, put a nail through the hole, then
clamp a strip along the nail and mark the fair line. Just be sure to
mark along the outside of the strip. The gunwale
strip fits underneath a 1/4" overhang of the deck surface - so don't
cut the deck flush with the ends of the strongback ribs.
Finally, I cut down a 8' long 8/4 mahogany board into 3/4" x 1/4"
strips. These are used for the outer gunwale edges and I'll also use
some for details on the wings. Having done this, I can honestly say
that spending the money to have someone mill the strips instead of me
doing it was money well spent. It's messy, dusty, you have to be
cautious to not cut off fingers, and for all that you wind up making
big sticks into little ones. (I only had to visit the doctor once
after this escapade - while cutting the very last strip, the push
stick I was using was kicked back by the blade into my thumb, causing
my thumb to bend back in some weird way. Nothing broken, just a very
swollen thumb for a few days...)
Strip counts
posted 2005 Feb 20
I haven't been working on the boat much recently - other
things have been keeping me busy. I did create a strip count,
however... here are my notes. All these counts are for one half of
the hull - i.e. you could build port side with this many strips.
Strip count on the
bulkhead material 26 strips
Strip count below
the chine 23 strips chine to c/l
Strip count on the
flare 21 strips per flare
These are all numbers for one side (port side).  Double these to
get the full deck.

centre to middle
1    F
2    1/2" yellow
3    F
4    1/2" yellow
5    F
6    F                  # first strip to fit into outer strips
7    10' + scr
8    F
9s   cut (80") + scr (60")
10s  cut + scr
11   F
12   F
s    scr                # first strip which doesn't touch transom
s    scr
s    scr


step to middle
1    F                  # runs free both bow & stern
2    F                  # runs free both bow & stern
3    F                  # first strip to fit into centre strips
4    10' + scr
5-6  F
7s   cut + scr
8    F
9    1/4" yellow
1/2s 1/2 + scr
11   F
s    scr                # first strip which doesn't touch transom
s    scr
s    key

step edge to the gunwale forward of station 6
s    74"
s    60"
s    53"
s    44"
10s  ?                  # 14 scrap strips in total


(plus a 14 scrap strips, lengths 74 to strip the area from the
step edge to the gunwale forward of station 6)

step:
1/2  cut                # 104"
-s   scr x 2            # 80" + 60"
-s   scr x 2
1/2  cut

transom:
cut x 20           # 58"

gunwale:
1-6  6              # full length 15' strips x6


11/29/03 [bld] 360 bead/cove WRC, 5760 lineal feet @ $0.28 per   $2,028.12
360 bead/cove western red cedar strips 1/4"x3/4"x16'
5760 lineal feet x $0.28/lf
12.5% savings for swift solo clients    $1612

6 bead/cove yellow cedar strips 1/4"x3/4"x16'
96 lineal feet x $0.55/lf               $52.80

handling and packaging (4 tubes)        $80
local transport to Vancouver BC         $125
regional transport to Issaquah WA       $108.32
customs services                        $50

(net net for this order: $0.35/lf)


10/24/04 [bld] 10 bead/cove WRC, 10 bead/cove yellow cedar       $370.81
10 bead/cove western red cedar strips 1/4"x3/4"x16'
160 lineal feet x $0.40/lf              $76 (?)

10 bead/cove yellow cedar strips 1/4"x3/4"x16'
160 lineal feet x $0.70/lf              $112 (?)

(net net for this order: $1.159/lf)

(net net for both orders: $0.39/lf)


As of Feb 15/05, Raven quotes
WRC at $0.40 for 16' ($0.36 for Swift Solos) and YC at $0.70 for 16'.
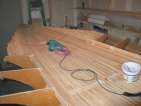
A wee bit 'o epoxy
posted 2005 Feb 13
I decided I'd gotten to the point that it was time to start filling
the staple holes. Not the end of sanding, but far enough along that
there doesn't seem to be a lot remaining.
[Update 2005 Dec 21: I should note
that if you're very observant, you can see this initial application of
epoxy in the finished product. Probably not worth doing if you want a
perfectly continuous tone to the finish.]
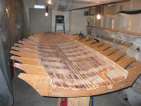
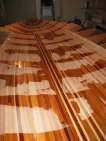
Sanding, sanding
posted 2005 Feb 6
It's amazing how quickly strips go from looking like hell when
they're glued up to looking smooth and sleek when they're sanded.
This week was spent pulling all the staples up and starting on
sanding. This time around I pulled the staples with pliers, using the
plastic when the staple was so tight I couldn't grip it with the
pliers. I pulled up everything but two rows of staples and the screws
in the bow, all the while scraping it down with the scraper (with a
fresh blade). Once the bulk of the scraping was done, I hit the
entire deck with the random orbital. I'm using the orbital a lot more
for the deck - I sand it down to the point where I can't feel ridges,
and then return with the fairing board and ensure it's completely
flat. This goes a lot faster, and it seems like I'm getting just as
good a surface.
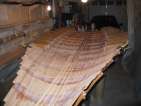
In front of station 6 it is difficult to sand with the fairing
board (or the ROS for that matter) - so I have had to use a block to
be able to get things smooth. The curve changes quickly, and so the
curve on the fairing board is either too little or too much. And the
curve can change this much in the width of the board. This means that
lots of moving around and sanding in different directions is
required. I also found that the deck is too high to sand easily - I'm
standing on a milk crate to be able to sand down. I probably should
have taken 6" off the bottom of the sawhorses.
On the hull, I had problems with glue lines, especially in the
flare where the flare is most concave. I don't seem to have as many
glue lines this time - I was careful to press the strips tight to each
other, and I'm going back and scraping off extra glue when I see
it.
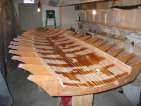
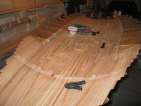
I picked up a sheet of 1/4" purpleheart, and once I got
it home immediately thought "gee, wouldn't it be nice to have a 1/4"
strip of that next to the 1/4" yellow cedar in the deck..." what a
drag. Should have bought it sooner.
Another note - the front three stations with a step are shifted
perhaps 1/8" to starboard. When you look at the deck, you can see
that something's not quite right with the yellow cedar strips, as if
they're flat on the port side. It's amazing how sensitive the eye is
to things like this.
Page 42 of 62
« First
…
«
40
41
42
43
44
»
…
Last »