Installing the centre rail
posted 2005 Oct 23
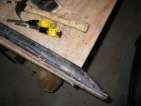
Installed the spin cleat block and the centre rail this week.
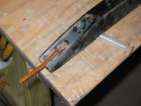
But before I did that, I drilled the hole for the exit scheve on
the starboard toe rail. This didn't go as swimmingly as I would have
liked - I forgot to measure twice. As a result, one of the holes was
1/8” too far aft, and I had to bond a shim in place to get the
right width. Seems ok, though...
Next up, I drilled the holes in the spin sheet ratchet block. I
used my guide for this - and it worked really well. I was thinking of
asking around if someone had a drill press, but these holes were out
less than 1 mm over two inches - pretty good for my money.
Then tape up all the holes, fill everything with epoxy, and bond in place. The vertical
bolts are 1/4”; the horizontal bolts are 10-24. With all the
holes drilled and positioned, the actual bonding isn't that hard. I
used tee-nuts on the back side - I'm sure VMG didn't, but I want to
sail my boat one day. ;-)
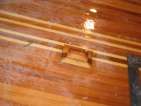
Next up was the centre rail. For this, I created a pattern of the
pedestal. Using the pattern, I located the centre and positioned that
at the right spot, 106” back. I then used the pattern to
position and drill a set of four pilot holes down into the deck - one
in the centre, and three between the tee-nuts in the bottom of the
rail. Add another couple along the length of the rail (making sure
they don't hit the protection patches on the underside).
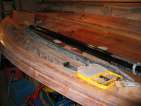
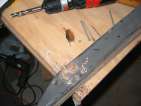
Once the pilot holes were done in the deck, I moved the deck over and
drilled pilot holes in the rail, drilling up from the bottom. I weighted and taped the rail
in place - there's no way to reach it from the side.
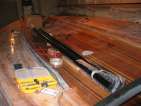
Next up, I filled all the holes with straight epoxy, and used
around seven squirts to cover the entire base - way more than
I needed, but because of the slight bow in the deck, a lot was needed.
I screwed the screws through the deck so the tip was far enough
through that it would mesh with the rail, and I could accurately
position the rail without the lines. Then I applied a bunch of pressure using paint cans -
again, it's impossible to lean over and do this - and wiggled the rail
until it meshed with the screw tips. Once everything was nice and
flat, I screwed it all in place from the bottom.
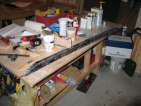
I cleaned up the excess with a squeegee - which gives a very tight
curve, but I figured that was ok.
Finishing the toe rails
posted 2005 Oct 9
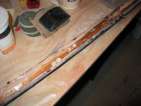
Did the final pieces for completion of the toe rails this week
(second attempt). First part was bonding the bottom pieces in place.
The second time I did these bottom strips they didn't fit quite as
tightly in the groove; I had thought about putting tape on the
underside to limit the amount of drippage. In the event, drippage
wasn't that bad.
Also while doing this I figured I would put another layer of
s-glass along the top edge. The glass has been so sanded down that
I've sanded all the way through - so the top edge can use it. I dug
out some spare stuff from glassing the hull, and got enough for the top edge.
And finally, my Skil jigsaw broke. The arm which goes
up to the top handle broke in half. I bought this August 10, 2003 for
$70. Lasted a bit over two years, and cut an awful lot of patterns,
pieces and other bits. They don't make them like they used to.
Redoing the toe rails
posted 2005 Oct 2
Well, it turns out the screws in the bevel blocks were a little too
tightly greased. They didn't come out - and because these are thin
(6-32) screws and long (2 1/2”), the torque on the head just snapped the head off. So
how do I get these out?
While I pondered that, I carved the hole for the exit scheve.
Drilled holes at the ends, chopped out the middle with a chisel, filed
down the flat edges. I'll seal the inside, but it's looking good.
I tried to remove the screws by twisting with pliers - but that
just snapped off more of the bolt. A tip
on the list was the key - use a soldering iron to heat the bolt, that
will heat the epoxy, and that's enough to loosen the bolt. Worked
like a charm.
I installed the spin launcher block and spin control block. Both
these were circular bulkhead pieces with a piece of the hybrid. This
time though I left one prong of the tee-nut straight, and drilled a
hole into the hybrid for it to go into. This stops it from rotating,
which I was concerned with.
I'm also spending time on the toe rails. The channel I routed isn't deep
enough - two lines of shock cord won't fit. Darn.
So I re-routed the
channel, this time 7/8” deep. I made a slight change to
glassing the channel as well - I added a layer of foam, to make the
channel as wide as possible. Coat the inside of the channel with a
layer of ketchup-consistency epoxy/silica. Wet out the 2” glass
tape on a piece of plastic, then put that on a layer of thin foam (I
used the packing foam the cedar strips came in, maybe 1/8”
thick), wrap around the cedar strip, and squeeze that strip into the
channel. Clamp the strip in place - I had to use shims to hold the
strip in, since it wasn't as tall as the channel. Clean up any excess
epoxy squeezed out.
Sand down the
resulting mess, plane
down a centre strip for it and sand the edges to 15°, and sand the
inside of the channel.
Once that was complete, I re-shaped the hole for the exit scheve - and because
the centre strip is gone, I now know that a 5/8" #6 screw with its tip
filed down will fit perfectly.
I then installed the backing plates for the trapeze shock cord, and
finally put the second bevel
block in place. This time around, I greased the bolts really well
(although it wasn't as necessary; I wasn't filling in the bolt holes
too). I put the top piece down, put bolts through one hole, and then
lined up the backing plate with that one bolt. Futzed for a while and
finally got a second bolt in place. I then tapped the remaining two
bolts through with a hammer - they weren't as willing to go through.
For the backing block, I drilled out divits for the nuts with a 7/16
drill bit. The nuts are square nuts, and I used plenty of
epoxy/silica/404 to bond them in place. They seem more
sturdy...
Page 34 of 62
« First
…
«
32
33
34
35
36
»
…
Last »