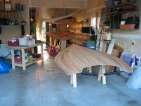
Completing the underside of the deck
posted 2005 Aug 28
Couple things were up for this week: I cleaned up the excess
hybrid hanging over the edge of the gunwale.
Once that was done, I applied protection patches on the
underside of the deck wherever a soldier or t-soldier would hit the
deck. I also put a strip down under the mast. A couple notes on
this:
- The pieces were circles six inches in diameter. Rounded
squares would have been as good (and easier to cut).
- Don't sand down the surface too far.
- It probably would have been better to put a blue dot on the
glass, and a red dot on the hull exactly where the centre of the
glass should be - then you just align the two dots, and all is
good.
- There should have been the same protection patches on the
hull. Oh well.
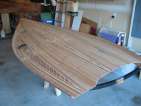
Glassing the inside of the deck
posted 2005 Aug 21
Got everything ready for glassing this week, and even did a couple
other things.
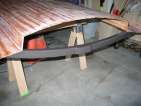
First, I figured while I had the hull upside down, I might as well
fair out the underside of the transom bar. (This is hard to do right
side up because the epoxy drips.) The stern edge and the bottom took
most of a three-squirt cup. I mixed in 1/2 tablespoon graphite powder
and a whole lot of 407 fairing filter (thus the grey colour).
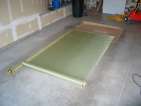
Next, I cut the
hybrid. I laid the piece down on the garage floor - a well vacuumed
floor - but another possibility would have been to suspend the roll on
a line and pull it off. (I mention this when doing the hull.) The floor worked well;
three cuts and I had the deck ready to go.
I decided I wanted to fair in the bow area a bit more; there
were indentations on the inner edges the hybrid wouldn't have easily
filled.
Next up, I did the actual sanding work on the transom bar. Because
of all the 407 I added, it sanded very easily - and the resulting
surface is very fair. It
looks awesome. I sanded into the underlying glass a couple times
(particularly on the gudgeon), but overall I'm happy with it.
I had an evening to burn, so I figured I would make backing plates
for the chainplates and spinnaker rail. This involved about 10 layers
of scrap s-glass and two layers of scrap hybrid: layers 2 and 9 are
hybrid, and the outermost and most of the inside layers are s-glass.
Most of my layers had some overlap of some kind (i.e. they weren't
entirely 12in x 12in pieces of solid glass). I laid this all out, put
in plenty of epoxy, covered in plastic, and clamped. Trim the edges,
and all is well. The most interesting bit of this was that the
plastic, which had a crease, left the impression of that crease in the
finished product - despite all the clamping pressure. Something to
watch out for when building centreboards.
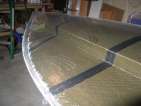
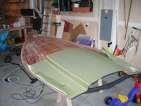
Finally, it was glassing time. I trimmed the hybrid before
the epoxy this time (the hull was different). We pulled 8
10-squirt cups, and wound up needing another three for the entire
deck. I went through and poured in the initial application of epoxy
and wet out the hybrid; then Max came back through and removed excess
epoxy.
Once the entire deck was wet out, we added in the carbon tape along
partial bulkheads, along the centreline up to the centreboard trunk,
and made an X with tape between the chainplate location and the mast
step. I wet all these out with epoxy/206 (or 205) and painted them
on, then pressed them down with a squeegee.
After that, I went back along the gunwales with a brush and painted
the hybrid on to the gunwales. This worked perfectly - I had debated
not putting the fillet
until after the hybrid; that wouldn't have worked nearly as well.
Then wait a couple hours and apply a second coat (epoxy/205 this
time). I used a regular 1/4" fuzzy nap roller for this coat. At this
point I stopped on the
hull, but there were still a few unfilled spots on the deck, so I did
a third coat, this time
with a thin, 1/8" West System foam roller (and again epoxy/205).
Overall it went very smoothly. I wish I had had Max over for the
topside of the deck. I remember now Bram had said when we glassed the
exterior of the hull "having two people makes this a lot easier - I'm
having you over when I have to do this next". There was very little
outgassing - perhaps only four or five bubbles showed up which we had
to remove. There are a couple spots where the hybrid pulled away from
the step - mostly in the angles. But overall it looks great.
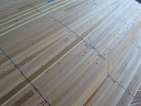
Filling holes on the deck
posted 2005 Aug 15
And so I began the long process of gap filling the underside of the
deck. I learned from the hull that it's worth spending time filling
bubble-generating holes. This surface gets a layer of hybrid, and
it's really hard to see bubbles in hybrid - so eliminating their
source is worthwhile.
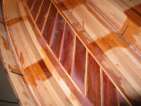
First I filled the gaps in the darts in the wings. These had a
bunch of unevenness, mostly because the three different woods had
slightly different widths. Epoxy/407 mix did the trick. Both side of
darts needed at most two squirts, and around two spoonfuls of
407. (407 has the strange property of seeming to never get to the
mayonnaise stage - since it's a fairing filter, you might expect it to
stay runny, so I suppose that make some sense. But when you apply it
in thin layers, you realize you added too much...)
Then I did a third
application of epoxy in the staple holes, and sanded it down.
Next up was a full sealer
coat. Sealer coat epoxy doesn't add any strength, and I'm just
filling in gaps. So I added 407 to the mix. The 407 seems to stop
the epoxy from sinking all the way through to the wood, so I should
need less epoxy. This entire side took 15 quirts of (the interior of
the hull took 24). I did
it in batches of five, and batch I added two spoonfuls of 407.
Once cured, I marked
all the bubble locations, so I can return later and re-fill the
bubbles. Sand. Another
coat, this time focused on the bubble locations.
Next up, I cut an "inverse
fillet" tool, and filled in the groove between the mahogany and
cedar strips with a nice rounded edge.
Sand everything down again. Almost there.
On gluelines
posted 2005 Aug 9
I've talked a bit about
glue lines before. I still have some glue
lines in the completed, glassed deck. I've come to the following
conclusions:
- Glue lines are impossible to remove. Avoid them like the
plague.
- The only way to remove glue lines is with the scraper, which
also hacks away at your wood. Sanding tends to sand down the
cedar instead of the glue, and so you have to come back with a
scraper anyway.
- When you install a strip, on the visible side you should see
absolutely no glue squeeze out. If you do, you put too much glue
in the cove of the strip. When applying the glue in the cove,
there shouldn't be a bead of glue, there should be a thin film.
- Better too little glue than too much, since the cedar will be
encased in epoxy and glass anyway.
- You should use tape to pull together adjacent strips
everywhere - everywhere. My wings don't have many glue lines -
and almost all the strips there I used tape to pull them
together. This slows down building, but you get better results.
- Scraping away rock hard glue leaves dings all over the cedar.
Best is to wait until the glue forms a thick skin, and remove it
then.
- Wiping away wet glue smears it all over, which is then sucked
up by the cedar, leaving a "glue smudge". If there is extra, wait
until it forms a skin (but is not rock hard) and remove it then.
VMG solved this problem by not using glue at all - they gave all
their strips a pre-coat of epoxy before assembling them on the
forms. Makes for pretty results...
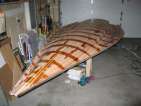
Deck removed from the forms
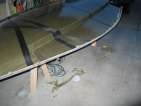
posted 2005 Aug 6
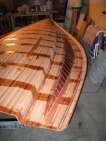
I removed the deck from the forms (just like the hull before it) and began
work on the underside. I started out by scraping everything down and
taking off all the dribbles of glue. Next, I
sanded everything down with 60-grit, but quickly switched to 40-grit
(when I realized how long 60-grit would take...) Already after a
single sanding pass many of the station lines had started to disappear.
I figured I would spend a bit of time cleaning up the front edge of
the step. This was mostly work with the rasp; rasp off the initial
bit and then switch to sandpaper to get the right surface.
Next, I put fillets around the edges of the gunwale and the inner
edges of the step. This was a pass with epoxy/405, and I used a 1/2"
radius washer for all the fillets. Bram did these fillets while the
deck was on the forms (from the bottom), to ensure it was strong
enough to move. I figured if I was careful I could do them afterwards,
and save myself a lot of cleanup time. No problems.
Then I did a bit more sanding and a bit of planing.
Next up, I figured I would strengthen the bond between the gunwale
strips. Using a syringe, I laid a line of epoxy down the entire length
of the gunwale. This mostly got sucked into the crack, and I came back
and re-filled areas which needed it. Gloved fingers can pop the
bubbles easily. All the extra I used to fill the screw holes with.
We're getting close now. Another pass with the sander, and I then
filled all the big holes I could see with straight epoxy. Then I
worked on all the staple holes. For the hull, I used a paintbrush to
paint on the epoxy; this time I used a stir stick and pressed it in
with a squeegee. I'm not sure which works better; the stick seemed
fine. During the first epoxy application for the staple holes, I went
back twice over everything - first time the strips soak up the epoxy,
return while still uncured and go over a second time to actually fill
the holes. I think this worked out pretty well.
Page 36 of 62
« First
…
«
34
35
36
37
38
»
…
Last »