On Sanding
posted 2005 Dec 20
An interesting conversation on sanding technique has been
happening on the list.
Mark White says:
A little info on sandpaper, they are not all the same.
formica
read page 115, the P grit paper is what you want to use for final
finishing. For sanding the wood, sand with the wood grain, and use a
good quality paper, it will have less "large" grains mixed with the
rest of the grains, and don't use a lot of pressure while sanding.
Using too much pressure will cause the sanding block to flex and not
actually fair what you are sanding, it will also wear out the
sandpaper quicker, and cause the paper to clog quicker. You can use a
wire brush to slap the paper surface to keep it clean. My father
always said "let the sandpaper do the work, not you", he managed a
body shop years ago.
Felix replied:
I suggest you use your sandpaper in a diagonal direction across the
strips to fair the hull, this is going to leave major scratches that
you need to get rid off in the second stage.
This is how I did it. Take the 60 grit sandpaper on your fairing board
and use LONG diagonal strokes with little pressure and keep moving
along the side of the boat. Get in a rhythm - feel the flow. You also
need to go in both directions, so that you end up with some sort of an
x-pattern on the boat. Now dont forget this is the first and most
important part of your sanding job. This is going to shape and fair
the hull. So you need to accomplish as much as possible in this
stage. You are looking for an even scratch colour or pattern on the
hull.
Now all the sweat that is running down your face and your forearms
will actually help pull up those grains, that you pushed down
earlier. So keep on going. It hurts but you wont die. Its a good
workout, too. On a personal note: I start sweating just looking at a
fairing board or plane, I think I need to see a doctor about this.
Now run your hand over the hull and "look" for little bumps. Try to
loose them, but use LONG strokes. You can also start to go into the
3rd dimension now - running the sandpaper with the grain.
You still want your 60 grit sandpaper on the board and start sanding
out those scratches you made across the grain. Dont skip to the next
grid before you are completely happy with the shape and look of your
hull. Oh, the bottom is going to be black, so you might look for a
very fair but not so scratch-free surface.
After that you might go to the next grid and start the "polish". You
may use the x-pattern again, but its just going to take you that much
longer to get to the next grit.
I also recommend doing the same when you start sanding the epoxy,
especially the stuff below the water line. It helps when you dont
have to start with 60 grit sandpaper. Im not sure what the others
will recommend on how far you should go. Smooth is fast.
Another couple tricks:
- Dont use pressure, let the sandpaper do the cutting. Otherwise
you will start putting little micro dents in the wood. If you want
to go crazy you could take a sponge and small amounts off water
after each grit and "pull" all those grains back up - but then again
- dont do it. Its an epoxy drenched racing machine and not a
jewellery box. Safe your sanity and put some extra effort into
fairing the hull.
- vacuum the dust frequently (no point in sanding fine dust
into really fine dust).
Painting on the first coat of black
posted 2005 Dec 19
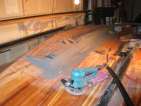
Spent an evening this week and painted on the first layer of black.
I sanded down the
starboard side of the step (finally; the other side was a while back. The interesting
part of this was when I built the jib track blocks, the masking tape
didn't stick to the sanded side, but did stick (strongly) to the
unsanded side. I had to sand off the tape glue which didn't pull off
with the tape. Odd.)
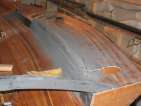
While I was doing this, I also sanded down the wings (twice), using
120 paper. When I glassed
the wings I didn't tip off the final coat, and so the surface was
stippled. The first time, I removed most of the stippling. I then
vacuumed up everything, and cleaned off the surface with acetone. I
then hit the spots that weren't touched the first time around.
Applied the 6-squirts epoxy/1 tablespoon graphite/209 special
hardener. The covered three sides of the transom bar, both rails, one
full step, and part of the launcher throat. I figured I'd keep on
going and mixed another 3-squirt batch, which completed the transom
bar, the launcher throat, the rest of the second step, and
a couple other spots.
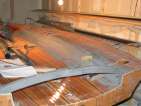
The hardest part of all this was keeping the epoxy from sagging.
Even after 40 minutes, the epoxy would still be sagging down the edges
of the step. It will definitely require a sanding and second coat of
graphite (and presumably I'll have to do that very quickly).
Installing jib track blocks
posted 2005 Dec 12
Finally installed the jib track blocks this week. The first
step was drilling the holes to route the shock cord from the toe rails
forward to the turn point at the bow. The cord has to go through the
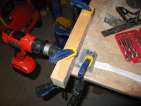
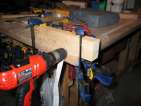
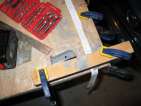
blocks. The face of the block isn't vertical, so I had to figure out
how to drill a straight hole through the block, only 1/8” off
the bottom of the block. To do this, I drilled a hole right next to
the bottom edge of a 2x4 using my drill templates to make sure it was
straight. I then aligned a paper ruler so it was
straight with the hole. Then position the block so the entry and exit
points are correctly aligned, and use the hole in the 2x4 as a guide
to get the correct positioning in the block. Also be sure to
position the shock cord hole so that it doesn't intersect with the
vertical bolts.
Then seal the hole (it
touched wood in my case), and the deck and backing plate. Once that's
done, screw it all together. There are so many
pieces, this takes a little while. I pressed the jib track into the
blocks while they were still uncured just to verify they were straight
and positioned correctly, but I didn't screw the track on with the
epoxy there - epoxy would have leaked out the holes and bonded the
track in place. As it is, I got a couple more spots on the track messy
with epoxy...
Next I cut the holes for the inspection ports. This was much
easier than I expected - I just marked the hole with a compass,
drilled a small starter hole out on one edge, and drilled around it
with my jigsaw. Perfection isn't really required (the lip of the port
will hide not-quite-perfect holes), and I didn't use the hole saw I
bought.
Overall I'm not terribly happy with how the jib track has worked
out:
- The track is pretty beat up. The black anodizing is fragile and
easy to scrape off, and I've done so in a few places.
- I didn't tape far enough on to the track, and as a result some
of the epoxy from the blocks got on to it. It doesn't come off.
And there is some from installing the blocks - just a small thin
bit, but it's still apparent.
- I drilled the holes horizontially on one side of the track.
- Screwing the track in, the holes are very, very tight - I
suspect either the crud in the holes is still there or the deck is
flexing slightly inward. I've tried to remove excess crud by
re-drilling the holes after the blocks were in place, which got rid
of some of it - but they're still tight. Must mean the deck is
flexed.
- Because the holes are so tight, it means that screwing in the
screws is hard, and they may not mesh with the screws in the t-nuts
correctly. I've had a couple screws come out with the threads
severely worn down. This is either because there's crud in the
threads on the t-nuts (which I didn't grease), or because I'm not
mating well. Either way it's a problem.
Overall I'm concerned about this area; hasn't gone well.
Remaining strips
posted 2005 Dec 10
I've got 13 + 55 + 92 = 160 WRC strips (and 6 Yellow cedar strips)
remaining. Each is 194 inches long (or thereabouts), just over 16'.
So that's 2586 lineal feet of strip. I bought the strips in two
batches and bought 370 WRC and 16 yellow cedar strips. So I used
210 WRC and 10 YC strips - the remaining strips are not quite enough
for another boat. No, at the moment I'm not considering doing that.
I want to sail mine first. ;-)
[Update 2006 Aug 22: It's worth
noting that I used 3560 lineal feet of strip. Were I to do it again,
I would buy 12 16’ YC strips, and 300 12’ WRC
strips. The longer strips are more expensive, and aren't really
necessary. I kind of like the spots where I scarfed in extra strips
(and I added in more scarfs just to add the look). I'd also consider
getting a few extra strips that are cut to be 1/2” or 1/4”
wide instead of 3/4” - I wound up doing this myself, but having
them do it would have been nice.]
Wikipedia has a great glossary of
boat terms
although you may feel like you're sailing in the 18th century...
Fillets
posted 2005 Dec 7
I came across this article in my
travels on the web (actually I think it was linked to from the
mailing list), and found it useful. I have since used their idea of
cleaning the bonding surface with acetone to ensure it's very clean
before bonding.
Preparing jib track blocks
posted 2005 Dec 4
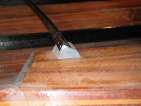
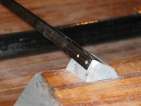
Not a lot going on this week. I completed the shaping of the jib rail
blocks - they look pretty spiffy. That complete, I began drilling
holes to mount them on the deck. I positioned the holes at the same
positions as they were originally drilled in the track. This led to
two problems:
- I decided to mount the track with the screws vertical, the same
way VMG mounted theirs.
The problem was because I used the end of the original track as my
pattern, I drilled the holes in the horizontal position. Damn.
- With the screw holes positioned in that way, the routing for the
shock cord had to be diverted slightly from its "natural" path. I
don't think this will be a problem, but it's a bit unfortunate.
Once the vertical holes in the blocks were done, I positioned the
blocks on the deck and verified their position - because the rail is
mounted on the top of the deck, the blocks are moved aft 1/4" from the
normal install point. So the centre of the jib track will intersect
the deck at 71 3/4”.
Then it was off to build the backing blocks - for these, which see
quite a bit of load, I used bulkhead material and a layer of the s-glass
composite.
Page 32 of 62
« First
…
«
30
31
32
33
34
»
…
Last »