Building jib track blocks
posted 2005 Nov 27
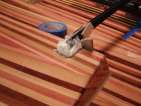
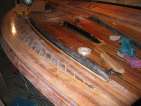
Continuing work on the deck. First, I applied a layer of
graphite & 407 filler to the step edges, transom bar, and sides of
the rails. This involved a good sanding down of the rails
& steps, then a thick layer of epoxy/graphite/407. Six squirts
covered the transom bar and one step + rail; another three polished
off the other step and rail. Next: sand all that off.
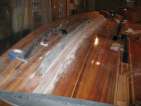
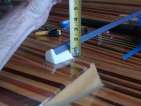
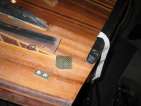
Next, I started working on installing the jib track. First, I
cut off the ends of the 49er track - the track should overlap the
wings by about 2 1/2”. I then used sandpaper and a metal file
to clean off the burrs and smooth things out. Using Mark's
instructions, I positioned the track -
insert a rod into one of the centre holes, then adjust it so the rod
points at a position 36” above the top hole of the forestay
fitting. Looking down from the bow, you should see a dot.
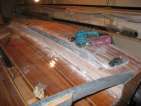
After positioning, tape the deck (using packing tape), then hot
glue down a block for a base (I used half-width bulkhead
material). Next, hot glue in a block to ensure the rail will be
correctly positioned fore & aft. Add a dot on the block to ensure the
rail is correct port-to-starboard.
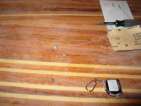
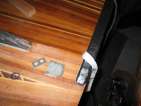
Once everything is positioned, I mixed up some
epoxy/graphite/404-high-density filler, and added in 1/2” scraps of
s-glass. The s-glass makes the epoxy much more thick - it's hard to
get it to stop sticking to the spreader stick. Put a big blob on the
base block and press the track in place. Once it's cured,
tap the blocks on the inner edge to "slide" them off the ends. Sand
them down to shape.
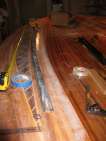
While I was working on those (and letting them cure), I figured I
would place the final couple of blocks for the trapeze line and
righting block. To do this, I had to align the blocks with the exit
from the toe rails - which meant threading line through the rails.
The line tended to get bunched up inside the rail (hope that won't be
a problem...) but with a coat hanger and some scraping, it made it
through. These blocks take 6-32 bolts; positioned about 40”
back from station zero and 1” in from the edge of the gunwale.
Starboard's backing block had a bit of a squeeze, but worked out ok.
Howto: Attach the jib track
posted 2005 Nov 23
One of the next steps will be attaching the jib track. It's not
really well described in the manual, so I did a bit of research on the
archives (ok, really my errata), and
found this.
- (link)
VMG's new way of mounting the jib track - on top of the wings.
- (link)
- First, cut the track so it leaves about 2 1/2 inches overlapping
on each wing.
- When you start sanding (grinding) the part of the tract that
rests on the deck at the top of the step you'll want to use the
following method of determining the angle of tilt. You'll use the two
holes in the centre of the track as a sight. They should intersect a
vertical line from the top centre of the forestay fitting about 36"
above the top of the forestay flange. Another words, set a tape
vertically on your forestay fitting and sight past the 36" mark into
the holes in the track. You should see a full moon in each hole. If
not, tip it until you do.
- (link)
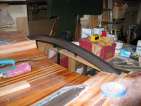
When the jib track is installed on top of the wings, the shock
cord must be routed under or over the track. Here's VMG's
solution.
- (link)
Mark White posted a picture of what he had done.
In talking with Mark, he suggested the following:
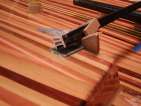
First put packing tape on the deck and down the steps
where you are working. I took a piece of leftover material from the
mainsheet cam base material and cut 2 rectangles, and tacked to the
packing tape on the deck in the correct position, with hot melt glue.
Cut the jib track so it has 2 1/2” resting on each side of the
wing. Take packing tape and carefully cover the ends of the jib
track, pressing into all the angles and wrap around the ends. Stack
2”x 4” blocks or whatever and some shims in the centre of
the deck to get the angle set and to balance the track. The angle is
in the errata, if I remember correctly, use the 2 holes in the middle
of the track for alignment. I inserted a 3/16” rod into one of
the holes, couldn't see the hole itself, and align to a point
36” vertically over the bow fitting, I raised that point to 36
1/2” since the track was raised 1/2”. Tape the blocks
together so they don't shift.
Hot melt glue a block on each wing (covered with packing tape),
with a tab that fits into the track to hold it in position fore and
aft and to form a dam, and glue a block on the track on each side to
hold the track in place p&s. Mix some epoxy and high density filler
with some chopped fibreglass cloth (1/2” in length), peanut
butter consistency, and fill the underside of the track. Press down
onto the rectangles tacked to the deck, and finish filling under and
all around to achieve the desired shape. You might want to add some
graphite powder to the mixture to keep from sanding through the
finish, if you want it black. Snap them off the track when cured, and
sand, fill, and finish.
There is room for the righting line to pass through the block
under the track (remove track first, it will be slightly in the way of
your hole when drilling, but not enough to block the line). I'm
sending 2 pictures now and 2 more separately. If you have any
questions just ask. The position of the track from station 0 is on
the deck plan, but Bram said to move it aft 1/4” to compensate
for the extra 1/2” of height.
Add an extra set of blocks to the ones glued to the step (to set
it back on to the wing a 1/4"). So the first block is wedge shaped
and sits on the edge of the step, then one glued down the side of the
step, if you know what I mean.
The blocks I made have ends and a back on them, although probably
not necessary. You will notice on your jib track a slight concave on
the backside. I had to sand out the "ridge" in the blocks this
created, so you can remove the track for refinishing, if you bond the
blocks to the deck. If you could fill this concave, maybe with wax or
something you could avoid having to sand, or just not have a back. So
far I have not bonded the blocks to the deck, and may not, just
through bolted with blocking and tee nuts inside the hull. You will
have to drill new holes for attaching to the deck, mine are on an
angle to the deck, drilled vertically through the track. If you go
this way, keep the holes in your deck 3/16 so when you tighten the
bolts the whole assembly doesn't creep foreword. Only the backing
block will need to be drilled larger for the tee nuts. The backing
block will set over station 8 also, so you will have to trim an extra
1/4" off starting at the step and out however wide your blocks are
when fitting the deck and hull.
More on the bow
posted 2005 Nov 20
Installed the jib
downhaul eye backing block this week. But mostly cleaned up the
bow fitting. First, I added some extra filler under the fitting to
make it better conform to the underside of the fitting. I also used
plastic to separate it -
mylar doesn't want to conform.
Once that was complete, I sanded everything down and applied some
filler. To get the
surface nice and roughed up, I used my (new!) dremel tool - I bought a
small sanding spindle and used that to rough it up. The dremel is
great for these small nooks that need a bit of roughness to keep the
epoxy - I'm glad I got it. It will be useful. It needed one final application but after
that things were fine.
Next, position the bow fitting, and drill holes for the 1/4"
bolts. I drilled the holes for port slightly more "upright" than the
ones on starboard - and as a result the heads of the bolts better fit
up against the fitting. I hope this doesn't make a difference - this
sees a *lot* of stress, as you can tell by all the reinforcements
which are done here.
And then prepare the underside of the bow for two layers of
s-glass reinforcement, 12” back from the bow. I decided to not
apply the glass right away; I'll wait until I take the deck off the
forms and clean up the underside a bit.
Sailing
posted 2005 Nov 16
Went out sailing on the weekend - I went out with a friend from
work on his Laser II. It was a blast. We put in at the Newport
launch, just south of I-90 on the east shore of Lake Washington.
There was a nice 10-15 knot SW wind which funnelled up between Mercer
Island and the shore - not quite enough to get out on the trapeze, but
still great sailing. (Oh, and it rained and "heavy misted" most of
the time we were out - but sailing's a water sport. You get wet.)
This was the first chance I got to test out all my brand-spanking
new gear:
Of course, all that sailing around made me really "boaty" (as a
co-worker would say). I'm itching to sail now... I came home and put
together a Christmas gift list which was all sailing gear.
- Ultimate Sailing calendar 2006 - I have 2005, and really like
it.
(link)
- sailing gloves: either the ronstan "sticky race gloves" or the
Gill "pro gloves". Three fingered. Lg.
(link)
- Rash guard: long sleeve, XL
(link)
There are more here: I like the "Gill Men's Rash Guards" LS
(link)
- Ronstan clear start wristwatch - i.e. - digital, big numbers,
waterproof, and easy to read as you're blasting up the race course
and thinking "do I need to get home for dinner?" (and doesn't break
the bank: Suunto makes interesting
watches that meet these
requirements, but they're too expensive)
(link)
Creating the bow fitting
posted 2005 Nov 13
Did a couple more backing blocks. First up was the backing block
for the trapeze shockcord routing blocks next to the transom bar.
These are two 20mm blocks stacked on top of each other - I figured a
double layer of bulkhead material would help with the sideways force.
20mm also have 6-32 holes. To hold the nut in place (there are no
6-32 tee-nuts), in the second layer of backing I drilled a 7/16” hole halfway
through the cedar. In that hole, I will bond a square nut with plenty
of epoxy/404.
Also installed a backing block for a downhaul next to the mast.
Because it's right near the centreboard trunk, it can't go over too
far - and thus must be cut off before it hits. By my measurements,
there will be 4mm of
space between the edge of this plate and the edge of the trunk. I
hope the trunk is vertical...
Next was to create the bow fitting (now that the dam is in
place). The final version of the dam I made out of foam-core (Tamara's
suggestion) - I covered it in packing tape, and it seems pretty good.
It's rough on the inside edge - but not enough to be concerning.
So:
- Wrap the spin
pole in plastic sheeting, and tape
- Mix 10 squirts epoxy with colloidal silica and 404 high
density filler
- position spin pole in correct location
- 10 squirts of epoxy/205 starts to kick and kicks with a lot of
exothermic activity
- See smoke
- Panic when you realize the plastic is melting
- Rip spin pole out of place
- Breath sigh of relief when you discover you've saved yourself
from having a permanently deployed spin pole
- Explore the curious
properties of kicked & hardened but not cured epoxy as you
crack the excess out (and wipe off all the unkicked, uncured
epoxy)
- Sand out the mess
I checked with Bram and the answer was "use mylar". I picked
some up 5-mil mylar at TAP
Plastics. Two wraps around the spin pole, and try, try again.
This time I mixed up a bit less epoxy (7 squirts + fillers), and put
it in place and let it cure a bit before I added in the second batch -
so some of the exothermic activity could pass by before I add in more.
I put another sheet of mylar on top, positioned the bow fitting,
and let everything cure.
Worked great - no sticking this time. A bit of sanding and all will be
well. The biggest problem was that the epoxy squeezed out from under
the top piece of mylar (the piece the bow fitting was sitting on top
of) and then enclosed the front edge of the mylar in the epoxy. It
all had to be sanded out - the mylar wouldn't work itself free. I
will have to put another round of filler on the top edges of this
block of epoxy - the 5-mil doesn't tightly conform to the underside of
the bow fitting, and so the fitting doesn't sit quite right. But it's
sure looking sleek.
[Update 2005 Nov 25: In retrospect,
for this big hunk of epoxy, I should have added in some chopped up
s-glass bits - provide a bit more strength for the fitting. I'll do
this for the jib track mounts, I should have done it here too.]
[Update 2008 Jan 01: I seem to recall
that Bram mentioned at the 2007
regatta that he was thinking of bonding a tube of carbon
fibre/glass into the deck as a forestay fitting. Then there's no
messing around with big gobs of epoxy or dams or anything else. Worth
considering, if you can figure out how to build the right fittings on
top...]
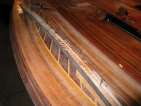
Bonding toe rails
posted 2005 Nov 7
Things are going rather slowly at the moment - at work two nights a
week, which doesn't leave much time for "other stuff" at home - I'm so
tired the last thing I want to do is build boats. Vegging in front of
the TV is about all I can muster.
Bonded the toe rails in place this week. I followed this
procedure:
- Positioned them on the deck (being sure they were the right
position on the opposite side, as well).
- Drew a line around the outside, so I could get the rail back
to that spot again.
- At numerous points on the underside of the rail, I measured
the distance from the edge to the cedar strip filling the groove.
Halve that (plus a certain adjustment depending on the slope of
the rail at that point - the inside edge slopes up more strongly)
and then measure on the deck that location.
- I'm using nine screws - four on the inner edge, five on the
outer edge. Mark points on the deck so the screws are equidistant
from each other (and the ends of the rail), and the right distance
in from the edge.
- Drill pilot holes down from the top through the deck.
- Position the rail, and drill up. Check the holes are ok.
- Mix a *ton* of epoxy and filler, thoroughly cover the
underside of the rail. I used the confectioner's trick of putting
the filler in a plastic bag, cutting a hole in a corner, and
squeezing it out.
- Position, and screw in place. The fillets are
1/2” radius on the inner and outer edges; at the ends, I
used a squeegee to remove the excess epoxy.
Then repeat for the other side. I started out with around 7
squirts of epoxy, and had to add in another two to fill everything
in. There was a small void underneath the rail - and as I filled it
in, it would blow bubbles and those would rise (slowly) up to the
surface of the fillet. It's super annoying. Put too much on the rail
to begin with.
Next up, I began working on the bow fitting. I placed the bow pole in place (and
thought "good heavens what a lot of sail") and measured 7 1/2”
inches back from the bow, and cut a pattern. I checked with the bow
fitting - and 7 1/2” isn't far enough back (good thing
I checked). I moved it back to 10” inches, which fits much
better. Note that the deck placement plan includes a position for the
top hole of the bow fitting to sit - and this defines where the bow
fitting should be positioned, and thus where the aft edge of the dam
should go.
Page 33 of 62
« First
…
«
31
32
33
34
35
»
…
Last »