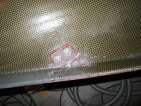
Deck touches hull!
posted 2006 Jan 29
I had promised myself that I would only have the deck in my car
bay for a week - that I could get all the protection patches
completed in a week. In the event, it took three. So it goes.
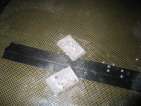
This week, I started out by putting an additional layer of 1”
e-glass tape on all the 6-32 nuts. I figure this is a small precaution
to take vs. trying to fix one of these after the fact. It does seem
to help, they are more tightly fixed in place.
I also glassed the
second centre bevel block, installed more tape, and then drilled the holes for the
6-32 bolts with the nifty
triangle bit on the Dremel tool.
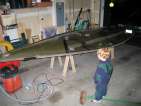
Once that was done, I was pretty much ready to get everything
together. I rearranged,
moved the deck, placed the cradle, lowered the hull, and placed the deck. Whoohoo!
Once that was done, I hooked the deck up to the roof pulley system. I
had to do some slight repositioning of the stand to ensure I could
just pull straight up and down, but (luckily) it worked out well, and
I don't have to push the deck around much to get it into position.
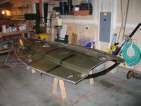
A note on the stand - it's four 60” 2x4's (cull from the
Orange Borg), with scrap 5/8” plywood nailed on to the ends.
The large end is 40x23, the small end 37x19 (these were mostly chosen
as a result of the scrap I had lying around). I nailed another
6” wide scrap of plywood diagonally across the bottom two 2x4's
to provide some stability. The cradle sits on the top 2x4s, and is
held in place by a couple of 2x3s (a cut-in-half 2x6). Seems stable
so far.
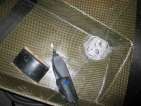
The first bit of fitting I did was on one of the backing blocks for
the trapeze cord; it needed around 1/8” shaved off in order to
fit behind the block on the transom. Trusty Dremel to the rescue.
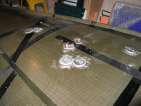
Protection patches, continued
posted 2006 Jan 22
I completed the second round of protection patches this week. I
scraped up the backing plates for the traveller bar - there was some
overhang involved here, so the Dremel was particularly helpful. (The
Dremel tool I bought on impulse, but it's been really helpful in
getting into tight spots...) Once everything was scraped up, I
applied liberal amounts
of epoxy/404 so the s-glass wouldn't have to go around a tight corner.
I bought a small triangular bit for the Dremel and used that to drill through all the
s-glass I had installed so the bolts could go through.
One of the two rectangular backing plates I
didn't install nuts on. So I drilled out a hole for the nut, in
preparation for the epoxy/404. While filling in the traveller bar
backing plate, I also bonded
the nuts in place and filled in the areas around the nuts so the
protection patches will fit nicely.
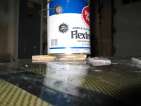
Once everything was cured, I sanded it all down, and went back and
applied a layer of s-glass to the rectangular blocks. Once I covered
it with epoxy, I put a sheet
of plastic and a layer of foam over it, then applied
pressure. This worked fairly well - down in the valleys there's a
couple spots where the glass didn't touch the backing block, but
overall it held quite well.
I also went back and filled in a couple holes I
drilled adjacent to the real hole in one of the blocks - the drill
slipped.
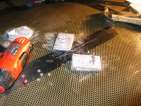
I have to say, the small 6-32 bolts are supremely annoying,
particularly the cleat bevel blocks. If the bolts pull out or the
nuts fall off, I'll be unhappy. Part of this is because I can't
figure out how I would replace the nut, or how I would bond a wood
screw into the same hole the machine screw went into. I've broken a
whole string of these 2 1/2” long 6-32 bolts; they are really
easy to torque the heads off of. And I wonder if they'll be the best
solution for the problem. Christian
suggested through-bolting them; but what a hassle.
I also finally figured out how to best apply grease to a bolt. You
squirt some grease onto a plastic sheet, then roll the bolt in it
lengthwise until the grease is evenly applied. This works really well
- no wiping off excess and then reapplying, it produces an even
application.
Finally, the only thing I wondered about while putting all these
patches on was this. In many spots the tee-nut was pounded into the
backing plate, and there was no excess epoxy which sqeezed out around
the edge. This means that there's a sharp transition from edge of
tee-nut to backing plate. When this happened, the protection patch
couldn't bond to anything right at the edge of the tee-nut. It may
have been worth going back and adding in a little extra epoxy around
the edges of the tee-nuts, just to be sure the patch had plenty of
surface area to stick to.
[Update 2008 Feb 25: Buying that
triagular bit was exactly the wrong thing to do. The glass needs to
stay in place, because water can seep in through the bolt holes and
get into the inner air chamber. I may have to epoxy all my bolts in
place to stop seepage.]
Backing for bow fitting, protection patches for tee-nuts
posted 2006 Jan 15
Finally got to the point of flipping the deck back over. All the
holes are drilled and backing blocks in place, now all that's left is
to install the backing for the bow fitting, and put "protection
patches" of s-glass under the tee-nuts. These patches should stop the
tee-nuts from popping out (which would be a real disaster - there's no
hope of getting in there to fix the problem...)
So, I flipped the deck
back over and checked everything out - generally looks pretty good. I
sanded down all the
backing blocks. There were a couple 6-32 square nuts which needed to
be re-seated, so I
started working on the backing for the bow fitting.
This backing is two
layers of s-glass/hybrid, plus a whole bunch of epoxy/high density
filler. It takes maybe 10 squirts to fill it all in. Because it's so
far forward, I sheared off the leading edges of the backing plates
(and I'll have to remove more, it doesn't mesh nicely with the hull).
To ensure the backing block was level, I put a level on the main part
of the deck, and then a small level on these backing blocks, and made
sure they levelled out as well.
Once that was complete, I cut the backing pieces. I screwed each
screw into its tee-nut so it was flush with the bottom of the tee-nut.
There were a couple exceptions - the pole ring saddle bolts, the spin
block backing piece. Here, I don't expect to have to remove these, so
I just cut small holes in the glass at the right spots and slipped it
over the bolts. Then, with the screws all in place, I went around
with a syringe of grease
and filled in the areas between the bolt and the nut, to ensure extra
epoxy didn't pool there and stop the bolt from going through once
everything is cured.
Then, just paint all the glass with epoxy, and sand the excess off once
cured.
[Update 2006 Aug 20: I learnt later
that any big hunk of epoxy and filler like this is usually better
if it includes a bunch of cut up s-glass as well. The s-glass adds
additional strength to the mixture.]
My screw collection
posted 2006 Jan 8
Because most of the screws I've used I've had to order (they're all
stainless, and I wanted to use square drive where I could), I've got a
pretty complete list of screws I used to hold everything together.
Herewith, a list:
| Date |
Vendor |
Part No |
# in package |
Description |
qty |
| 3/17/2006 |
West Marine |
? |
1 |
#10-24 Stainless Steel acorn nuts |
4 |
| ? |
1 |
#10-24 Stainless Steel cap nuts |
4 |
| 3/12/2006 |
McFeely's |
3604-BI-D |
pkg of 25 |
#10-24 Brass Threaded Inserts |
1 |
| 3604-SRT-D |
pkg of 10 |
#10-24 Stainless Steel Threaded Inserts |
1 |
| RMS-1012-D |
pkg of 25 |
#10-24 x 1-1/4” Stainless Pan Head Machine Screw |
1 |
| RMS-1014-D |
pkg of 25 |
#10-24 x 1-1/2” Stainless Pan Head Machine Screw |
1 |
| RMS-1412-D |
pkg of 25 |
1/4”-20 x 1-1/4” Stainless Pan Head Machine Screw |
1 |
| SSN-2520-d |
pkg of 10 |
1/4”-20 Stainless Steel Tee Nuts |
1 |
| WSF-0400-D |
pkg of 25 |
1/4”-20 Stainless Fender Washer |
1 |
| WSS-1024-D |
pkg of 25 |
#10-24 Stainless Flat Washer |
1 |
| 8/29/2005 |
McMaster-Carr |
91772 A703 |
pkg of 10 |
18-8 stainless steel pan head Phillips machine screw, 1/4”-20 thread, 4” length |
2 |
| 8/30/2005 |
McFeely's |
FMS-1020-d |
pkg of 25 |
#10-24 x 2” Stainless Flat Head Machine Screw |
2 |
| SSN-1824-d |
pkg of 10 |
#10-24 Stainless Steel Tee Nuts |
4 |
| RMS-1020-d |
pkg of 25 |
#10-24 x 2” Stainless Pan Head Machine Screw |
3 |
| SSN-2520-d |
pkg of 10 |
1/4”-20 Stainless Steel Tee Nuts |
1 |
| 9/07/2005 |
McMaster-Carr |
91831 A029 |
pkg of 100 |
18-8 stainless steel wing hex nylon insert locknut, 1/4”-20 screw size, 7/16” width, 5/16” height |
1 |
| 90313 A205 |
pkg of 25 |
18-8 stainless steel large-od flat washer, 1/4” screw size, 17/64” id, 7/8” od |
1 |
| 90107 A007 |
pkg of 100 |
316 stainless steel flat washer, 6 screw size, 5/32” ID, 5/16” od |
1 |
| 90257 A007 |
pkg of 100 |
316 stainless steel machine screw nut, 6-32 screw size, 5/16” width, 7/64” height |
1 |
| 91772 A161 |
pkg of 100 |
18-8 stainless steel pan head phillips machine screw, 6-32 thread, 2 1/2” length |
1 |
| 91772 A157 |
pkg of 100 |
18-8 stainless steel pan head phillips machine screw, 6-32 thread, 1 1/2” length |
1 |
| 9/26/2005 |
McMaster-Carr |
94785 A007 |
pkg of 100 |
18-8 stainless steel machine screw square nut, 6-32 screw size 5/16” width, 7/64” height |
1 |
| 92001 A281 |
pkg of 25 |
18-8 stainless steel wing nut 6-32 screw size, 23/32” wing spread |
1 |
| 9/30/2005 |
McFeely's |
0605-PSS-C |
pkg of 100 |
#6 x 5/8 stainless steel pan head square drive wood screw |
1 |
| 0805-PSS-C |
pkg of 100 |
#8 x 5/8 stainless steel pan head square drive wood screw |
1 |
| RMS-1410-D |
pkg of 25 |
1/4”-20 x 1” stainless steel pan head square drive machine screw |
1 |
| RMS-0610-D |
pkg of 25 |
#6-32 x 1” stainless steel pan head square drive machine screw |
1 |
| 10/02/2005 |
Fisheries Supply |
4110B |
1 |
#6 x 1/2” stainless steel pan head square drive wood screw |
20 |
| 4120B |
1 |
#8 x 1/2” stainless steel pan head square drive wood screw |
20 |
| 4206B |
1 |
#6 x 3/8” stainless steel pan head square drive wood screw |
12 |
| 4208B |
1 |
#6 x 1/2” stainless steel flat head square drive wood screw |
20 |
| 01/09/2006 |
McFeely's |
RMS-1410-D |
pkg of 25 |
1/4”-20 x 1” stainless steel pan head square drive machine screw |
1 |
| RMS-0610-D |
pkg of 25 |
#6-32 x 1” stainless steel pan head square drive machine screw |
2 |
| RMS-1024-D |
pkg of 25 |
#10-24 x 2 1/2” stainless steel pan head square drive machine screw |
2 |
Page 31 of 62
« First
…
«
29
30
31
32
33
»
…
Last »