Taping things off
posted 2006 July 31
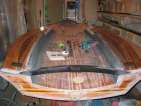
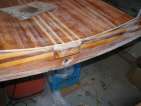
This week was getting tape down and getting ready to do the black
trim. That, of course, meant I had to
do
more
sanding. Once the
sanding was complete, I applied the yellow-green 3M masking tape (the good
stuff). Along the wings, I measured out from the rail 3/4” and
make a small mark, then placed the tape edge down on them. Getting
the gradual curve to be fair takes some doing - the trick is to ensure
that it doesn't buckle and ridge - if it doesn't form a ridge, then
the curve is gradual enough and it will be fair (enough).
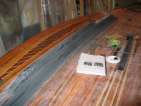
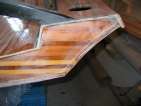
I tried a couple patterns in the front part of the deck. At
first, I wanted to leave some of the nice 1/4” yellow cedar strip showing
on the gunwales - but this looked kinda goofy in matter of fact, and
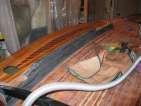
so I just covered the gunwales up (sigh). The transom took a bunch of work
(lots of curves and angles). To get the curves nice and smooth, I
used both a "Vary Form" and a set of French Curves - both were pretty
useful. Once all the green tape was on, I made sure everything was
pressed down tight (a putty knife helps here), and then applied the blue tape to catch any
escaping epoxy. The blue tape also helps afterwards - when sanding
down the epoxy, you first see blue, then see green, so you can tell
how far down you've gone.
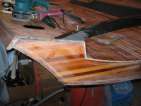
I also filled up a couple spots - between the deck and transom as well as the
transom bolt heads. Most
importantly, I filled under the bolt heads on the bowpiece -
the force needs to be applied downward on the entire bolt head, not
just the edges.
Catching up
posted 2006 July 24
Took seven weeks off. Went on vacation. Busy at work.
Busy at home. Or maybe it
was the mail from Bill Scheumann
describing what he had done in the *year* since he was at the deck
bonding point:
Warren,
Since that bonding picture, I have cut the CB trunk holes, made the CB
cassette, finished the hull and topsides, built the rudder and CB from
Greg's foam blanks, made the rudder cassette and tiller from Greg's
blank and started the black trim. I painted the top sides because I
was not happy with the way the s-glass came out. Below is a picture
showing the 2-part Epifanes bold blue poly with a white boot stripe.
The paint has been wet sanded to 2000 grit. All of this took me time
because I'm fussy (too anal in other words) and the demands of my job
kept me out of the shop.
I cut the CB trunk holes just before bonding the deck, but I like
Roger's
method of cutting them before installing the trunk in the hull,
after careful measurements. The holes are easier to cut without the
trunk in the way. He then used 2" wide wooden blocks, wrapped in
plastic wrap, placed in the two openings to position the trunk in it's
precise location between the hull and deck while bonding the trunk to
the hull. This method holds the trunk in the precise vertical
position while it cures. The holes later make it easier to clamp the
centre of the hull when bonding and fitting the deck. If your trunk
is already bonded in place, cut the rough lower hole while the boat is
flipped, after drilling some pilot holes for the saw blade. The angle
of the hull tips the saw blade away from the trunk sides, but be
careful not to hit the top of the inside trunk wall where the block
will rest. I used a rasp to finish the edge. The deck hole is more
difficult to cut if the two deck control blocks are in the way, so cut
the hole before mounting them on the deck.
Anyway, I did a little bit. I sanded down the trailing edge of the deck so
it was flush with the transom. To do this, I took the belt sander and
carefully aligned it up so it was parallel with the transom, and took
off most of the edge. Once it got pretty close to flush, I put a piece
of metal flashing against the transom and used that to protect it from
going too far. Once really close, I used the flashing with a regular
sanding block to get to flush.
I sanded down the inner
edge of the step and toe rail on starboard side (finally - port
was done back in April).
I sanded down the deck,
just to take of the high stuff. I sanded down the bow (which was really wavy)
using the belt sander.
I rasped out more of
the hole for the centreboard trunk. I also bonded the bolts into the
transom bar and through blocks (finally - this was supposed to be part
of bonding). Plenty of epoxy/403 to fill up the entire hole, rolled
the bolt in it as well, and screwed it into a stainless square nut in
the hull. Then added a bit more epoxy around the nut in the hull and
the bolt on the top.
And finally, I removed the
chainplates, cleaned the wings with acetone, put another layer of epoxy
down. I've been meaning to do this ever since I first glassed the wings and left a
stippled surface...