Wetsanding and Varnishing links
posted 2006 September 28
I've had these links in my files for ages. Time to put them in.
- (link)
talks about wetsanding & steel wool
- (link)
varnishing a kayak. One of the interesting points One Ocean Kayaks
makes is that one part varnish cures by allowing the volatile
solvents to evaporate. Two-part
varnishes cure by "reacting together to form a solid which is
superior to varnish (or other single component systems) in all
desirable mechanical properties. This includes hardness, scratch
resistance, solvent resistance and surface quality, namely
gloss."
- (link)
varnishing (& steel wool, wetsanding)
- (link)
Sanding to a mirror finish
And of course, I mentioned it a bit here. I'm using real running
water now - and it works a LOT better than using a bucket. Using the
bucket you sand small particles into even smaller ones. Using running
water, the sanded off particles are washed away.
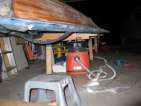
Wetsanding
posted 2006 September 25
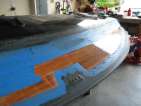
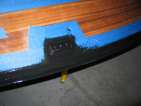
So with Yet Another Black Layer on, more sanding beckoned. And I finally
figured it was time to take the tape off. First the blue
stuff, which was pretty easy - very little extra dripping. Most of the
problem was because this tape folded into ridges, those ridges were
sanded away, and I couldn't pull off the entire thing in one piece. I
probably used more than I needed to in the bow, there wasn't enough
dripping to justify covering the entire thing (although it does
provide protection against drips from the brush, and that can be
equally important).
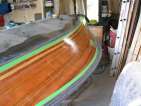
Next, the green tape.
This is great tape, it came right off. Just be careful to pull up
toward the black line (so the tape is being pulled up toward the
black). I also lifted it off with a very acute angle,
so it wouldn't cause chips in the black. Occasionally I scored the
black with a knife, or used my knife to get the tape started again -
but overall, it looks great.
There are a couple spots where the different pieces of tape
overlapped, and there's an
edge (which can be cleaned up fairly easily). There are other
spots where the epoxy squeaked under the tape and so the edge isn't
quite as sharp as it should be - and this it's much, much harder to
get rid of. Make SURE the tape is pressed down hard (I thought I had)!
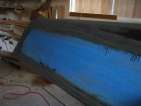
Next: Wetsanding.
Wetsanding is highly effective. Sanding this way is just
awesome. The paper sands quickly, it never clogs, you don't have to
wear the respirator... You just get a bit wet, and it's a bit messy.
Glad we had a warm week.
The objective is to get everything to have the "dull" look - it's
starting to appear here.
To control the water output, I went down to Orange Borg, bought the
cheapest hose I could find and a couple small drill bits, and then
drilled holes into the first six feet of the hose. This turned out to
be too long - two feet
was about right.
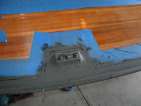
While the hull is wet, it's really hard to tell what needs sanding,
especially on the wood. I finally took the plunge and decided to draw
on the hull - and cover it in permanent marker ink, then sand it all
off (the idea comes from here). This
method turned out to be very effective. It's really easy to see
what's done and what needs a bit more sanding. I only wish I'd done it
to begin with (so I would have removed less epoxy).
Perfection.
I then marked up a few
spots which needed more, and then sanded down port side.
More black, black
posted 2006 September 18
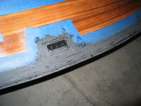
Well, last week I managed to sand through a couple spots, and left
a few zebra stripes, and
so after a wee bit more sanding it was time for
another layer of black. I sanded down with 100-grit on the gunwale
edge, and used the random orbital on the entire thing - probably a
mistake, as I took off the black on the backing plates. I've come
to the conclusion that 1) for the black, it's worth using 100-grit
paper so you don't go too quickly (and it doesn't leave the same
scratches), and 2) you're always after the least number of strokes
with the paper. One stroke too many, and it's another layer of
black that has to go on.
There were a couple spots that needed another layer of black - I
sanded through the black below the chine, on the backing blocks, and had the
zebra look where the
gunwale tape "stepped down" to the hull itself.
I did the next application on a Sunday so I didn't have to do it
overnight. The plan was to only lightly apply black to the areas that
needed it, but I covered most of the black along the gunwale (although
I didn't paint into the gulley between the gunwale and hull - already
enough epoxy in there). The first application was two
3-squirt cups. The second
application was only one, and I used up not quite all of it. It's
getting cooler here, so the epoxy didn't cure quite as quickly as it
did last week - but it was still far enough along for the next step.
And the third application
was one 3-squirt cup that I finished off, lightly applied.
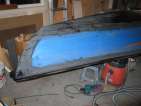
Black on the gunwales
posted 2006 September 11
Finally got the black on the gunwale. This took a bit of doing -
had to wait for the time to do it, and to ensure that the next day I
could stand not having slept.
The way I've been doing these multiple applications of epoxy 3
hours apart is by doing them overnight. With two small kids running
around, this is pretty much the only way to go (other than forcing
the kids on Tamara, which isn't fair).
You might expect that I'd be a wreck after these sessions, but
overall they haven't been bad. I try and wait for a weekend, but
given this experience I may try during the week.
The trick is this. Get the kids to bed early, and dive in with the
first application (I also
did the transom and the blue-marked spots on the
deck). This takes the longest, usually an hour; done at 8pm. Come
back 3 1/2 hours later (11:30pm) and do the second layer (30 minutes).
Set the kitchen timer for 3 1/2 hours and immediately go to sleep on
the couch. Come back 3 1/2 hours later (3:30 am) and do the third layer. Go to sleep in
bed. If you need a fourth application, do it when you wake up in the
morning.
Working like this, I got the black done on the gunwales, and was
pretty functional the next day. The hardest part is getting to sleep
at 4am - I was pretty awake.
For these applications, I used the recipe of 3 squirts epoxy/207
hardener, 1/2 tblsp graphite, 1 tsp (packed) 410. I'm not sure this
made a huge difference, but it does seem to be a slightly lighter
shade.
Finally, after a mere nine hours after the last coat, I returned
and sanded down what I
had applied. It was shockingly easy. The epoxy hadn't cured rock
hard yet, and as a result it balled up and fell away. I
could sand down everything, and didn't really need the dust mask. I'm
not sure if this is due to the 410 or because of the only nine hours,
but sanding sure was easy this time.
Taping the gunwales
posted 2006 September 4
Time to get the first layer of black down on the gunwales. I
started by sanding off
the tape - this was easy, although I wound up sanding off quite a bit
of the bottom edge of the gunwale as well, and I'll have to go back
over with another layer of black (sigh). Once that was all clean, I
taped both the upper and
lower edges. The upper edge needs a sharper line - something I have
meant to do since I put the black on the hull. I put a few nice curves in, then covered up
the remainder with blue tape.
I removed the tape on the "top" edge of the gunwale -
although I should have put some back so I wouldn't get drips on the
edges. I then trimmed
the bow down a bit, and I think I'm ready to go.
Page 23 of 62
« First
…
«
21
22
23
24
25
»
…
Last »