Did the taxes
posted 2007 March 26
Spent the last two weeks doing the taxes (one to mope about and
avoid the problem, the next to actually do them). I hate doing taxes.
Tamara didn't to use an accountant this year (too expensive), and so
instead I sat down with my copy of TurboTax and answered such
questions as "did you have any contracts or saddles?" and declared
that I did not have a form 6478 "Credit for Alcohol Used as Fuel" (why
waste perfectly good alcohol on *that*?)
I talkedcommiserated with my dad about doing taxes, and
his answer to the bizarre questions was good: "I figure I'm a
relatively smart guy. If I can't figure out what the question means,
well, I just guess." That seems like a fine principle to me. What
the hell.
For an evening TurboTax was telling me that I owed $11,000, had to
pay the AMT to
the tune of $2,000, and owed a $600 underpayment penalty. Not to
mention that I had to pay $4,000 quarterly in estimated tax payments.
Lovely.
That nightmare passed, however (don't forget to declare your
carryover capital loss from last year's return in both the standard
and AMT columns...) and I recovered my good nature.
Rudder box extracted!
posted 2007 March 12
So I layed up the rudder box Feb 17. (I layed up the
rudder way back in December.) And this week I
actually managed to remove the rudder box from the rudder.
This had me stymied for quite a white. I first figured there was
just too much friction, and decided to cut out the newspaper in the
flat section of the board. First, I used the Japanese pull saw (thin)
to get in there and rip out the paper. Once most of the paper was
gone (except for the leading and trailing edges), I used my regular
wood saw (not thin - cuts against the paper itself) to remove more
paper.
With just pushing and pulling, this didn't get me anywhere. I
needed more force. So I started whacking the bottom edge of the
rudder box with the end of a bar clamp. This got me to about 1
1/2” off the top end; not too bad, but still a long ways to go,
and the part was completely stuck.
I asked Greg for suggestions. Here's what he proposed:
First prep the top or bottom edges of the cassette. I would mark a
straight line and use my dremmel and a flat bastard file to get a flat
top or bottom that can rest securely on a box jig see below. Be
careful of your rudder but it sounds like you have some 1/8th inch
gap.
Take a piece of hardwood or good thick plywood (build from several
layers epoxied together) about 1 inch thick 2 inches wide 30 inches
long. Cut it into a 2 lengths 4 inches longer than the chord of the
rudder. This will leave a 2 inch overhang in front and back of the
blade/cassette. Cut some 1/2 to 2 inch blocks of the leftover
material as end spacers.
Make a box frame with the spacers (sand them to thickness if
necessary) so that the box is narrow enough to just fit the blade at
its thickest part. but too narrow to allow the cassette to pass
through. Use regular wood glue to glue the parts together one evening
and use it the next evening.
Use some more hardwood 2 inch square scrap cut or sanded "thinner"
to make some blocks that fit inside the box frame at the trailing edge
and the leading edge rounds so that there are multiple points that
touch the cassette top but do not touch the foil.
Since you have polished your blade, you might want to put some thin
material from an old t-shirt inside to prevent scratching. If you do,
use a little spray of super 77 for that and trim the edges so they
wont ride up and bunch up and block the insides.
Screw the box jig down to the middle of your workshop bench through
its ends as shown in the diagram with a few good long drywall screws.
Now you have a choice of push or pull. Since you have filled the
top of the board with epoxy you can do either.
For push: Take a piece of hardwood timber about 3 1/2 inches
wide and 15 inches long and sand or cut thin enough so that it would
pass through the cassestte at the thickest part. Screw another
hardwood cleat block to the bench to push against so that your car
jack can be used to slowly and gently apply pressure to the top of the
blade and push it through the cassette. Enormous pressure can be
applied directly horizontally this way and it will push the board
out. You might have to run a strap around the cassette to stop it
bucking up out of alingment if there is a hangup inside.
For pull: Use the bench cleat inside the jack frame to pull
against screw two nice big ring bolts securely into the epoxy at the
top of the board. Make sure the threads bite into the epoxy
well. Imbed them with 5 min epoxy if you like. Use 1/4 inch line or
better to make a tackle fall (one of the triple block sets) to a
screwed down cleat on the bench and heave away to remove the blade
from the cassette.
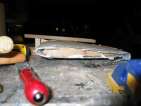
Because I already had the blade partly extracted, I went with push.
I built the jig and
glued it together.
Unlike Greg's suggestion, I made the flat parts of the boards run
along the (mostly) flat part of the blade - then I just needed shims
at the leading edge. I also cut an insert for the top, so I
would spread the force out along the entire top of the epoxy plug.
My first attempt was to try and use bar clamps instead of a car
jack to apply the force. This worked, but only so far - it got me
from about 1 1/2” overhang to about 3 1/2” overhang. But
then it was completely stuck.
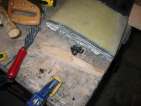
So then I decided to go for the full-on car jack approach. I through-bolted the entire
jig on to my bench, and bolted a stop-block to the edge. My first
attempt used the weirdo jacks from the BMW and the Volvo. There were
two problems here: first, the jack applied uneven pressure on the
insert block (I could only hook it around one edge), and the long
insert block wanted to rise upwards due to the force.
Fine. I went and bought a plain old jack, and used that. This
applied serious force. I
was afraid I'd break off the edge of the workbench - you could see the
edge deforming downwards, and hear the slight cracks of the edge (yes
- 1 1/2” full inches of plywood giving way). To solve that, I
put a long bar clamp along the top - which transferred the force from
the pushblock back to the jig.
Then turn the crank, wait a few minutes. Turn the crank, wait a
few minutes. The block wanted to push up, so I would push it down to
keep it in line with the jig and board. I could hear faint "popping",
like plastic wrap popping in the distance - I figured this was the
plastic wrap being compressed as it went through the jig. I heard one
substantial "crack" - but there's no visible damage after the fact, so
I'm not sure what actually happened.
Once I had the short block through, I replaced it with the long block and continued on.
And finally. Three weeks after layup, I had my rudder back. Turns out the
paper at the leading edge had bunched up. (Not to mention
that the jig was slightly too
narrow - I should have allowed a gap of 1/32” or so). Were
I to build another rudder box, I would probably grease the blade, and
then wrap in mylar (since mylar won't conform to indentations like
saran wrap does, and it's not sticky like saran wrap). Then wrap in
newspaper or a towel, another layer of mylar, and then the layup.
So, then rip out the peel-ply from the inside, sand down the top
and bottom edges, and it looks done.
[Update 2007 Mar 28: Greg suggested
another good idea for lubrication between the plastic sheeting and the
board: Vaseline. That would have worked wonders.]