Sanding the boards, building the spreaders
posted 2006 December 31
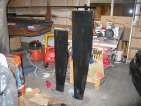
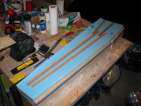
Did a few things over the past ten days. First was to put three layers of black on the rudder and
centreboard. Each layer takes nine squirts, three at a time. The
third batch is a bit too much, and so I spread the extra over the
entire surface of both boards. The third layer only took 7 squirts
— for the four-squirt cup I just dumped in 1/3rd of a teaspoon.
Close enough.
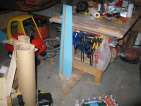
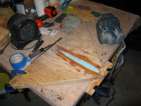
To support the boards vertically while I was painting, I took two
wood boards and drove screws through the end: the screws press into
the blue foam and ensure the board doesn't slide around. Both the
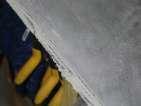
boards have a number of ridges in them which are hard to see, until
the board is reflective with wet epoxy; the rudder has a couple quite noticeable ones. Not
quite sure how they got there.
Once everything cured, it was time to longboard them. Both rudder
and centreboard have a ridge in the middle, where
the two pieces of foam joined together. This is partly due to an
actual bump being there
(I'm sure), and partly because the upper section is flat, and the
lower section tapers slowly to the tip - and this point is where the
board transitions from being flat to tapering. I don't want to sand
through the s-glass exterior either... needs another layer of black.
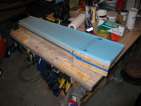
On both the rudder and centerboard I sanded the trailing edge all
the way down to the kevlar - and even then there was a small
depression right before the trailing edge. The curved trailing edge strikes
again. With all that sanding complete, all I need to do is rough up
the unsanded parts, and another layer of black can go on. Later.
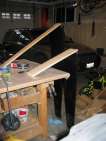
Next up: build the spreaders. Per the list,
when the spreaders are installed they should be 30.5 inches across tip
to tip, and 6.25 inches to mast track from straight edge on the aft
side of the shrouds. (Bill also describes the jig
he used to bond the spreaders to the collar, they should be well
re-enforced at the bonding point, and should have around a 7°
negative angle of attack to account for the mast bend.)
The strategy with the spreaders is to build them in two steps:
first, bond the inner part, then when it's just past tacky, put on the
second part of uni-directional carbon. In retrospect I'm not sure
splitting it up is necessary, and it does cause a few hassles...
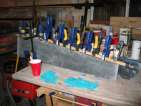
First, I bonded the saddles to the wood backing
with five-minute epoxy. I cut all the layers, each 24” x
5”. First step layers:
- foam core
- hybrid (scrap)
- s-glass (plain/coarse weave, from the centreboard/rudder
construction)
- peel-ply
- muslin absorbent layer
- mylar
Then for the second step:
- 1 1/2” uni-directional graphite tape, three strands, one
on either side and one along the leading edge
- 3” uni-directional graphite tape, along the leading edge
- s-glass (satin/smooth weave, from the deck/hull)
- peel-ply
- muslin absorbent layer
- mylar
Make sure everything is wide enough as the layers stack up - my
second s-glass layer was just barely enough to cover the entire second
spreader, and probably not enough to have a good bond at the trailing
edge. 5 1/2” wide would have been better. Sigh.
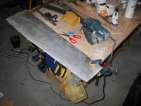
For the first spreader, I cut the hybrid to shape the foam
core. Then wet the first step out: foam, hybrid, s-glass, peel-ply,
muslin, mylar, saddles, clamp, and wait.
When I came back three hours later, I pulled the saddles apart -
and the saddles stayed stuck to the foam saddles. And ripped
them off the wood. Wonderful. The mylar is supposed to act as a
barrier for the epoxy, but a very thin layer (from my gloves) bonded
the mylar to the saddles. And apparently, when the epoxy is still
(just) tacky, the mylar sticks right to it, and it won't let free. Of
course, I can't stop now. The first layer is still tacky, and I need a
chemical bond. I bonded the pieces of the saddle back onto the support
with 5-minute epoxy, and keep on going. I didn't destroy the
spreader: it seemed to have turned out ok, although there could be
more hybrid along the entire edge. Place the 1 1/2” carbon and
the 3” carbon and the s-glass, this time wrap the saddles in
plastic wrap, clamp, and
wait.
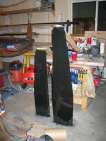
This led to a pretty good result — the finished spreader looks
fine. And it popped right out of the mylar, no problems at all.
Armed with all this knowledge from the first spreader, I built the
next one. This time, I didn't trim the hybrid.
Paint the foam, hybrid, s-glass. Peel-ply. Muslin and mylar. Saddles
are wrapped in (the same) plastic wrap. Clamp. Wait four hours for
the epoxy to set up.
When I returned and pulled off the mylar, it was clear that the
epoxy was beyond tacky - still malleable, but not rock hard. The
mylar was stuck tightly to the epoxy. It seems that once the epoxy
gets to this beyond-liquid-not-rock-solid stage, it's still very stuck
to the mylar. I had to destroy the mylar wrapping when I took
it off — it came off in "jumps" like old masking tape does.
More than that, it wanted to pull the peel ply and s-glass off with
it. I gave it a blast
with the heater for 20 minutes to cure it a bit more, then removed the
peel ply.
Once everything was off, I used a trick Greg & Roger have
mentioned
on the list: You can cut right through aramid cloths if the epoxy is
tack free but not rock solid. And it worked like a charm.
Next up, apply 1 1/2” uni-carbon tape to the trailing edges and leading edge, add in the
3” tape on the leading edge, the s-glass layer, peel-ply, absorbent muslin,
and a new piece of mylar, clamp, and let cure
overnight. (Note that the mylar doesn't have to be right up against
the layup — doesn't seem to matter, you just get this line of epoxy along the
leading edge outside the peel ply.)
And of course, the cured spreader just popped right out of the
supports.
Worklist for the winter
posted 2006 December 22
My goal is to be able to sail by summer. (Well, hopefully. A
friend of mine asked when I was going to be done. I said "You're
asking a software engineer to accurately schedule
something?")
I figure I have a fighting chance, anyway. Things I know I have
to complete:
- Complete cutting the holes for the centreboard insert blocks.
- Complete the insert blocks
- Build the rudder box
- Build the rudder
- Build the spreaders
- Sand down the mast (c.f.
here
and
here)
- Re-apply the sail track (c.f. here)
- Rig the mast
- Rig the boom
- Wetsand the deck
- Varnish the deck and hull
- Apply non-skid
And I figure I have about 8 to 12 weeks before the weather turns
nice enough that I can begin the wetsanding of the hull again. Given
that I completed sanding the hull in late October and it was
starting to get a bit
nippy, I figure the earliest I could start wetsanding the deck is
late March. So I've got
at least ten weeks to get the above list done (gulp).
Cleaning up the rudder
posted 2006 December 18
This was a brief week - I had to deal with certain household (mis)adventures in
lieu of boat building.
I did sand off the
trailing edge of the rudder. This lead to the conclusion that All
the precautions I took to ensure the trailing edge was straight
didn't seem to help much - I still had to sand through a bunch of
layers of hybrid on only one side of the foil. I'll have to clean up
the kevlar fuzzies.
I wet out the trailing edge with a brush, clamped it down with a strip
of folded over mylar, clamped with strips, and let set overnight.
Repeat with the centreboard. Once I had sanded lightly it looked
quite good - much less fuzziness, and the strands that are in there
seem more tacked down.
Bill asked
on the list on how to clean up the trailing edge, but there wasn't
any reply. In mail, he said:
When the extra was cut off of the trailing edge, I ended up with the
fuzzies. I followed Bram's suggestion to lay up a fine edge with
mylar and filled the taper with long carbon strands running the length
of the trailing edge, with high-density filler and graphite powder in
the epoxy (for strength). Some of the strands ran up on the surface
of the board where there was fill needed anyway. Once this cured, a
long board sanded the edge and surface true. My foils ended up with
an extra layer (s-glass) and is a tight fit in the trunk. It remains
to be seen whether the CB endures my learning to right this thing.
Bram prefers to do the layup in one cure. Mine was in two. I don't
recall that he ever replied specifically to my question #3.
With that in mind, it would have been helpful to keep all the
strands I pulled out of the carbon as cut-lines. (sigh; I even thought
to myself "what a waste of money!" as I pulled them out...)
Building the rudder
posted 2006 December 11
Actually skinned the rudder this week. Bonded the board on the
large side, and screwed and
bonded the small end, to try and avoid it falling off and make it more
capable of holding all the weight of the saddles. Wrapped the saddles in
plastic wrap (entirely this time - no little blue areas showing
through). Cut some scrap
strips to clamp on the trailing edge. Pulled eight cups of 5
squirts each (and fished the pump out of the resin container). Then
started at 8pm and
finished laying everything up just after 9 - way faster than the
centreboard. (The centreboard took about 2 1/2 hours to lay up; the
rudder took just one.)
Next was to get the saddles on and aligned. I forgot to duct tape
them together, so that was
first - leaving only about 1/8” of space between the leading
edges. Then, apply
clamps. On the top edge I put my bar level along the side
opposite the wood strip, and used all the bar clamps; the bottom edge
I used all the quick clamps, which seemed to work out well. On the
trailing edge I clamped the cedar strips in place.
Once again, clamping wasn't perfect with about
1/8” offset between the top edges of the saddles. This time,
this caused some problems: there is an indentation in the leading
edge of the rudder, and the trailing edge has a jog where the saddles were
offset. The next one of these I build, I think when I get to this stage I will place the
rig head end on the ground, clamp the saddles in place, then draw a
line where either saddle meets up with the wood end supports. At that
location, I will screw in a support. Then the saddle will rest on
that support, and be able to slide in and out to get the right level
of compression, and won't slip down. (Of course, the PDF already says to do
this, but I didn't follow that bit. Silly me.)
The saddles pretty much fell off the board - I may
even be able to use them again (although they got pretty dinged up in
the garage prior to this and there are spots in the board which aren't
flat due to the saddles not being tight — sigh). Then rip off the peel-ply, and pry &
chisel off of trailing edge cedar strip. And it's time to shape and
fair.
Preparing the rudder blank
posted 2006 December 4
I spent this week preparing to glass the rudder. First, there was
cleaning up the mess from
the centreboard. I decided that I wanted to put a strip of cedar down the
middle of the board (in lieu of Greg's technique - maybe if this one
fails I'll do his next). I used one set of strips the length of the
rudder, and a second set around 2/3rds as long, and glued them all
together - the short pieces don't need to be as long, as the tip of
the rudder is quite thin. In retrospect, it would have been easier to
bond the blue foam in the exact centre of two long pieces.
Then, cut the rudder,
bond back together with 5-minute
epoxy, plane smooth, and
fill the gaps. The plan
doesn't like to pull the blue foam - it makes ripples instead.
I had a few concerns. First was sawing the foam: I was concerned
the saw would not cut perfectly vertically through the foam, although
I seem to have avoided this fate. Another problem was ensuring the
foam was bonded to the cedar strips in a perfectly straight line
(don't want a curved rudder, either). This is why having two long
strips would have been good, then it's easier to tell if it is going
on straight. Finally, planing the cedar makes the rudder very
slightly flatter in the middle than it would have been with the foam,
but it doesn't seem too much of a problem.