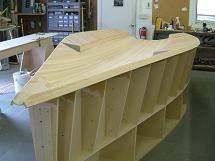
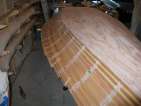
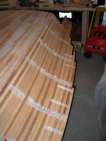
Sanding the bowpiece
posted 2004 Jul 26
So, with the bulk of the bowpiece cut to fit and the first
application of epoxy into staple holes, it's time to... wait for
it... sand some more!
I thought about renting a hand-held belt sander at around $13 a
day, but finally just broke down and bought the cheapest I could find,
a Ryobi, for $50. It positively rips through wood, and I probably
could have just rented, but now it's on hand for later projects. So
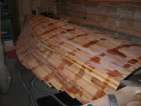
with my brand-spanking-new belt sander I hit the bow and went from rough to smooth in pretty much 30
minutes. The biggest challenge here is to try and ensure that you
don't remove too much material, especially towards the knucle where
the bowpiece is relatively thin.
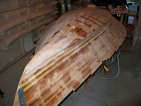
Next was rounding the bow out. I used the method suggested
by Greg:
Mark the centerline continuing down the front face with
pencil. Then divide the front sides into 4 with straight diverging
pencil lines from the top point to the bottom . Use a straight line on
the side of the block back from the front corner about the same size
as one of the quadrants on the front face. To make short work of the
shaping, use a belt sander to flatten the front corner to the lines
you have just drawn. Making and equal bevel on both sides. Divide the
front faces again and bevel that from the centerline. Use this
technique of successive approximations to a fair curve until it looks
right. If you divide up both sides carefully like this the shape will
be perfectly equal both sides. Touch it up with the hand sanding
block. Fill the thirsty end grains now with unthickened epoxy to
prevent dry lay-up when glassing the bottom.
I made sure that the front face was square to the rest of the boat
(although station 1/2 was about 1/8" out of square it seemed, so I
still was careful to eyeball everything to ensure it looked correct).
I then followed Greg's
directions, and it worked out very well - after touching it up with a
block, it looks quite
nice. The final bowpiece is 6" wide, 5" deep, and 13"
high - so next time I can save a bit on cedar costs. ;-)
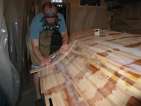
Just to pass the time, I filled all the staple holes again and
faired a bit more.
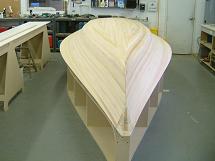
Cutting the bow
posted 2004 Jul 18
In between two hour sanding sessions, I decided I should begin
attaching the bowpiece to the bow of the hull. With my instructions and math I started out by drawing a
picture of exactly what was required:
Initially quite a bit
of material has to be removed. It's a bit scary to be cutting all
this off - especially having constructed it so lovingly. But you can
always fill in the gaps with filler, and anyways, the resulting bow is
going to be hidden under black graphite, so it's all invisible.
I carefully measured
everything, to within 1/4" generally - so I wanted to be pretty
accurate in the cuts. Once done, I managed to cut a bit too far aft
of where I needed to. Part of this was because the lines curve aft
due to the concave hull at this point, and partly because my pull saw
has a tendency to curve to the right. I should have kept a 1/8"
buffer and sanded it off afterwards.
Another mistake was I still had the stabilising 2x2 sticking out
station 1/2. I should have cut this off. As it was, I used a circle saw to cut it off,
and cleaned it up a bit with the rasp.
I hot-glued the bow
piece in place. The hot-glue is strong (three dabs held that entire
thing in place), and sets quickly (within 10 seconds). Once it was
tacked in place, I crawled
underneath and put in a fillet of epoxy/406 with some fibreglass tape - later on
I'll reinforce this, just to be sure.
While that was curing, I set about filling staple holes with
straight epoxy (with a wee bit of 406 mixed in). The 406 reduces how
much the epoxy runs, but makes it more visible.
Next up was cutting off the excess of the bowpiece. To start with,
I aligned my pull saw to lop off the very front of the bow. I made
sure the blade was parallel to the part of the kunckle which was at
the right angle, and then cut it all off. The blade had a tendancy
(in my case) to curve slightly outwards; thus the bottom of the
bowpiece will need a little extra cutting/sanding to make the bow
straight.
Next cut the sides. I pressed the blade up against the side of the
hull and then started cutting, so the bowpiece followed the same curve
as the hull. I put duct tape on the hull to protect it from
scratches, and took it off. On the port side, the saw wanted to curve
away from the hull, so I had no problems - it followed the slight
flare of the hull. On starboard, I had to section the pieces I
removed and cut in from the side to remove them, then restart the
blade; because it wanted to curve towards the hull, it's worth making
the blade flare out from the fair line a bit - this way there is some
extra to sand off when the time comes.
You recall I thought I
should have built the strongbacks with better support. Check out how
the guys at VMG
Skiffs built theirs:
Well first, wouldn't it be nice to have separate hull and deck
molds, and second, I'll bet those don't move much.
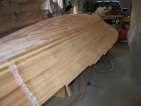
Fairing the flare
posted 2004 Jul 12
Continuing to fair the flare. It's hot, messy (you get wood dust
all over the place), exhausting work - so much so that I wrote a top
ten list and posted
it to the mailing list:
Top 10 things to ponder while sanding your swift solo:
10. How it's sure going to be nice once you get past the hull
and start on the flare (not!)
9. What your high-school football coach would say to motivate
you if only he could see you now
8. What Greg's boat will look like if only half of what he says
is true
7. What Bram would look like if half of what Greg says is true
6. "Is this good enough? No." Repeat.
5. "Boy, if I do a great job sanding I'll be able to take a swim
that much faster!"
4. How the rough spot you're sure you sanded down managed to
reappear overnight
3. Is there an Olympic event in sanding? Have I qualified yet?
2. (there is no number 2, I'm too busy sanding!)
And, the number 1 thing to ponder while sanding your swift solo:
1. top ten lists!
Must have been a long night that night. Of course, it's all
required for that fast, smooth shiny surface...
All the websites suggest using contact cement to hold the sandpaper
to the fairing board. This works ok, but it isn't a strong enough
bond. I started using Super-77 (which if anything is too strong), and
when I want to replace my paper I scrape it off with a scraper. This
makes sure the paper stays stuck.
One other note. One of the strips on the hull (below the chine,
near the bow) pulled away from the form by about 3/8", and I didn't
notice this when I put the second strip next to it. This means that I
had to plane a lot of the strip away to make it fair. When I flip the
hull over, I'll have to put a bunch of filler in the hole to
strengthen it. At this point, because of the compound twist in the
strip, I probably should have screwed it to the station.
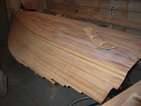
More stripping the flare
posted 2004 Jul 4
I wound up using 21 strips on each flare - 20 full length, the 21st
strip is cut in half, the 22nd is scarfed from two pieces of scrap,
and the remaining two strips are scrap ends from the first 20. The
only note here is that the strip that is cut in half should not be cut
exactly in half (as I did) - it's better to cut one side about 12"
longer than the other. As you get towards the outer edges, the strips
don't seem to want to pull together as well, and so it's important to
pull them up with tape. Avoid the gaps - they are hard to deal
with later!
With all the strips are done, I pulled out most of the staples and
started scraping. I left some staples on the gunwales - the humidity
can change quite a bit in the garage, and I don't want the hull to
pull off the forms.
I used the scraper to get all the glue dribbles off the hull, and
to start the fairing process. I used the plane some, but I found that
because the flare is concave, the plane can't really get in to pull
any material off, and the scraper does a better job. I used the disc
sander to round the corners on the scraper blade (to reduce my chances
of scraping in a divit, although I still made a few). Just be sure to
change the blade frequently - make sure it is very sharp.
I built (another) fairing board. This one is slightly longer than
the others, and has 4mm rope tied to the ends running through a jam
cleat I can use to control the bend in the board. Thus I can sand the
concave flare. Just takes lots and lots of time...
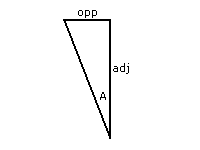
I did the math for the bowpiece as well. I've pasted the template
to a piece of hardboard and cut it out, and aligned it on the hull to
see where things fall. When I laid down the bowpiece I currently
have, I found I could reduce the amount of wood in the bow and get
more mileage my current bowpiece by tilting it slightly - a 14°
angle. This involved a wee bit of high-school
math.
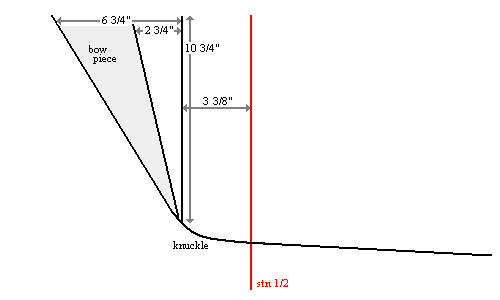
The vertical distance from the "knuckle" (the point where the bow
begins to curve up) to the gunwale is 10 5/8", and at the gunwale the
distance in where the bowpiece should come to is 2 3/4" away from
vertical. So:
          opp = 2 3/4" = 2.75"
          adj = 10 5/8" = 10.625"

          tan A = opp/adj
                = 2.75/10.625
                = 0.2588
          A = arctan(0.2588)
          A = 14.5°
Of course, when I actually cut the bow off, I'll use the measured
distances from the stations rather than the degree measurement.
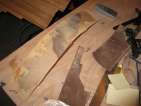
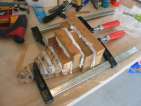
I also added another four pieces of 1 1/4" wide solid cedar to the
end of my bowpiece, adding another 5 inches of height. Now it's long
enough to fit correctly into the pattern below the knuckle of the
bow. I used the piece of solid 2x6 I had bought for this (and other
miscellaneous bits), but because the grain direction had to alternate,
I had to construct one piece wide enough with some 2" tape and epoxy.
I'm not too worried, it won't be terribly noticeable in the final
product (I think).
Page 49 of 62
« First
…
«
47
48
49
50
51
»
…
Last »