Stripping the flare
posted 2004 Jun 28
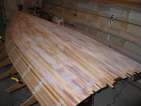
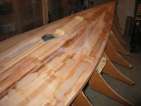
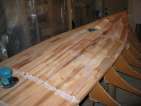
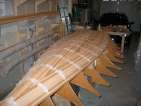
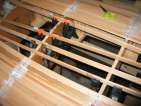
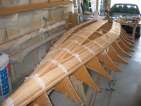
I finished fairing the hull below the centerline and started
stripping the flares in earnest. To ensure the hull doesn't buckle
while I'm working on the flares, I stapled the hull down to the
strongback in a number of spots.
The flares don't take long to strip - each takes 21 strips (20 full
length and 1 cut in roughly half). Once the main part of the flare is
done, the starting points of the strips stagger quite substantially,
and a lot of extra strip is left hanging off the stern. That extra is
useful for later on when the strips at the side get very short.
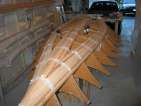
I've also been looking at the bow piece and how to attach it
correctly. My bow piece is only about 6" high (per the instructions,
as far as I can tell), and some of the pictures
on the mailing list have indicated that 10" is more appropriate. Greg
also posted a missive
on how he did the actual shaping, which I think will be useful when I
get to that point.
Fairing
posted 2004 Jun 20
Enough of the theory - let's get some practice.
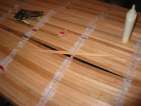
I've been applying big patches of 410 fairing compound to ensure
the entire hull is perfectly fair without any ridges - 410 is very
easy to apply, and sands off easily. However, after having applied it
to most of the hull, I discovered that it should not be used under
dark paint where it will get very hot. Like under the black graphite
coating that will cover the hull below the chine. Sigh. At least
most of it will be sanded off, and what remains will be touching the
cool water most of the time.
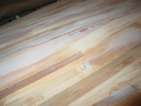
I found that when installing heartwood strips, they seem to have
more of a tendency to crack. The strip that cracked while building the
hull below the w/l was heartwood as well. One strip on the flare cracked, and I just glued the
two pieces together and carried on.
As I've been waiting for the epoxy to cure, I have been installing
strips along the flare. The sole reason to wait to install these is
to make it easier to lean into the centre to fair the hull. So far, I
haven't installed enough for this to be a concern.
I cut off the finger
strips at the bow - I now have a real bow! I checked the bow
profile against the profile Bram provided with the plans (it looks
like this)
and it looks pretty close - only the very base of the bow needs a
little extra height, which will be added after the hull has been
glassed.
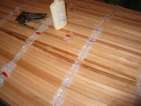
Because of the issues with 410, I switched to 407 for the remaining
spots between station 13
and 14. 407 doesn't seem to sand as quickly and easily down as
410 did. I also had this batch kick off while I was carrying it
around - it's about 22 degrees here right now, and I was looking
around for places to put some of the leftover, and I found that the
bulk of the epoxy had formed a disc in the middle of the cup. And it
started to smoke. Fun fun.
In passing, I also think it would have been better to use chipboard
instead of particle board for the stations - no extremely solid
reason, but it seems like the better answer. The chipboard would be
more dimensionally stable, easier to get a hold in with a screw or
stable (I think), and less of a mess when cutting it out.
More on fairing
posted 2004 Jun 18
I posted on the Kayak
Forum (the forum run by the author of the Kayak book). I
asked "I'm looking at fairing boards, and the ones at the local supply
store look a lot like planes. So the question arises: If you are
sanding with the grain, does the long axis of the fairing board run
parallel or at 90 deg to the strips?"
One person suggested running them at 30-45° to the angle of the
strips. But the best answer I got back was
Fairing boards work best when the length of the board spans the high
spots of the unfair surface. Since most surfaces are unfair in more
than one direction, the board should be run in more than one
direction. My preference is to move along the boat for some distance
running the board in one direction, and then work back to the start
point running the board at some angle to the first direction. If the
surface needs more fairing in one direction than another, either take
more strokes in that direction, or skew the angle that the stokes
cross in to favour that direction. Sometimes it can help to have a
flexible board to wrap around curves and run mostly sideways -
along the short direction of the board.
Don't worry about cross grain scratches until most of the fairing
is complete.
You can make your own boards out of plywood. For kayaks, 3 mm seems
to work well for flexible boards, and 4 mm for stiffer boards. For a
small boat, 4 mm and 6 mm would probably work well.
Sam
Articles on fairing
posted 2004 Jun 17
A couple links and articles I've found on fairing:
Sanding
Sanding a stripper can be time consuming, but there are things you
can do to make it go faster. The best way is to only do as much
sanding as is necessary. When fairing the strips the goal is to make a
smooth surface which is also ready to accept epoxy. First remove any
big drips of glue with a scraper. A Pro-Prep works well for this or
any paint scraper. A scraper works best if it is sharp. Keep a fine
metal file handy to touch up the blade as it gets dull. Scraping the
glue is usually not enough to dull it, but you want the tool sharp to
begin with. After the major drips are gone, sweep or vacuum the
surface to get rid of the loose bits of glue.
Next, plane the surface with a sharp block plane. You want to
remove the major irregularities in the surface. The ridge between two
strips should be smoothed out and any steps at butt-joints should be
knocked off. Don't be afraid of using the plane. With the plane set
very fine you will have much more control than you would doing this
task by sanding. You can easily remove just the wood you want if your
plane is good and sharp. Remember, the goal now is fairing, this means
you want to create long, smooth curves without any sudden bumps or
dips. To do this, use long strokes with the plane. Do not concentrate
on one place. If there is a low spot, you want to lower the area all
around it so there is a smooth transition. High spots should be
knocked off with a few short strokes of the plane then smoothed out
with increasingly longer ones. The plane can be used diagonally to the
grain as well as with it. For best results, hold the plane
approximately parallel to the grain while pushing it diagonally across
the grain.
When most of the major irregularities are removed, it is time for
the fairing sander. To save yourself time, start with a very course
sandpaper. 50 or 60 grit will do well. This stuff can remove wood
pretty quickly so you need to use some care. It will also create deep
scratches in the wood, so always sand with the grain. The fairing
sander does not work well on inside curves. Instead use a foam or wood
block cut with a curved face to get into these areas. Again, the goal
is fairing, don't try to make one small spot perfect. This can make a
low spot. If you are trying to smooth out an area which is low, you
want to transition the areas around it to make a fair surface down to
the low spot. This requires that you sand with long strokes. Use your
whole body and don't be afraid to lean into it. If the sand paper gets
dull, replace it. Don't waste your time sanding with dull paper just
to save the few cents of a new sheet. Sharp paper works faster and
does a better job.
You are done with the fairing board or curved sanding block when
you no longer see any glue on the surface of the wood and there are no
visible signs of saw marks on the strips. Now you can go to a random
orbital sander. 80 grit sandpaper is a good place to start, but you
may be able to use coarser. The goal now is to remove the surface
scratches left by the fairing. You want to make the surface of the
wood uniformly smooth. Once again, the boat should be fair, so don't
concentrate in one spot. Work in 2 foot wide swaths from centerline
down to the sheerline, then move over one foot so you over lap half of
the section you just did. Swing your sander in smooth arcs over the
section you are sanding, keeping the sander in contact with the
surface and moving at all times. If you have to stop, lift the sander
up. Many sanders will accelerate when removed from the surface. If you
bring them back down onto the surface when they are going fast you can
create a divit. Instead, turn off the sander, put it back down and
then restart. You don't need to wait for the sander to stop completely
before using it, but let it slow somewhat. If the sander is still
moving, bring it down while sweeping the surface so it does not dig
into one spot.
When you can't see anymore scratches and the surface is uniformly
smooth, wet down the surface and let it dry. This will raise the
grain, highlight scratches, and show up any remaining glue. Remove the
glue and remaining scratches with further sanding, then sand the whole
boat again with 80 grit sand paper. You do not need to sand any
further than this. Finer sandpaper is unnecessary. The epoxy bonds
best to a fairly coarse surface. As long as any scratches across the
grain have been removed, further sanding will not improve the
appearance of the boat. Excessive sanding with fine sandpaper on the
Random Orbit Sander can cause dark red cedar to have a blotchy effect,
since you are actually buffing the wood fibres.
I also found a few
threads
on
fairing
kayaks,
which is the same thing.
One Ocean Kayaks also discusses their
method, which is similar to the building manual, but they fill
staple holes prior to hitting the hull with the fairing board.
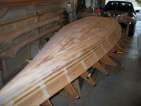
Fairing
posted 2004 Jun 13
With the final key piece in place, I started pulling staples and scraping off glue. I find
the scraper to be the best way to start things - it pulls off all the
glue, a small amount of wood, and reduces the edges between
strips. Just be sure that you're always using a new blade - when the
scraper is sharp, it does a good job.
Once everything is scraped relatively flat, I hit it with the
random orbital sander. This made everything a bit smoother, and
pulled off the remaining glue I had missed. Next up was the plane - I
mostly focused on the spots where there was a significant difference
between the heights of strips - and with a couple pulls of the plane,
those disappeared. One side I had problems with tear-out - I had to
reduce the depth of the blade slightly, and pull the toe of the plane
in, and this made things a little better (it's still going to take a
bunch of sanding to get rid of the rough spots, though).
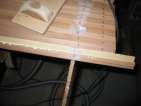
Next up is the longboard. I built two out of 1/4" (3-layer)
plywood - one with the grain running lengthwise, one with the grain
vertically. The two have a different willingness to curve, so
depending on if what I'm sanding is curvy or not I will pick the one I
want.
Once the bow was mostly done, I pulled the staples on the
remainder of the hull and repeated the process. Scrape, sand, plane, and fair. Kayak suggests
putting fairing compound down on the hull before really hitting it
with the longboard - I did this on the port side, and I think
Kayak is right, especially for areas which must be perfectly
fair. The key strip on the starboard side required a lot of work with
the longboard, and still isn't perfect, and as a result I think I've
created a thin spot. Putting some fairing compound down and then
hitting it would have been better (and is what I've done on the port
side).
All this fairing (and thus, leaning on the strongback) has made me
wish that I'd built strongback supports which were a bit more sturdy.
The strongback sways front back and side to side when I'm really
hitting it with the longboard - wider sawhorse supports would help
stop this. Even with the support tubes this is still a
problem.
[Update 2004 Oct 5: I bought plans for sturdy sawhorses, which would
be better than using sawhorse brackets. I'm pondering if I should
build these sawhorses for when I build the deck.]
[Update 2008 Jan 12: Bram posted an
idea from Mark White on how to stop the hull/deck from separating from
the forms while you're working on it: just before removing the
staples, install wooden tooth picks to keep the hull tight to the
stations after the staples are removed.
I should have him tell you directly but basically, he
drills some holes through the cedar and into the stations (the
diameter of the toothpick). He epoxies the tooth picks in and leaves
them until the s-glass is finished. He then cuts the hull loose with
his thin Japanese saw just as he would plastic staples. You only
likely need a dozen or so for the entire hull. The obvious benefit is
that the hole is filled with wood and will look great.
Stripping below the chine
posted 2004 Jun 6
Stripping doesn't take too long - I almost want it to go slower,
because alignment took so long. Oh well.
As I said, I've been using cut-up plastic milk jugs as the
protection between the staples and the cedar. Per side, with 10
strips on the gunwale side and 5 strips along the keel, I ran out of
milk jug chits. So three milk jugs will fill up 30 strips. Of those thirty
strips, 4 were scarfed.
Once the strips from the keel and gunwale meet at the stern, I had
to start cutting strips with bevels at both ends. This gets tricky.
The bevel at the stern edge is 12-14" long - and it's hard to ensure a
good fit. The other problem is that very small changes in height
remove a *lot* of length. One of the final pieces I wound up doing
three times - the first one split, the second one I cut 1/8" too
short, and it was the third one which actually worked. Even filing
the cove into the bevel can reduce the overall length of the piece by
1/2".
I found that it was best to start with the stern bevel, since it's
the longest and the hardest to get right. Once that one is done,
insert it tightly into the slot and make an alignment mark on the strip
and an already installed strip, halfway along the new strip. This
way, you can check for fit of the other end, without having to put the
long bevel back into it's position.
Once I had the stern bevel right, I would cut the strip about an
inch too long, and then work down to the right length. At first, it
seemed like once I put glue on everything and put it in, I could get
it to slide a bit further
than what the mark indicated - the glue was lubricating the fit. But
one strip this didn't work for me (and it was already all glued up)
and it popped up about 1/4" - and I had to force it into position.
Once the glue gets a skin, it won't bond as well - so you are
committed once the glue goes on.
As the gap closed, when I got to a width of less than 3 and more
than 2, I started planning. The two strips before the "key strip"
have to have their bead planed off, so the key strip can fit
correctly. Then it's just a matter of taking a piece of scrap and
slowly planing it down and trying it in the keyhole until it fits perfectly. One side
was perfect, the other side I took (exactly) one pull too many with
the plane and it was slightly loose. Not enough to matter,
though.
Overall, the hull below the waterline took 46 16" strips. 14 of
those were scarfed.
My strip counts for the hull below the chine.  Comments help figure
out what the nomenclature means.  First column is the strip number;
second column is the count of how many strips were used.  All strips
are 192-194" long (just over 16').

Gunwale towards keelline:
1-9 9     # first 9 strips are full length strips
10s 1/2   # strip 10 is scarfed: 1/2 of a new strip, 1/2 is scrap
11  1
12s 1/2   # strip 12 is scarfed: 1/2 of a new strip, 1/2 is scrap
13  1
-s  0     # this strip is scarfed: both halves are scrap
1/2 1/2   # this strip is 1/2 a full length strip
1/2 1/2

=13

Keelline towards gunwale:
1-4 4
5s  1/2
6   1
7s  1/2
8   1
-s  0
-s  0
1/2 1/2
1/2 1/2

=8

Key strips, those which don't hang over transom:
1
2
3
k         # the key strip, planed down to the right thickness from
          # a scrap

=2 (would have been 1 but for breakage)

=23 194" strips required to strip one half of the hull from chine to c/l.

(with no scarfing: 15+11+2=28 strips)
Page 50 of 62
« First
…
«
48
49
50
51
52
»
…
Last »