Attaching the transom, and making the cradle
posted 2004 Aug 30
Well, the Olympics got a bit dull, so I started up again.
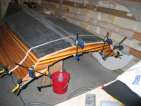
First, I decided to attach the transom. I first fit the transom to
the hull, inset by the 1/4" width of the bevel, and clamped it in place. I
checked where the gaps were (because the hull wants to pull towards
the fibreglass) and used a clamp there to ensure things were tight.
The clamps I used have a tendency to pull the transom inwards towards
the boat, so I used some spacers to make sure things
were vertical. It takes long enough to clamp everything together that
you can't glue the transom to the hull with a bead of thickened epoxy
- it would set up before you had attached everything.
Next, I mixed some epoxy/406 to peanut butter stage, and put in a
1/2" fillet. Next, I put
on a strip of 2" fibreglass
tape, followed by a second strip. My tape at one point got some
epoxy on one of the edges, and so the edge is hard - this makes the
tape not want to stick to the wood. I had to use painter's tape to
get the fibreglass tape to stay in some spots.
I made three mistakes:
- I got a mess all over, and epoxy on me. When painting
unthickened epoxy onto the tape, it dribbles down the brush and
drips onto you. This is the time to wear a full Tyvek outfit,
especially your arms.
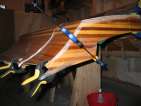
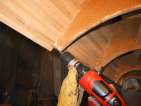
- You'll notice
the complete lack of a gudgeon backing block. Drag. I'll have to
sand off some of the glass & fillet to allow the backing piece
to fit. [update: this is actually the right thing to do. If you
attach the gudgeon backing block, the centre of the transom won't
fit flush against the centre rail of the strongback. The mistake
is really putting a bunch of epoxy/filler right in the middle,
which makes it harder to fit the backing block in later.]
- In retrospect, the tape probably should have overlapped by an
inch, and then had one inch on either side of the fillet - not
directly overlapped with each other. That way they would have
provided more transfer of force between the hull and the transom.
Only #2 is one I'll really have to address. For #3, I may put an
overlapping section of hybrid over the seam when I glass the inside
of the hull.
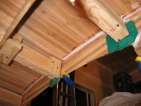
The following night, I put a 1" wide strip of tape along the seam
on the outside of the hull. I started out by using epoxy/205 to fill
end grains on hull strips. I then put the tape on the edge, allowing
one edge to hang over the hull side. The tape wouldn't stick tightly
to the joint between the hull & transom - I clamped station 14 back on
to force the tape tight to the joint. Even then, there were bubbles
under the tape right in the joint line. It might have been
worthwhile to mix up some epoxy/wood dust and put a line of filler
in there - the downside being there would be a little line. Probably
better that line than a little line of bubbles.
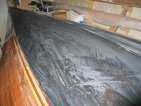
With the transom attached, I followed that up with another coat of
epoxy/graphite. I prepped the surface with 80-grit (which is what
Gudgeon recommends) and a quick pass with 60-grit on the orbital
sander. There were a number of spots where the graphite was sanded off.
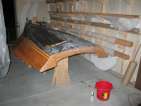
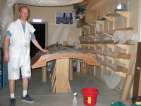
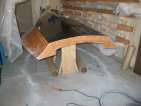
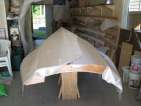
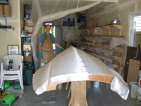
While that was drying, I started working on the cradle. The cradle
fits over stations 6 and 10; the station 6 end is 60" wide, station
10 is 72" wide. I made the beams 12" wide and the trunk 14" wide.
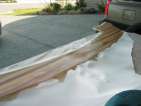
I then:
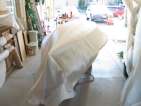
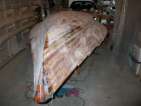
- Cut indoor/outdoor carpet to size, with 4" extra around the
edges, and cut strips of
hybrid and e-glass to size
- Taped the carpet
to the hull
- Covered everything with plastic
- Wet out the hybrid, then added carbon tape on the leading and trailing
edges
- Put down and wet out 6 pieces of e-glass, in groups of two
- Filled the weave
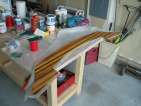
Next step is to trim this cradle, then cut patterns for the edges,
and put real wood supports in place.
[Update 2008 Mar 24: Four years
later, I actually put the boat, on the cradle, on the dolly. It is very
"backward tippy" - you can't step any further back than the end of the
centre rail - but if the cradle went back to station 11 (say), then
the boat would be too far forward on the dolly and would run into the
handle.]
Wetsanding
posted 2004 Aug 24
I found an article online
about wet sanding. This one talks about the final stages of the
process, where the sandpaper is of such a fine grit it's hard to
know where you've sanded and where you haven't - they suggest
scribbling all over the hull with a sharpie, then going back and
sanding it all off..
These 'doodles' are neither from boredom nor from frustration
over bad epoxy job. After the last filler coat of epoxy, I draw a
dense grid by magic marker to color both the high as well as the low
spots on the surface. This technique saves a huge amount of time
during sanding and virtually guarantees that your kayak will be
perfectly prepared for varnish.
How, Why? When the surface is coated with water as you wet sand,
it is almost impossible to see the dimples and imperfections and how
much material you are actually removing (also true for
varnishing). When you are done sanding and the hull dries, you will
suddenly see hundreds of small, shiny low spots that your sander
missed. The magic marker in the low spots will tell you to keep
sanding and when it is OK to move on (you don't have to stop hundred
times to check on your progress).
The disadvantages: You can't cheat! The color will stay
there until you sand the low spots out. (Well, you can cheat by
cleaning it with lacquer thinner ;-) )
The advantages: Perfect professional smoothness and top
notch hull performance. (dimpled surface is very bad for laminar flow
on the hull and gives rise to premature turbulent flow and viscous
drag ), in other words, you won't be as fast as you could be, for the
same effort, (and NO, the varnish will not fill the low spots).
Wetsanding
posted 2004 Aug 22
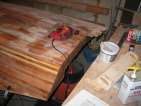
I started wetsanding the black area of the hull. The instructions
say to put two coats of black on, but I figured I would sand things
down a bit before putting the second one on, to reduce the number of
dribbles and get a better (flatter) surface.
220 is the finest wet/dry sandpaper. I squirt the surface with a
spray bottle, then sand until the water turns to grey. Periodically,
I'll sponge down the hull and fairing board to remove the carbon from
it. Sanding like this makes a nice grey slurry, which is better than
constantly clogging up paper. Using more water would probably make
things go faster (it would keep the paper clearer), but makes way more
of a mess. It's still pretty messy, though, so I used some Tyvek coveralls to try and
keep myself relatively clean. It mostly works.
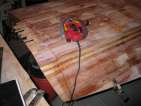
Drips are the biggest
problem. Smoothing these out takes plenty of effort. You can
also see where everything is perfectly flat (it's grey) and where I
haven't reached yet (black) - everything will have to be grey by the
time I finish. Still lots of
sanding to go.
Before I put on the second coat of black, I decided to attach my
transom. First, I marked
the screw holes I used, and the position of the rails on the back of
the station (so I can re-attach it when I build the deck). Next I marked a line on the bilge
side 1/4" in from the edge. Next, rasp/sand at 45°, making
a chord between the line and the trailing edge. Having a knife edge
at the trailing lip stops water from clinging up the transom, which
makes a cleaner, faster exit for the boat.
[Update 2004 Aug 30: In retrospect,
it would have been better if I hadn't sanded off the last 1/4" of the
cured epoxy/glass. This way, all the wet sanding goop would have
dripped off the hull rather than soak into the strips at the
edge.]
What's the weather like out there?
posted 2004 Aug 18
There was a post a while back in the SOC Sailing folder about local
weather forecasts, which was interesting.
When you say forecast, WHICH forecast are you referring to? I rely
on http://www.atmos.washington.edu/data/,
which has links to the Regional and marine forecasts, and more
importantly a Guidance discussion on the forecast.
It also has links to the UW's FEA meteorology site called the MM5. Select the 4km
domain for a zoomed in view and the larger domain model for the
general view including the Gulf of Alaska (which drives our weather
systems).
So if you were to go to the MM5 forecast generated at noon on
Friday you get this
link and within that you select "Subdomain SLP, 10 m winds, 925 mb
T or topography" And look at the loop, you would see that while there
is forecast for some wind in the San Juans, overall the forecast is
for very light winds, and not far south (east entrance of the
straights), there is a forecast for essentially no wind. Given the
variable nature of the convergence zones we have around here (i.e. a
1-2mile change in where the pressure system comes ashore on Vancouver
Is or the Olympics can be a 5-10 mile change in the convergence zone),
there was a very good bet for no wind in the San Juans or anywhere in
the north Puget Sound (which is what we had).
My experience is that the MM5 from 12-24hrs prior to the day, is
usually accurate to +/- 3 hours and +/- 20 miles. (i.e. the phenomenon
predicted will happen within 3 hours of the prediction and within 20
miles of the prediction). Pretty darned good.
The gotcha is that there are a huge number of microclimates in the
area and "forecasts" like you hear on the weather channel and
especially on the evening news, are agglomerations of all of those
microclimates and hence essentially useless except for broad trends.
Preparing & glassing the hull
posted 2004 Aug 10
First up, trimming the stern edge of the hull. I trimmed it about
1/8" long - I did this by measuring the underside of the strip at the
centreline, chine and edge. I then used the same measurement, less
1/4", from the ends of the strip on the visible side. One chine
measurement was a bit too long, so I cut off too much - so I sanded
everything down to 1/8".
Did more sanding.
Next up was a sealer coat. Two days before glassing, I applied
this coat. I used 207 for this, although I should have used 205 or
206 - there isn't really a need for 207 at this point (since to wet
out the glass we used 206). The next evening, I sanded off the sheen, both
to remove epoxy which wasn't providing any purpose (the important
stuff is the epoxy which soaks into the wood), and to provide some
"tooth" for the glass + epoxy to bond to. I started with 60 grit on
the fairing board, and once I had made a pass over the entire hull I
went back with the random
orbital and 100 grit to remove the 60 grit scratches.
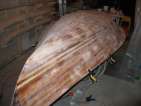
Now the hull is all ready
for glass.
I took a day off work, Bram came up to assist, and we glassed the
hull. It was a hot day - 32°C - which meant that we had to work
quickly (and that since everything cured quickly, it didn't take too
long). There was also a nice breeze through the garage, which kept
the fumes under control.
We laid out two pieces of glass running lengthwise, with a 4"
overlap in the center (two inches on either side of the centerline),
and blue tape to stop it from sliding off. Then, cut around the edges
leaving about 1 1/2" of extra hanging over. Around the edge of the
hull on the floor we laid out plastic to catch the drips.
We then squirted ten 10-squirt cups of resin (no hardener yet).
For the first application, 206 is the hardener to use, since we don't
need the UV-resistant properties of 207 (yet). Bram poured it on to
the glass and began spreading it and working it in; he started at
about station 8. From there, always keep a wet edge, working outwards
from that point towards the edges, the stern and the bow. Alternate
working on the stern edge and the bow edge, to ensure the edge is
wet. Always pour new resin in an area which is already wet, and then
spread it outwards. Use a fresh scraper at about a 45° angle to
spread the resin. Always pull away from the wet area.
While he did this, I squirted hardener into the cups and mixed when
he ran out of resin, and pulled off the blue tape. Use new mixing
sticks for each batch - reusing sticks will cause the new batch to set
off much faster. Once you've wet all the way out to the stern edge,
cut the glass off about 1/4" from the edge - this way the wet glass
doesn't pull down on the stern edge and create a ridge. Once he was
far enough along, I came along and worked bubbles out of the cloth.
Always work the bubbles towards an edge or a dry area. Use a fresh
scraper at about 80° to the surface to pull out extra resin, and
work the bubbles out. Don't press so hard that the fabric gets white;
it should look dry and dull. The excess resin will
have a white, bubbly look to it, take that and discard it.
Once the entire hull is complete, make a couple rounds to ensure
all the bubbles have been worked out. Also, if there is a void
underneath the resin, dab the spot with a brush dipped in resin to
fill underneath the glass with resin.
Bram indicated that doing this glassing with two people makes it
much easier - with one, you're worried the epoxy is going to kick off
before you have a chance to smooth things out. With one applying the
epoxy and the other working out the bubbles, it's much less of a
concern. He said when he next glasses a boat, he's inviting me
down. ;-)
Wait for the epoxy to become tack-free - no longer sticky, but not
hard. It was about 30°C on this day, so that didn't take long -
about 2 hours.
Once the first coat was tack-free, I applied the second coat. For this, I
used a standard 4" painter's
roller with a tray of epoxy/207. Probably better would have been
to use the rollers I bought from John R. Sweet - the rollers I did use
left felt bits in the applied epoxy. The goal of the second coat is
to fill the weave of the fabric with epoxy; it took about five
10-squirt cups. Be very careful about applying too much, especially
on the flare and towards the bow - having drips is bad. Once the
epoxy has been rolled on with a roller, go back and "tip off" the
surface by running a standard bristle brush along the surface,
lengthwise. The roller leaves a dimpled surface, and running the
brush along creates grooves, which are easier for the epoxy to fill
in.
Three hours later, I came back and applied coat number three - to provide more
protection, and to fill in any remaining spots where the glass fabric
is showing through. For this coat, I used only three 10-squirt cups,
and again used the roller and tipped it off with a brush.
Finally, another three hours later, coat four went on below the
chine, this time with graphite mixed in. I wanted to put this on now
so it had a chemical bond (less sanding), although the manual says it
gets added after the transom has been installed. The instructions for
423 say
423 Graphite Powder is a fine black powder that can be
mixed with WEST SYSTEM epoxy to produce a low-friction exterior
coating with increased scuff resistance and durability. Epoxy/graphite
is commonly used as a bearing surface, and as a coating on rudders and
centerboards, or on the bottoms of racing craft that are dry
sailed. It does not provide antifouling qualities. The epoxy/graphite
mixture can also be used in teak deck construction to simulate the
look of traditional seams and to protect the epoxy from
sunlight. Cures to a black color. Add to mixed resin/hardener at the
rate of up to 10% by volume (approximately 5.7 oz. per B
group).
Six squirts of 105 is 3 1/2 fl oz, and six squirts of 207 is 1
1/4 fl oz (roughly). (It's also worth noting that five squirts
105 is 3 fl oz, and five squirts 207 is 1 fl oz.) The
instructions say to use 1 tablespoon per 5 fl oz, so for the
mixed epoxy it's about the right ratio. I used a brush to apply
this coat, and as a result it was a bit thicker than with the
roller, which I wanted since it will be sanded down. It used five
6-squirt cups. The trick for this coat is to ensure that as you
get closer to the bow, put less of the epoxy on - otherwise you
run into problems with drips. I had to wipe off quite a number
of drips, and as a result the bow wound up getting black clouds which I
will have to sand off later. Also, use the brush to "pull" the
epoxy up from the line. It might also be worth waiting a bit for
the epoxy to kick slightly and become more viscous. As it was,
I just kept coming back every 5-10 minutes to check for and
remove drips.
All in all, I used a bunch of epoxy:
- coat 1: 6 ten-squirt cups
- coat 2: 5 ten-squirt cups
- coat 3: 3 ten-squirt cups
- coat 4 (with graphite, below chine): 5 six-squirt cups
During the day while waiting for epoxy to cure, I pulled out my
transom. The transom had a bunch of 1-3 mm bubbles all over the
surface, under the glass. I knew I could do better, it was pretty
ugly. I decided I could build another (drag), try and inject some
resin into the holes (hard), or use the belt sander and take off the
glass, and resurface. I decided on the last approach. It makes a huge
mess doing this, I couldn't have done it on anything that wasn't
perfectly flat, and wear long sleeves should you attempt it. Removing
the glass went well,
though, and the new sealer
coat looks pretty nice - hopefully the glass will add to that.
[Update 2005 May 8: In retrospect, to
avoid the problem of finding the exact centre line of the hull, I
should have drilled a hole right when I applied the second coat of epoxy. The
hole should be right along the centreline, in the middle of station 6.
Then, I should have notched the inner side of the hull, right at the
tips of station 6. This way, I could have aligned up station 6
perfectly.]
Trimming the hull
posted 2004 Aug 1
We're getting close. The hull is starting to look pretty good (and
it's getting smooth, as well, which is heartening).
I took the orbital sander to the hull with 100 grit (I couldn't
find 80) just to knock down the scratches. It makes a substantial
difference in how smooth the hull feels - it's much nicer now.
Next up is trimming the edge of the hull down to the right point.
The first step is to drill holes along the flat gunwale edges up
through the hull. Then put nails through the holes and clamp a (fair)
strip of cedar to the nails, and mark the line along the hull (I used
red).
The manual shows Bram using a hand saw to trim the edge, but I
decided to use the jigsaw
- finer control of where I'm cutting, and less likely to split the
strips because of the motion of the blade. (I did wind up splitting
some near station 1 at the bow, but at that point it didn't matter a
lot because the split was away from the cutline).
The only trick with this is getting the bevel right. The jigsaw
cuts at 90° to the surface of the hull, and the edge should be
bevelled so that it aligns with the gunwale. I went back with a block plane and put more of
a bevel on the edge (and also cleaned it up and faired it a bit more).
The only trick is from stations 6 forward - there, the bevel is at
less than 90° to the hull, and if you just cut you'll cut off the
tips of the strongback. So, you have to cut 1/4" below the line, and
lift the jigsaw up so the top edge of the plate is touching the hull
and the bottom is about 1" off the surface. This way you cut an angle
in the strip, and can make it around the station edges.
Next I went back and marked the spots on the hull that need filling
with blue tape (the only downside: the tape is a bit too sticky and
can be hard to remove with gloves on). Then I mixed epoxy/207 with
2/3rds 405 (wood colour), 1/3 407 (purple), and a bit of 403 (to
lighten it up). Works great.