Glassing the cradle
posted 2004 Sep 26
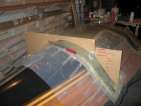
Did most of the work to get the cradle built. I started out by
building patterns for the cedar supports. I rough cut these by using
the template patterns for the stations. Once the cardboard was on the
cradle, I adjusted them by creating a "cut here" line. To do this, I
taped a pen to a spacer (a scrap piece of strip). Then I ran both
along the cradle, long edge of the strip against the cradle, and drew
a line along the cardboard pattern. This gave me a better cut line,
especially along the flat part of the cradle. I then cut the
cardboard along the line along the flat part, and slightly towards the
cradle edge on the vertical part. Once all that was done, I either removed more cardboard from
the tight spots with a rasp, or added some back with more
cardboard.
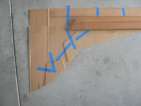
All I could find at the local lumberyard was 5/4 x 4", so I had to
cut out pieces to fit the patterns. The stern support is supposed to
be just over 45" wide, and I had the supports come up to about 1" from
the edges of the cradle. I cut a bunch of pieces and
then glued them up to
form the supports. Use the cardboard templates to trace out the
pattern onto the wood, and cut to shape. The forward
support required some rasping to get it to fit well, mostly because
the contact edge needs an angle on it to fit against the wood. The
aft support fits pretty easily right after cutting.
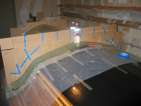
I traced out the cut pattern on the cradle itself, using my red
epoxy mixing cups to get rounded edges at the corners. Then I trimmed
the cradle to size. I went through about 5 blades doing this - the
glass dulls everything it touches. The best cutting blade was the
metal blade - the entire cradle can be cut with about three of
them.
Next, rough up the
outer surface, bond the
front and rear supports in place with a 1/2" fillet (drag a washer
along the fillet to get the exact radius), and cover the fillet with
two layers of 2" glass tape.
At this point, I had to ensure both supports were level. I ensured
the hull was level, and then checked level on the bottom edge of the
support. The front one needed an adjustment, so I cut off a wedge along the
top edge. After these two pieces are in place, I added in the centre
rail to provide a little more support and torsional resistance.
Next up is to glass the entire thing again with another two layers.
I ran out of glass - I only had enough for another full layer, and
then one layer on the leading and trailing edge of the cradle. I
started with 10 yards 10 oz e-glass, and I could have used another
yard or two. Here's the first layer, which took 5
10-squirt cups, and two hours to do - mostly because of all the weird
angles and trying to get a decent (no air gaps) connection. Followed
by the second layer with
the remaining scraps of glass I have.
Swift Sailing Do's & Don'ts
posted 2004 Sep 20
Bram posted
a quick do's and don'ts list of things to do when sailing a Swift
(since the howto manual isn't done yet).
Short course How To Manual
Let me start with some don'ts:
- Don't let anyone sail your boat without knee pads and shin
guards and a life jacket (most areas a wet suit is also a must)
- Don't leave your rig under tension overnight
- Don't leave your boat out in the sunlight for long periods
when not in use (cover it)
- Don't leave your inspection ports or drain plug in when the
boat is not being sailed
- Don't let you breather hole become plugged
- Don't let anyone sail your boat without first giving them a
stern warning about not standing astride the tiller to raise the
kite (they will fall on their ass and break your tiller or transom
bar).
- Don't leave your sails in the sunlight when not in use
- Don't believe that sailing downwind is easier without the
kite.
- Don't sail straight downwind. Instead, broad reach and
jibe-much like tacking to weather
- Don't fall inboard during capsizes if you can avoid it.
Instead, bail early and go over the outside so that you don't get
pitched into you new sails (you damage either your sails or you
mast track).
Some Do's:
- Do work your way up the wind range, starting in light wind (6
knots or so).
- Do capsize and right the boat intentionally a few times to get
practice and to check for leaks
- Do hoist the kite on starboard tack. Drop your right knee on
the starboard wing and place the tiller extension behind your
right knee. Steer a course that keeps the boat level while in
this position (usually lower than a beam reach but always higher
than a run) by rocking on your knee/ass to whichever side the
tiller needs to move. With a little practice you will find that
you can steer the boat very well with no hands. Drop the kite on
port tack using the same but opposite technique.
- Do Set your primary shrouds at 20 to 25 on the new Loos gauge
and your caps at 7 to 10. To start with, set your lowers so they
are just snug after you set your primaries but before you pull on
the caps.
- Do steer aggressively through jibes-keep your speed up so the
load on the mainsail is minimal.
Miscellaneous stuff
posted 2004 Sep 15
So it turns out that VMG
Skiffs is going to stop production of the Swift - the number of
orders they expected to get just never materialised. I talked to Pat
there, and he was sad to stop, but it just wasn't profitable.
Apparently he had had other 505 and I-14 sailors through the shop, and
they were saying that the Swifts he was rolling out were $40,000 boats
easily - but it's hard to convince people that $40k for a 14' boat is
worth the cost.
Before they shut down, I asked him to build me a couple pieces - a
vang arm assembly (which would have been a bear to do myself), the
mast step, the mainsheet cleat platform, and a sheet of peel ply.
These were the bits and pieces that would have been the most
difficult to fabricate at home, so I'm happy to get them.
Pat also indicated that a lot of people can't justify spending $14k
on a (homebuilt) boat when it's a singlehander - at least if your wife
can go out with you, she is somewhat invested in the funding of the
boat. The Swift is also hard to build, especially for first-timers.
To address both these problems, Pat liked the NS-14 skiffs - he pointed
me at the Delta V, by Northwest Marine Design,
from whom I had already bought plans for the K-12. Perhaps that will
be another boat later on...
Another interesting idea I saw while on vacation... Someone up at
Green Acres had a Mistral WindGlider
(watch out, flash heavy). This was an inflatable base with a small
sail, and rudder and centerboard. It looked small, not really
comfortable to sail, and would require a lot of wind to get going. On
the other hand, it packs up into a (relatively) smallish bag, so you
can take it with you - pretty useful.
Finally, I found a good glossary of boat
building terms.