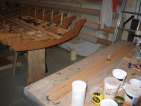
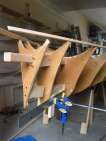
Installing strips
posted 2004 May 31
Even after all that alignment, I still decided I needed a shim on
station 5. As I was laying the first few strips out, the inward bow
of the strips at that station was pretty large, and it looked like if
I moved it over I would get a bow on the other side, so I put in a
shim. This consisted of 4 strips of 1" wide thin cardboard (like
cereal box cardboard), stacked, each 2" shorter than the next one so
the width narrows as you get closer to the keel. I removed the
staples on that side and put the shim in, and it looks a lot
better.
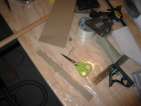
Getting a tight fit for the strip in the bow is important.
Creating a bead is easy - a few pulls of the plane and it's done. For
the coves, I created a tool - a 7/32" chainsaw file taped to a spare
strip. I later added two pieces of plywood on either side so the file
would be guided to the right location. This works pretty well.
Once a strip running along the keel line would touch the side
strips, I put strips down the keel. I planed off the beads on two
strips just as I did with the keel, and then used the laser level to align the
strips up correctly. Glue and staple, and add lots of tape to ensure
they are tight to each other.
Now it's just a matter of putting strips on. Once the ends hanging
off the stern were long enough, I started cutting a single strip in
half and scarfing the
leftovers with a halved strip. The scarf is about 3-4 inches long, so
it's very strong, and I'm careful to put the scarfed strips in where
there won't be two scarfs side-by-side.
Finished off one bundle of strips - three more to go!
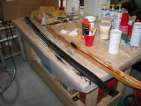
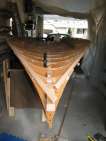
Completing toe rails, installing strips
posted 2004 May 23
Strips are installed!
Glassing the rails went pretty well - one of them worked very well,
and the other had a few extra bubbles along one edge. To remedy this,
I took a syringe full of epoxy and squirted it into the voids. This
worked quite well - well enough that I'm considering going back to
some other parts and trying this out on them as well.
Once that was all dry, I painted on a epoxy/graphite/406 mixture.
When dry, I sanded it down smooth - it looks like it will need another
one just to make the rails perfectly smooth anyway. Later on, I'm
going to head over to Max's and use his table router to rout a groove
in the bottom - but until then, I might as well continue on the
hull.
I flipped over the strongback (again), and did some final checking
on the station positions. Station 1 had to be dropped down slightly
and realigned so it was centred. I also moved station 4 over
slightly. Once that was complete, I cut the front of the
strongback rail so it matched the lie of the strips, and went back
over all the forms to ensure the tape hadn't broken through. (I also
took an intermission to
cover my workbench with new plastic.)
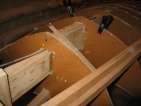
The strongback is supported laterally only by the divits in the
stands, and isn't very strong if you lean on it. Installing strips is
going to require a bunch of leaning. So I built side supports out of the
remaining piece of tube that the cedar strips came in.
Next, I went through the entire strongback and ensured all the
wings were the correct distance apart. Occasionally I had to add a
shim to get them perfectly vertical.
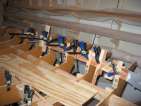
Now I was ready for the first strips. The first two strips go
above and below the chine, and you have to create a rolling bevel for
them to attach. I planed the cove off one strip to match the angle
which bisected the two surfaces on either side of the chine line. For
the other strip, I just held both strips on the chine and made sure
they were tight.
I used a bunch of U-shaped pieces of plywood to hold the first
strip on the strongback, and then sighted down it to ensure it was
fair and didn't have any kinks. Once it was ready, I stapled it on! The second
one was easy - glue the edge, staple it down (starting at the bow),
and then tape all the pieces together between the stations, so they
get a good bond.
Getting the pieces at the bow to work correctly is a bit of a pain
- they should intersect like interlocking fingers. I used the saw and
the power sander to try and get the right angle, and then worked for a
perfect fit with a sanding block. You have to take the cove off the
bottom of the strips as they go on, to ensure that the strip can fit
into the previous strip.
Building the toe rails
posted 2004 May 13
Started building the toe rails. (After all that alignment, you
can't just immediately start stripping the hull - you have to build
these rails first. You are tantalized before being allowed to
continue.)
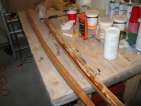
Per the directions, I cut 36 strips of 64" each, and removed the
cove on 12 of them. I marked the ends of those 12 so I could find
them easily again. (I did this a while ago.) I put down an extra
sheet of plastic on the workbench, and then pre-painted 18 of the
strips needed for one rail with a mixture of epoxy/206/406. I then
built up a stack, 3 wide and 6 tall, with 2" glass tape and epoxy
mixture between each layer of 3 strips. Once this was ready, I
wrapped them in the extra plastic, and clamped them to the
strongback. Be sure to pull down tight on them so all the strips are
touching the wingtops.
Once everything has cured, it's time to clean things up a bit. Lots
of time on the sander for this. Once the sides are cleaned of the
excess epoxy, sand off the upper gunwale edge so the outside edge is
at right angles to the
wingtop. I did this by repeatedly running the rail along the edge of
the disc. I saved the dust from this, it may come in handy when
fairing.
The ends get a bevel from 1/8" up to 5" back from the end. Per the
clarification
the rails should be cut off at an overall length of 62". I marked
guidelines around the rails, then rough-cut them with the saw and
sanded them down to the marks.
Next up, I put a small 1/4" radius around all the top edges. Then
I glassed the top edge with 2" tape (with epoxy/207) - the
instructions say to use two 3" pieces overlapped along the top. Since
I don't have 3" tape, I put this 2" piece down along the top, and I'll
use the regular s-glass cloth for the entire rail.
I also did another check of the alignment with the laser level -
shooting from station 14, it's out by about 2mm at station 7. Pretty
good, I figure - it's still the way the strips fall that's most
important.
Alignment done!
posted 2004 May 2
Well, I finally got to the point where I think everything is in
alignment. I may have to adjust the front few sections to ensure
strips are true on them, but overall everything seems to be as good as
I'm going to be able to get it.
Stations 1 and 1/2 I aligned by checking them against the gunwale
strips. At first I was worried because the lie of the stations seems
to indicate that the bow curves down, but I found a picture in the
manual which shows that this is indeed what happens.
I trimmed off the side rails at station 6 so the strips wouldn't
run into the rails. I have to do this for station 1 still, and
there's more to be removed there.
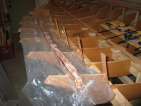
With the alignment finally complete, I started on the toe rails.
For the toe rails, you use 18 strips 64" long. They are stacked three
tall and six wide. The bottom 6 have their coves removed. Ideally I
should not have cut these pieces before aligning the strongback,
because the mangled gunwale strips would have been perfect to put in
the rails. Oh well.
I laid down a piece of plastic, mixed up a batch of expoy/207/406,
and used a 2" paintbrush to glop the mixture on. I pre-wet one side
of the strips, which also allowed some of the mix to get between the
strips. Then, I laid them
out - I made sure there was enough mix in the coves, put three
together, painted the mix on top, put down 2" glass tape, painted
again, and then another layer of strips. This goes on until the stack
is six high. Be sure the strips with the cove removed are all on one
side. Once that's done, I wrapped the assembly in the plastic, and clamp it to the strongback.
Add a bunch more clamps to ensure the strips touch the bottom edge and
are tight together both vertically and horizontally.
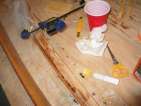
Really the only problem I had was with the pump on the 207 - it
went up so quickly, it pulled up air. I slowed down my pumping action
a bit, and that seemed to improve the situation. Also, one strip must
have been pretty bent, as I had a couple problems where the strip
wanted to fly out of the stack. Lots of clamping helped keep it in
place.
Page 51 of 62
« First
…
«
49
50
51
52
53
»
…
Last »