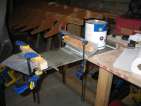
Installing the centreboard trunk
posted 2004 Nov 28
I finally worked up the courage to install the centreboard trunk.
More or less, this was a matter of doing enough dry runs with
inserting everything in place, measuring, double-checking,
triple-checking, and ensuring that everything was as correct as it
could be before actually taking the plunge and putting everything in
place.
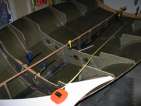
Before cutting station 8 in half (the trunk fits in a gap cut in
the middle of the station), I measured everything out and dropped it
into place, and drew lines along the hull where it should be
installed. (Of course, I then sanded down the hull and repeated the
exercise...) I also made a mark on the centre strip once I had made
the bulkhead vertical, so when I actually tack things in place it's
easy to get the bulkhead vertical again.
I then measured the
width of the trunk in about five different spots, and transcribed the
measurements to the bulkhead and to the station 8 template, so I can
undercut slightly and then sneak up on the perfect fit with the
sander. All the measurements were the same save one, which was a bit
larger - probably because of the width of glass tape.
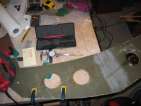
With everything measured, I cut the bulkhead, then
sanded it down to size. I cut the divits in the top and
bottom, and the drain
hole. I then clamped these bulkhead halves to the template
pattern, and put that back in the hull and realigned everything -
vertically, and equidistant from the transom (and 24" leading edge to
leading edge from station 6).
Once everything was aligned, I tacked the first half of station 8
in place, using the glue gun and pressing the bulkhead against the
correctly aligned template. It took maybe 6 attempts to get this to
work - the bulkhead kept popping off when I clamped the wing to it.
Solution: more glue. The bulkhead also didn't fit flush against the
hull, despite my trying to coax it into the correct position as I did
with station 6 - things
are sufficiently stiff that they won't move. At the hull edge of the
flare, the bulkhead is maybe 1-1.5mm away from touching the
hull. I also taped
the bulkhead to the adjacent bulkheads to ensure it stays vertical
while bonding it in place (although fibre tape would have been better
- blue tape likes to stretch). Then fillet and tape the bulkhead
in place, and everything's good.
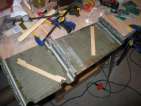
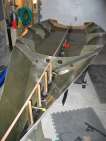
Even with all that measurement, the centreboard trunk didn't fit perfectly against the bonded
bulkhead 8, and I had to go back and remove 1/8" from the bottom
divit. Once that was done, I began aligning the trunk. Since I knew
that bulkhead 8 had been cut vertically, I had to align the bulkhead
centered in the hull, and that would cause the trunk to be vertical as
well. This worked well - when I put the trunk in place with half of
bulkhead 8 bonded in, the trunk lined up perfectly with the lines on
bulkhead 6. So confidence levels are high(ish).
I removed a small amount from the top edge (below the divits) on
both sides of the bulkhead to get a better fit, and then tried another method of checking
for vertical. By putting a post in the trunk and measuring from the
top of the post to the gunwales, I can see if the distance is equal.
It was off by about 1/4" - which seems within the margin of error.
With the trunk all aligned, I drilled holes in bulkhead 6 so
I can screw it back in and everything will match up.
Time to bond. I first put a shim in the bottom of the
trunk, so when I come back and route out the hole there's a little gap
between the hull skin and the trunk wall (which is good). Then a thin
line of expoy/405 around the base edge (to stop water from getting in
and out), and a whole pile of filler on the station 6 edge. Plop it
in, clamp it to bulkhead 6, and screw it together. I used a paint can
to hold the trunk down - bulkhead 6 leans forward slightly and the
trunk wanted to pop off the hull without the extra weight. Fillet
everything with a 1/2" fillet.
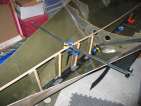
Next, I placed and tacked
the other half of bulkhead 8 in place. I used hot glue on the trunk
edge of the bulkhead, which probably wasn't a good idea - hot glue
won't compress to nothing, so it pushed the second half of the
bulkhead a little further over the edge of the gunwale than it was
during dry runs. It was easier to tack in place, though, only took
one try. Then bond in place with epoxy/405, and finally return to the
entire thing and tape over all the fillets, ensure the water path is
clear, and seal any remaining open cedar (the drain path for station
8, for instance).
All done. That's a
relief. I think (hope) it's all good to go.
No Boat of the Year honours this year
posted 2004 Nov 27
Bram spent some
time in Annapolis for the Sailing World Boat of the
Year competition.
Alas, it was not to be. Boat
of the Year went to the J/100. The best performance boat went to
the Nacra
A2.
Maybe next time.
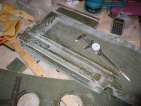
Building the centreboard trunk
posted 2004 Nov 21
I was telling Max that when I need to be absolutely sure that I get
something right, I slow down. Like ensuring that the c/b trunk is
perfectly vertical, that it is perfectly straight, and that everything
is aligned. Thus I'm not careening forward as usual.
Another problem I've been pondering is exactly how I'm going to
hoist this boat - I need to solve this since I'm going to hang it
while working on the deck. The list was discussing
possible ways to hoist the deck (and later boat). The Harken Hoister
came up as a possibility. However, the Swift (plus all it's gear)
would probably be pushing the weight limits of the largest size, and
in a conversation with the Harken rep he said he can't sanction such a
thing - so I guess I'll have to build something out myself. However,
the installation instructions
provide enough detail that I could build something very similar, with
a higher weight limit.
Before going down that path, I did consider using a Sports Solutions Up
And Away Deluxe Hoist System 40030, which is similar to the hoist
we use to hang
our bicycles, just with a 200 lb limit.
The roof is 10'4" high at the small door side of the garage, and
slopes slightly down towards the garage door end. From the far wall
to the duct is 11'4". There are 6 ceiling trusses 16" apart. One
other problem with hoisting is the ceiling trusses. They aren't
standard 2x4s or 2x6s:
Did a few other things this week. I started marking up station 8 in
preparation of cutting it. I bonded the mast step in place. However,
after having bonded it in place, I realised that the mast step didn't
reach the edges of the trunk - it was shy by almost 1/8" in
places. Given the downward force on this plate, I wanted all the force
applied to the entire edge. So I decided to destructively remove it
(gulp!). I drilled four holes in the corners, then ran my jigsaw
around to remove the middle piece. I then put the trunk on it's side
and cut off the top 1/8" of the piece with the jigsaw. I sanded off
the remaining cedar and hybrid, and used a file to remove the
remaining filets. This was instructive - it helps show what a good
fillet looks like (the space formed by a washer pressed edgewise into
a 90° wall), and why. Once everything was sanded down, I bonded
in a replacement which
fits better.
I completed all the bonding together of the trunk - I bonded the top flanges for the trunk,
which was all that was left. To position these correctly, I clamped
the end piece in place and put the trunk in the hull. When the end
piece barely touched the centre strip, I took the trunk out, moved the
endpiece up 1/8", and called that good. For the step end of the long
flanges, I again checked how much space there was between the step and
the strip, and added 1/8". When I fit the deck, I can sand off what is
necessary to get a perfect fit.
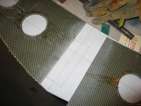
I then wrapped the
flanges in a bit of 2" tape, and the centreboard trunk is pretty
much done. I decided on 2" tape because getting the edges of 1" tape
to stick (especially above the 45° flange) wasn't going to be easy
- it's hard now for the spots where I am using 1" tape (at the step
end of the long flange).
I have also been assembling parts for the hoister. So far, these
have been pulleys (from Home Depot, theirs were steel instead of Lowe's
plastic variety), rope, and eye hooks. All the pieces involved in
hanging the hull say "not to be used when hanging overhead" and have
various different rated working loads. So a little stress test was
required.
Finally, I ordered another 10 Yellow Cedar strips from Raven so I would have enough
for the details I'd like to put on the deck. Sheane Reid, the owner
of Raven, was saying that the number of orders he's been getting is
dropping - a few orders for Swifts, but other than that very little.
Apparently the home-built kayak market is drying up.
The strips were trucked down from B.C. to a depot in Kent; I then went
down and picked them up there. This was really easy - they are 16'
long strips, packed in a 17' long cardboard tube. Tying this tube
down to the roof rack was a piece of cake (I should have picked up the
first batch).
One other tidbit - when I cut down the tubes the first time, I used
a jigsaw and made a bunch of tubes using the jigsaw - the
tubes are substantial and made from 1/4" thick cardboard. This takes
forever. This time around, I lay out the tube and ran down the length
with the circular saw, cutting it in half - then I cut pieces every
few feet, and pulled them up. Worked great, and took no time at
all.
[Update 2006 Mar 5: When building the
centreboard trunk, there's a new adjustment which is worth taking
advantage of. The PDF "Some
notes on making the centreboard insert blocks" describes epoxying
tubes into the corners to guide the bolts into place. Way easier when
the trunk is still being assembled.]
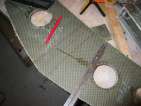
Building the centreboard trunk
posted 2004 Nov 14
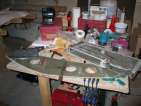
I'm continuing to work on bonding the entire c/b trunk up. There
are a lot of pieces, and they all have to be carefully measured before
bonding, so it's taking some time. I have to say - it probably would
have been a better idea to bond this all together with the hull on the
forms. The downside to that would be that you can't take the trunk
and test for fit (maybe just bonding the posts to the sides would be
all you did, then install the flanges with the hull off the forms so
the flange positioning is correct). But the reality is I've been
doing a bunch of work at the bench, and not in the hull, so why not be
able to park the car in the garage?
First off, my initial
attempt at making the posts wider didn't pan out, I still need to
add about 1/8" to get them to the right width. Bram said a shim would
work, so I cut and bonded a shim. It's made
from some scrap hybrid - I cut through the cedar with the jigsaw so I
had two thin pieces. It worked pretty well - the jigsaw doesn't cut
perfectly straight, but it's easy to flatten out the resulting piece
on the belt sander. I also used tape between the shim and the post to
increase strength.
Next up is actually bonding the second side of the trunk on. I
decided to use tape on the inside edge of the centre post - just to
add a bit more strength. I taped the first side, then
put down a layer of epoxy/403/406 - because this is laminating, 403 is
a good filler, that's it's strength. Be sure to sand the inside of
the flat trunk edge - I didn't, and should have. To get nice fillets,
I screwed washers on to the end of a scrap stick - worked perfectly. Be sure to clamp
in the middle as well as the ends - otherwise the centre doesn't get
as tight a contact. I also wound up using a few tools to remove the excess
epoxy.
While waiting for the fillet to cure a bit, I positioned the
soldiers. Remember - do these last, because otherwise you can't
position the partial bulkheads easily. I have cut down the
soldiers and bulkheads by different amounts: the solders by ¼",
the bulkheads by 1/8", and
the t-soldiers not at all. A lot of sanding may be required to get
everything lined up and even. Bram says here
that the ¼" removed was also to cause the gunwales to come down
a bit lower. It's a pity this just came up now, after I've bonded
everything in - using the router would have been a lot easier than the
sander.
I placed the tape
inside the centreboard trunk. This was pretty easy, as was wetting it
out with epoxy. The only trick is that it wants to pull away from the
angle in the inside, I had to be careful to push it in tight.
Next, I bonded the soldiers in place. I made sure everything was
sanded down. I used a syringe to fill under the soldiers so they're
solidly bonded to the hull. I used epoxy/405. I filleted around the
edges with a 1/2" radius washer. I got smart this time with the tape
- I cut the pieces as an isosceles
trapezoid. This way they don't stick out above the fillet (as they
do on the t-soldiers, I'll have to go back and remove the excess). The
other thing here is that painting plain epoxy on the fillet which
isn't covered with tape makes the surface a lot smoother, especially
if you do this while it's still wet.
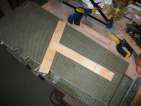
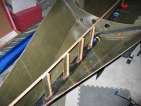
Before bonding the bottom flanges, I wanted to be able to locate
the hole easily when the hull is flipped over. So I traced an outline of the
location, and drilled a
couple holes for the router bit. These will also be handy to verify
my identified centreline is exactly right.
Next up is bonding the bottom flanges onto the bottom edge of the
centreboard trunk. These flanges don't run parallel with the bottom
of the mast step - it's important to place the trunk in the hull and
align everything. Once it's all aligned, bond the flanges in place,
bond on the end piece,
add a layer of tape and
everything is ready to go. In retrospect, I probably should have used
1" tape - I think the 2" tape is overkill.
One other note: when you attach the soldiers to the underside of
the deck, you put on a 3" radius circle of glass between the soldier
and the tape. This spreads the load around, and thus reduces the
likelihood that the carbon tape will break. I wonder if it would have
been a good idea to do this on the hull, too.
Installing t-soldiers
posted 2004 Nov 7
Didn't get a whole lot done this week. Worked on installing
t-soldiers on Monday, then there was this election on Tuesday, went to
a Canucks night out on Wednesday, watched Thursday night TV, and
prepared for our weekend in Vancouver on Friday.
I did bond the t-soldiers to the hull (ahead of station 6),
however. First, I ran a strip down the centreline of
the hull (a strip I know is straight, some aren't) and tacked it in
place at the bow and bulkhead 6. Then, I sanded down the hull and
t-soldiers at the areas that will be bonded. Then, I centered the
t-soldiers on the centerline and so that they were placed halfway in
front and behind the station line. Next, I ensured the center of the
top of the t-soldier was 12" from the front edge of bulkhead 6 (and
likewise all the way to soldier 2). I marked a line around the base
so I knew where the soldier was going to land when I started bonding.
I ensured the soldiers were vertical with the level (having already
adjusted the hull so that bulkhead 6 is perfectly vertical). Once all
this was done, I tacked the top edge in place with a dollop of
hot-glue.
I wanted to bond the bottom edge of the soldiers to the hull, so I
had to lift the soldiers
out of the way while I put some epoxy in the correct location (good
thing I'd drawn a little rectangle where the soldier should sit). I
sanded a 5° angle on the bottom edge of soldier 2 so it would sit
perfectly vertically; I did the same to soldier 3, but 5° was a
bit too much, 2½° would have been better. Once I had lifted
the soldiers out of the way, I used a syringe to fill the rectangle
with epoxy/405.
All told, bonding the soldiers in place took two squirts for the fillets,
and one for the epoxy on the glass.
Page 45 of 62
« First
…
«
43
44
45
46
47
»
…
Last »