(More) Installing the launcher throat
posted 2005 Jul 28
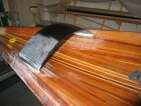
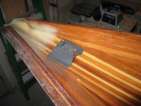
Next steps: added the second layer of glass, this
time using s-glass and a full 6" of overlap on the launcher throat.
The best way to do this is to wet out the glass with a brush, and then
use a squeegee to remove the excess epoxy and press it into the
surface.
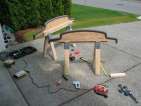
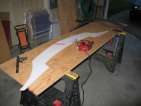
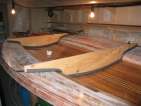
I also had the time to build sawhorses to support the deck while I
work on it. These are 5/8" ply cut to shape at stations 6 and 10, then
a strip of pipe insulation used to protect the hull. The actual
sawhorses are the boring old scrap 2x4 ends (I got lucky and found a
bunch of culled pieces at home depot), and pre-made sawhorse
supports. The curved supports are screwed into the sawhorses with
drywall screws. Once I'm done with these, I'm going to re-purpose the
legs to make Tristan a new table.
[Update 2006 Aug 7: in retrospect,
using this much overlap of glass probably wasn't worth it - four
inches was enough. And I should have cut the glass into a isosceles
trapezoid where it lay on the deck, so all the glass on the deck would
be covered by the black coat.]
Installing the launcher throat
posted 2005 Jul 22
Back from India, back from Calgary, and it's time to do a bit more
work on the boat.
Up in Calgary I met up with Roger of Aquilo Boats who built a bunch
of parts for me. In particular:
- launcher throat
- spinnaker pole ring
- forestay fitting
- centreboard foam blank
- rudder foam blank
- mast base
- foam spreader cores
Instructions for building the launcher throat are on the website
(local). I had
Roger do it for me, I figured I'd rather spend the money and work on
the hull than spend two weeks building the launcher throat.
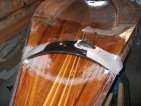
The launcher throats are two layers of hybrid and one layer of
s-glass, wrapped around a foam wing shape. It's really light (less
than 1 lb.), but it takes a *lot* of time to carve off the edges and
shape it to the deck - lots of time on the belt sander. My throat
wound up with an angle of about 15° along the long edge and
25° on the short edge.
It should be installed 28"
back (a change from the book). A chord running through the aero
section should hit the deck at the mast. Mine is a bit further back and not
quite that tilted back, but should be fine. It is held in place with
a 5/8" fillet. (The instructions say 1 1/4" diameter, and it took me a
while to see that it was diameter, not radius - since all the other
fillet measurements are given as radii).
Then a layer of 2" e-glass
tape, wet everything out, and it's in place.
[Update 2008 Feb 4: Don't install it
a "bit further back". The entire jib system relies on the launcher
throat being in the correct position a certain distance from the
forestay, and by moving it back it messes up the rigging. (Not so
much that it's unrecoverable, but it's a hassle that's not worth
dealing with.) The spinnaker socks are also made to fit the correct
position, not the further back position. Don't move it back.]