More on the centreboard
posted 2006 November 28
I asked
on the list about how closely aligned the leading edges of the saddles
should be:
When I layed mine up, the saddles were offset (at the trunk end) by
around 1/8" - if I kept pressing them together they'd miss each other
by 1/8". I tried to fix this a couple times, but the problem I ran
into is it (could? would?) lead to the layup sliding up and off, which
wouldn't be good.
A few good ideas came out of this:
- Alignment needn't be perfect. But that said, to improve it,
hinge the leading edge side of the saddles together with duct tape in
several places to help hold them in place while clamping. (Bill)
- When I made my stands, I C-clamped little ledges of
1”x1” wood to support the saddles backed with hardboard
(masonite). The ledges supported the lower ends of the saddles while
getting the clamps in place, but not tight, along the top of the
saddle. (Bill)
- (Perhaps?) I started making my foils without the benefit of the
Centreboard 101 PDF, so the first layer of hybrid went on with my
saddles laying flat. But this mistake gave me a nice stiff blank to
epoxy to the stands. (Bill)
- Once all of the clamps were ready for tightening, I pulled down
on the plastic sheeting covering the peel ply to tighten the layup
before final clamping. (Bill)
- Use chipboard for the saddles. It's flat. It's heavy. It
doesn't bow like plywood does.
- Clamp bar levels along either side of the leading edge, instead
of using a straight piece of 1”x4”. Mark
did this.
- On the rudder, I think I'm going to clamp the fabric exiting the
trailing edge with two strips of cedar on either side. Given that
there's just point contact on the trailing edges with the saddles, and
the saddles may not align perfectly, this seems like a reasonable
precaution.
- Something for others to consider is to use a layer of perforated
ply between the peel ply and the breather or absorbent layer. Of
course vacuum is even better. (Dave Lindsey) (Fiberglass
Supply has some of this.)
- There was a conversation
about if internal ribs are a good idea. Christian has had problems
with the (v2) foam cores breaking:
I would suggest adding something in the middle to help keep the
skins apart. I've had 3 of those break, and each time the foam had
compressed/crushed, once that happens the board breaks. Since the
leading edge of those boards is straight you can just run it through a
table saw with a thin kerf blade. Greg suggested carbon there, I have
heard that other classes have used wood. Anyway you get the idea. Greg
suggested 2 cuts. Depending on what you use and how thick it is, that
might be a good idea. Its like an I-Beam, so you want to make the cut
around the section where it is thickest.
I've switched to a 29er board in 015. It is probably not the
fastest, but I dont have to worry about it breaking and its nice and
wide to stand on.
In 073 I have a Phil's
Foil cedar cored board. He charges about $200 for the core. It
requires less layup, and I didn't have to worry about keeping it all
straight etc,etc. So the end cost is probably around the same as a
foam cored one. But it is of course heavier.
For the cedar cored board, Christian used this layup:
Two layers of hybrid, left it short of the trailing edge of the
board. I did one about 1 inch short, and the next 2 inches
short. (cord on the board is about 10 inches) On the outside I put a
layer of 9oz S-glass beyond the trailing edge. Sand it down to a nice
fine edge once cured/faired.
Robert has a wood cored board also, not sure about the exact layup,
but I think he just has 2-3 layers of glass on his.
Greg also describe the process he used to add internal sheer webs
to his rudder/centreboard.
- Join the saddle parts for one side & mount on flat plywood.
- Join the core parts in the saddle but cover with saran to prevent sticking.
- Join the other saddle parts on the core in the lower saddle, cover with saran to prevent sticking.
- Stretch saran over saddles stick tape to under side to keep clean.
- Take out the core, mark a line from root to tip on both sides where you want the shear web. Mark a line 1 inch on either side parallel to the shear web.
- Between the two outer parallel lines on both sides of the board sand a slot in the board 2 inches wide, about 16th inch deep.
- Cut the board in half down the center of the slot.
- Cut out strips of carbon and hybrid, on the bias if you can as long as the board. Using any scraps you have.
- Layup the strips with epoxy, alternating their bias, on the bench top, 4-6 layers depending how deep your slot is.
- Place the epoxyed tapes in the gap between the halves of the blade.
- Bend 1/2 of the plys to the leading edge and 1/2 to the trailing edge.
- Lay some mylar strip on top of the wet epoxyed cores to help you handle the thing.
- Repeat divide of the shear web for the other side of the board and mylar cover.
- Layup some carbon uni. I use 1-2 strip of 2 inch wide on each side of the board.
- Use a bit of goop to fill any spaces.
- Put the uni on top of the sheer web to help hold it down and provide a cap.
- Replace mylar if you want or replace with thin peel ply strip or just sand it later.
- Tape the two halves together with masking tape
- Put back in saddles and let set for 6 hours with a few weights on top.
- At 6 hours, crack open and remove peel ply.
- Let set hard for 24hrs fill and sand, if not already fair.
Repeat procedure if you need extra sheer webs.
Then folow the skinning procedure as before.
Build the centreboard
posted 2006 November 27
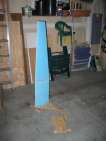
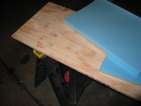
Built the centreboard. First, I bonded the blank to a scrap
of wood kicking around the garage. I attached it about an inch below where the rods
will be. I trimmed the saddles down so
they were 1/2” shorter than the blank. I wrapped the saddles in
plastic wrap.
Once that was all ready, it was time to go. First three layers: an application
of epoxy/silica, then hybrid (10” short of full length), full-length
carbon, and full-length hybrid. Then 16” short carbon, 2x
full-length carbon, full-length s-glass, and the absorbent layers.
All tolled, all this layup took around three hours: we started at just
after nine, and went to just after noon.
Some thoughts on the process:
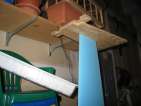
- When bonding the blank to the support, the leading edge of the
blank should flush with the top of the rods. When positioning the
kevlar/carbon on the leading edge, it's better to have the centre line
poking up or perfectly even with the rods.
- This takes a lot of epoxy. I didn't follow the instructions
exactly, and ensured that each layer was fully wetted out - I painted
on epoxy for each layer, then lightly squeegeed it in. Carbon seemed
to be very thirsty. I used 16 5-squirt cups (roughly).
- Early on, as I was squeegeeing, I pressed against the opposite
side of the blank to stop it from bowing away. This left depressions
in the layup on the other side. Don't do that.
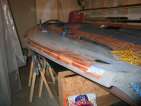
- Once everything was clamped, the assembly broke
off the smaller end, and so I broke off the larger end and laid it
flat. This was a mistake. The weight of all the fabric pulled everything down, causing the
trailing edge to be curved down.
- The weight of the layup on the blank causes the blank to bow
down in the middle of the blank - so when you put the saddles on the
outside, the saddles can be aligned at the ends but be too high by
1/8” in the middle. I don't think there's much to do about
this.
- Aligning the saddles perfectly is hard. We messed with the
alignment for quite a while - not pulling the entire saddles off, but
instead moving them around, which runs the risk of sliding the fabric forward on the blank
(messing the leading edge up, bad). On the narrow end, I screwed a support in. This
will make sure the saddles are correctly positioned, but will also
stop there from being any compression at this point - slightly wider
tip.
- Even with all that epoxy, I still got resin starvation. It seems
like in areas which were exceptionally well clamped, the epoxy wicked
through the peel ply and into the absorbent layer. But the absorbent
layer was a bit too absorbent, and that meant that the glass was
starved. I'll probably use muslin next time instead of t-shirt like
material.
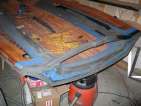
- The plastic wrap, despite being a hassle to set up, worked perfectly. The blue foam
just popped off (in areas where there was plastic wrap).
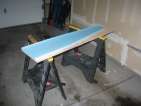
So, after peeling off the peel-ply, I set about to do
a bit of trimming and shaping. Once the bulk of
the curve was removed with the bench sander, I started to
fix the last little bits. I ran a ruler standing on its edge along
the entire trailing edge. If, when pressed tight, the trailing edge
holds the ruler up so you can see light under it, more trailing edge
needs to be taken off. Mark
that spot, then I used the hand-held belt sander to take off a bit
of extra material. The non-gravity side has a slight curve up - the
glass bends up before it goes down.
One additional problem is that the gravity side (the side all the
fabric draped down toward) has kevlar running through it. You can see
lines of
kevlar/carbon/kevlar. Aside from the fact this isn't quite as strong
as it could be (easier to delaminate), I have to figure out how to
stop the kevlar tufts from appearing and messing up the finish.
More sailing gadgets
posted 2006 November 22
The trade rags are
starting to build out the "cool gear" lists. Here's some more cool
sailing gadgets:
- Contemporary
Team Racing, both the manual as well as the cdrom with animated
flash demos. This sounds like a great way to learn the sailing
rules while figuring out how to team sail.
- Geko 301
which seems like the GPS I should have waited for when I bought my
first GPS. (Review.)
WAAS, satellite lock in 20 seconds... but then again, it's not like
my current GPS has seen extremely heavy use...
- Standard Horizon
radios, the HX270S and HX370S. (Review.)
Need a radio, right? (Of course, I'm not really sure how these
compare to the icom or Uniden offerings.)
- And, of course, Ultimate Sailing, which
I still really like.
Now building part four of 3
posted 2006 November 21
When I started this project, I originally thought of it in three
big parts: build the bits and
pieces, build the hull,
and build the deck. But
since the time I started, there's been a lot of development in how to
best build additional parts - and so now it seems like there's part
four, where all the new parts get built.
Part four is: build the centreboard, build the rudder, build the
rudder cassette, build the centreboard inserts, rig the boom, rig the
mast...
Hopefully I'll reach the end sooner or later. It's heartening to
know that someone has finished
already.
Preparing the centreboard/rudder
posted 2006 November 20
I started the process for building the centreboard. First, the PDF. I have the "v1"
cores from Greg - they are 57” long. The newer ones are
64” and "The new ones are higher aspect ratio and a bit
thinner. This makes them easier to make and most importantly easier
fit inside the CB case."
I cut a (single) sheet of 4x8 3/8” plywood to make the saddles. There isn't enough
room on that sheet to add in the rudder templates - I bought a smaller
2x4 sheet for those.
While I was at it, I also cut a (straight) piece of lumber I had
laying around for the spreaders.
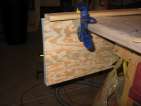
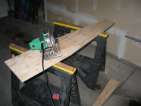
Next, drill, cut and
screw the support for the
rods - the holes should be 6” apart, inside edge to inside edge.
I'm going to use my PVC pipe from the flanges to hold the cloth.
Next, per the instructions, I screwed a very (very) straight piece
of 1x3 pine to one leading
edge of the saddles; I screwed another to the other saddle's
trailing edge. With the clamping, I figure this should keep it
perfectly straight. At first I used Quik-clamps for this - bar clamps work better. The
quick-clamps don't have quite enough strength to hold the 1x4 in
exactly the right spot - one screw shifted slightly when it hit the
plywood. Using the bar clamp makes sure the 1x4 stays in exactly the
same space.
Next, sand the edges, bond
the corners of the saddles in place, bond the two pieces of the
board together. Then, start cutting the materials.
This was my materials order:
| yds | item | description | unit price | price |
|---|
| 6 | C53-6292 | Style 284, 5.8oz. x 50in. Carbon, 3k, 2x2 twill, 12x12 | 50.65 | 303.90 |
| x | C61-4411 | Style 353, 5.1oz. x 38in. Kevlar, 4 HS | 15.90 | |
| 6 | C11-1459 | Style 4533, 5.6ox. x 30in. S-2 glass | 8.96 | 53.73 |
| 4 | M05-2888 | Nylon Ply 19 x 60in. 1.9oz. peel ply | 4.35 | 17.38 |
| 4 | M13-4314 | Release Bag-125, 0.001 x 60in release film | 1.19 | 4.77 |
| 6 | C61-4420 | Style 353, 5.1oz. x 50in. Kevlar, 4 HS | 18.57 | 111.42 |
| | | | | 491.20 |
| | | Freight | | 20.63 |
I bought from Fiberglass
Supply because they were close and I'd get what I needed within a
few days. They had run out of 38” wide kevlar, but had
50” instead - which turns out to be even better.
I calculated that 6 yards is the amount of carbon I needed to be
able to build both the rudder and the centreboard. Because the
centreboard is exactly 25” around, I can fit two pieces for it
next to each other, lengthwise. One rudder piece can fit crosswise
across 50” carbon.
Each fabric I cut by measuring, pulling a strand out, then cutting
along the strand. For full length pieces, be sure the fabric is about
1” short of the full length - that's plenty long.
Kevlar,
S-glass,
carbon. Once the piece
is cut, be sure to pull a strand from the centre, so when it goes on
the leading edge it can be aligned right to the leading edge of the
blade. Fold in half lengthwise and roll up. The S-glass is plain
weave - and it would have been better to get a satin weave. Plain
weave leaves too many ridges between strands of glass, which fills up
with epoxy adding no strength. Unfortunately, Sweet Composites
is just too far away (although if I did order from them, I would go
with
- Style 285 is a 17x17, 1140 denier, 5 oz, 4-harness satin [crowfoot] weave, thickness ~10 mils.
- Style 94233 is 13 x 13, 3K warp & fill, 5.7 oz 2x2 twill weave, similar to Hexcel style 284, thickness approx 9 mils.
- Style 6580 is a 73x70 6-oz 8-harness satin weave made with a 2-ply twisted yarn, thickness ~6 mils.
).
[Update 2006 Dec 18: It's worth
keeping those pulled strands. They can turn into the trailing edge of
the rudder and centreboard, once it's all skinned and the trailing
edge is sanded down.]
Next, cut the peel ply
- very thin nylon. I had bought some from VMG (when I got my vang and other pieces). It's
the same stuff, I probably didn't need to buy this. Then the
absorbent cotton fabric (the women at Jo-Anns asked "You want to sew
your own t-shirt?"), and the centreboard and rudder are ready to
assemble.
Nice ride
posted 2006 November 14
If I were going to buy a new yacht, I'd sure look hard at one of these.
They're even in the latest Bond thriller, and
they have an interesting story
about the filming.
Sanding down the deck black
posted 2006 November 13
This week was spent sanding down the application of black. Each
side took around three hours; then another half hour to remove the
tape (carefully). For most of the sanding, I sanded with the block on
all the flat surfaces, and then used a sheet of 120-grit to lightly
take the shine off the rounded edges (of the gunwale, for instance).
This way I was less likely to sand through - although it's not quite
as fair. I figure I sanded through in three or four spots - but I'll
fix those up when I come back and wetsand in the spring.
When I pulled off the tape, I pulled out a small divit. I guess there
is something to the instructions that the surface should be roughed up
before applying the epoxy. One more (guaranteed) round of epoxy.
Another problem that came up was the black seeped under the tape in a
number of spots. The best way I found
to address this was to wrap 120-grit paper around a putty knife, use
the edge of the knife to get a sharp edge, and sand away the
black. Seems to work pretty well.
So, with the rails, gunwale, and underside of the gunwale
done, it was time to remove all the tape. And it's starting to look
pretty sweet. Now all I
need is a centreboard, rudder, rudder box, mast, boom...
Winter building
posted 2006 November 5
I think my winter is going to be occupied with building the "other
parts" (also known as the "third half" of building a Swift). Taking
my lead from Bill, I'm going
to aim to:
- cut the CB trunk holes,
- made the CB cassette,
- built the rudder and CB from Greg's foam blanks,
- made the rudder cassette and tiller from Greg's blank, and
- perhaps (if I make it there) rigging my mast or boom.
In the spring (when it heats up again), I will complete the black
trim and finish the hull and topsides - I don't want to do this now,
because I want the varnish to cure when it's warmer.
Of course, this week was all used up building my new PC and
installing/transferring software over to it. Took a week to get it
going. Amazing.
Page 21 of 62
« First
…
«
19
20
21
22
23
»
…
Last »