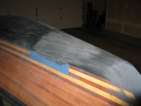
Sanding the deck
posted 2006 October 30
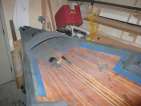
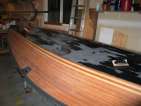
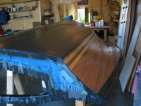
With the boat finally back in the garage, it's time to fix up the
deck and get it ready for a few applications of black. This has been
hard going - not having car out of garage means there's no impetus to
get cracking to get the car out of the elements, and so motivation is
lacking. That doesn't mean I haven't done a bunch of sanding, though.
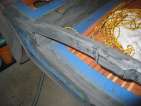
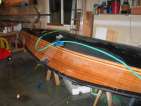
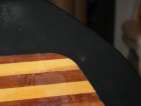
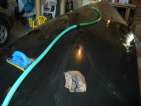
I also prepared the gunwale for black. I taped off a few spots to
stop "black overshoot". In spots where I had sanded through the green
tape, I added more on top. I should have put the original blue tape
as close to the edge of the green as possible (about 1mm works well).
Then, when sanding through the blue and green, it's a lot easier to
tell how much is left to go. Now, I have to put blue on to ensure
that I don't epoxy the green tape on to the deck.
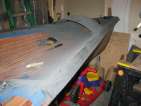
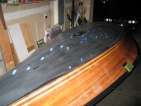
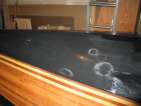
Once all that was ready, I tagged places that needed black with
post-it flags. Tape
sticks too well and it's hard to get off with gloved fingers. These
worked pretty well.
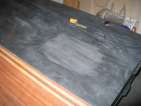
Then, black: one two three.
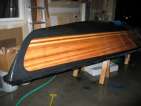
I stopped wetsanding at exactly the right time - the cold has
arrived. When I got up the next morning, there was a nice thick layer
of frost over everything outside. Apparently October has gone from a
record high to a record low. At least I timed things well.
Let's go sailing
posted 2006 October 26
I feel compelled to post this
video. Rockin'.
You might also want to check out the SwiftSolo Class Association's
photos on
flickr.
Enough is enough
posted 2006 October 23
Onwards. I cleaned up last week's epoxy pass,
and then marked all the
spots where I had to remove more scratches from the random orbital.
Putting a bright light
against the surface helps find all those spots. Then sand. Even if cold and wet.
Since I had gone to all this trouble, I figured even with the risk
of sanding through, I might as well take a few passes with the longboard to ensure things
are at least *somewhat* fair. This board had 220 on it; once I
finished a quick pass with that, I hit the 400-grit and 600-grit.
There were still some scratches, both from the random orbital and
spots I'd missed with the 400/600, and the 220 had left a mark. I tagged these with tape, then
sanded them down with 220 on a block, rinsed, squeegeed, and
checked if they needed another pass.
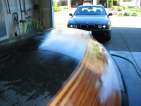
Once all those scratches were gone, I switched to a new sheet of 400 paper, with the
objective to remove all white lines (which were sanding lines from
coarser paper). Then 600
(again). Then 800. Now
there's a nice reflection.
By this point, the hull should look pretty much like a mirror.
Mine does, but there are a few obvious scratches. More than that, the
entire surface has the very light directional scratches, as metal
might if you rubbed it with a slightly abrasive rag. And finally,
all reflected lines should be (at most) bowed with no discontinuities.
Certainly I haven't reached that level of perfection. But to
remove the discontinuities in the reflection on the hull, I would have
to sand all the way down to the wood. Enough's enough. I want to sail
one day. Time to flip the hull back and start working on something
else. I could do this for the rest of time.
There are a still a few scratches; to get these out I'd have to
re-sand down to 400 and back up to 800. Max at one point said "well,
kayak builders all say to not bother going past 640 - not worth it".
And when I think about it, all I'm going to do is go out and scratch
up the hull anyway. Why take these out now?
So, I moved the hull back into the garage, vacuumed the floor (all the paste from
the wetsanding collected on the concrete, dried out, and would fly up
in the air if I didn't vacuum it up), and, wait for it... started sanding some more.
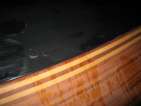
I know of three places where I've sanded through: a spot on the bow
piece (which I think I'll get when I'm doing the deck), a spot around
station 6 right near the edge of the black on the left side, and near
the transom on the right side you can see red circles that I
previously epoxied over. This last part means I've sanded through all
three layers from a few weeks
ago. Amazing.
So all told, there were seven applications of black for
the hull:
Sep8,
Sep17,
Oct1,
Oct4,
Oct7,
Oct13,
Oct15. Talk about a
Sisyphean task.
If you sand, you will sand through
posted 2006 October 16
If there is a truism about sanding this black, it is that if you
sand, you will sand through. This isn't helped any by the vast
expanse of black on the hull.
I started out with 220
— and managed to sand
through (sigh). I figured, if that was the only spot I might not
patch it up. So I continued on to 400 grit. By 400, the
squeegee was starting to really slide off the hull — quite
noticeable how much smoother the surface got. Both 400 and 600 like to
"float" over the hull, they can't get below the sheet of water. To get
around this, I would wet the surface, move the water away, sand a bit,
then rinse.
With 600 grit, the
hull started to get somewhat reflective — I wonder
what 1000 will be like. And, of course, I got a bit wet. It's chilly these
days, wetsanding is cold.
With another hole sanded into the black, I went back and fixed it. While I was at
it, I filled all the dimples, and I decided
that the underside of the launcher throat could be faired out a bit as well.
While this was all curing, I went back to the hull and used the
random orbital to sand down some spots on the hull where there were
innies. This was a mistake. I used too rough a grit of paper. Now I
have swirly sanding marks in a bunch of spots - and I'm going to have
to sand more to get rid of them all. And sanding means I'll sand
through. Sigh.
So, I cleaned up the launcher throat and cleaned
up the transom (which is
starting to look done). And applied another three-round application
of black epoxy, one two three (including the throat).
And once everything cured, I started sanding again. Rule number
one about sanding off patches: sand the edges to feather them in. Work
your way into the spot which you were covering up. And only sand that
spot enough to remove the gloss, no more. Even with this approach,
once I started wetsanding
a bit - I sanded through
in another six spots. Six is too many. One two three. Oh, and on to the second can of black graphite
powder. Hope I don't need a third.
Still Wetsanding
posted 2006 October 9
With another layer of black on, it was time for... wait for
it... more sanding. But that just
turned up spots I had
missed with the previous application of black. Time for an entire new
layer... again. Three layers —
one
two
three — overnight
in the middle of the week, because I wanted to be sure I could wetsand
on Friday (I intended to take the day off). Each application was very
thin - only three squirts per side - which made "line runs" less
likely.
Having put all this black on, the one thing I can say is make
*sure* you pull as many loose bristles out of these brushes as
possible, it's a *pain* to get them out of the epoxy. (Although that
said, using the sharp point of a pencil to pull them off works ok.
Another option is a x-acto knife, or any kind of knife point.)
On to Friday. I
started out with wet 60 to pull off the "big" high spots, then moved
on to 220. As I went, I squeegeed off the area I
worked to see how many dimples remained. 220 turned out not to go
quite quickly enough, so I returned to 60 and went another round over the entire
hull. After a few hours it started to look
rather smooth. Then mark the dimples, return
with the 220.
Eventually, I stopped marking the dimples. I used to do "passes"
on the hull - sand all the way along, squeegee it off, circle the
dimples, repeat. But with the squeegee, it's easier to just squeegee
one area, mark, sand, and repeat just in that area. That way there's
less moving the hose around (which is a hassle - it always wants to
fall off the hull).
Of course, all that sanding meant I sanded through the black. Time for more (two, three).
More wetsanding
posted 2006 October 2
Well, onwards with the sanding. Things were going slowly with my
220-grit, so I figured I might as well try using 60-grit regular paper and
see how it worked in the water. Result: not too bad. It just falls
apart a bit quicker. However, it does sand down the high spots pretty
quickly. I took all the pieces of dull paper filled with caked on
dust, and breathed a
second life into them - the caking went away. But they still don't
last long - I eventually bore a hole in the middle of the paper.
So, I scribbled some
more, and moved epoxy from
the hull to the floor (slowly) and gradually wound up with
something smoother and
greyer. The 60-grit leaves a greyer colour than the 220-grit
does.
The hull had a lot of long edges from the last application of
black, and so needed quite a lot of work. The 60-grit allowed me to
make some headway fairly
quickly - but I've still got a lot of innie dimples on the sanded
area. It's pretty easy to see these dimples where more sanding is
required - when the water is running, they turn up as black and the
sanded area is a dark grey. Of course, sanding just means I'll sand through. Getting a
good, smooth coat of this black stuff takes for *ever*. The trick
with sanding is you must take *one* stroke, check, repeat. Always you
want the fewest possible strokes. Especially with this black stuff.
So, it's time for another layer of black. Tape. Fill dimples (3-squirts). Cover
up a bit more
(3-squirts). And then cover up again (3-squirts). By the
end of these three applications, I figured I had filled most of the
dimples, and covered most of the thin areas. The strategy was to
spread out the epoxy with each application, so it remains fair, and
has a slightly raised middle section where the sanded through part
was.
And that completed another 240 applications of epoxy
(I'm now past 440).
Bits and pieces
posted 2006 October 1
I've ordered a number of pieces, and have more to go.
Specifically:
From VMG:
From Roger at Aquilo
Boats in Calgary:
- launcher throat
- spinnaker pole ring
- forestay fitting
- centreboard foam blank (the old style one: 57” long.
Greg: "I still think the older one would be fine, there is only a
slight difference in plan shape. If you keep the skins pulled
tight with not too much resin and to the layup recomended in the
PDF it will work fine, just like Brams centerboards made with the
same core. The new ones are higher aspect ratio and a bit
thinner. This makes them easier to make and most importantly
easier fit inside the CB case.")
- rudder foam blank (layup)
- mast base
- foam spreader cores
Other things kicking around the house:
- Mainsail (under the master bed)
- spinnaker
- the rigging kit
(box in the garage)
- tiller extensions (in the hallway closet)
- the mast and boom (from Bram, in the garage)
And finally, things I need to get.
- the "butt plug", a.k.a. mast base fitting (from Greg)
- spreader collar (from Greg)
- boat cover (from Bram)
- a spinnaker sock (from Bram)
- mast head fitting (from Bram)
Page 22 of 62
« First
…
«
20
21
22
23
24
»
…
Last »