Fairing bulkheads (2)
posted 2003 Dec 30
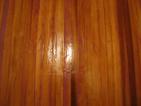
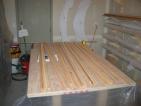
Well, I took a good look at how the straight epoxy turned out
today. You can see a number of spots where the epoxy isn't very thick
at all, it's just a very thin layer over the wood strips, and the
texture of the wood still shows through. I kept the spreader pretty
vertical for the entire time, and wasn't too careful about if the
sharp side or rounded side of the spreader was pulling; as a result,
it looks like there would have been a lot of resin starvation were I
actually glassing fabric. There's more instructions here; in particular when
spreading glass on fabric, you should hold the spreader at around
45°.
Another note: Bram indicates that the first resin application is
mostly to fill in staple holes, so the order isn't especially
important.
Reading through the The Strip-Built Sea Kayak, I found out that
having a grooved aluminum roller would help reduce the amount of
excess resin used to hold the hybrid on to the bulkhead materials. I
don't have one, so I ordered a couple from LBI
Products (2x ES-422-100-300 and 1x ES-782-100-300).
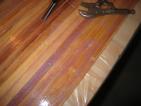
So, to keep things moving along, I decided to flip the bulkhead
strips over and get started on the other side. I made a couple of
changes this time - first off, I was much more aggressive about getting
the glue off. The paint scraper is like the first step of planing -
it pulls off some of the high spots of the wood as well. You may
leave a rough surface on the wood, but this will get cleaned up
quickly with the sander. In fact, with the scraper, I didn't even
bother to use the plane.
Next, I tried the random orbital sander with 40-grit, but it didn't
seem to be doing much. So I switched to using an 10-inch strip of
60-grit on a sanding block. This made a big difference. I generated
a lot of dust quickly and really smoothed things out. And I worked up
a nice sweat.
Since this worked out so well, I started looking into buying or
building a fairing board. Fisheries Supply sells a "3M
Hookit Marine Fairing Board System", but the board is $50 and the
sheets (10 of them supposedly) are $50. $100 seems a bit steep, so I
asked the list, and got a reply
from Rob Deane. He suggests just building one with 1/4" plywood
board, and using 3M Repositionable Spray Adhesive to glue plain old
aluminum oxide paper on.
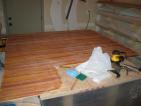
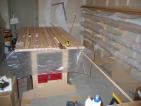
In hindsight, because the strips hang over about 12 inches on
either side of the tabletop, it might have been helpful to take two
pairs of straight pieces of wood, wrap them in plastic, and clamp them
on the top and bottom of the strips hanging from the edge. A lot of
the fairing needs to be done at the end of the strips - they tend to
be like "fingers", each piece not quite in the same plane. The boards
would have helped with this.
Another excellent reference - One Ocean
Kayaks has a bunch of pages with color pictures and good ideas on
how to build a kayak. Excellent site.
Bram posted a pdf with instructions on how to glass out the entire
hull:
When wetting the s-glass, start by dumping about 10 oz. of epoxy on
the center of the bottom. Squeegee it from the center toward the
sides, bow and stern. Dump the second 10 ozs. in a circle on top of
the outer edge of the wet-out surface - not on dry material. Continue
to squeegee in an outward direction in ever larger circles. Never
leave a wet edge very long before extending it further. When you get
to the sides, continue to work toward the bow and stern without
letting any edge set very long. When the epoxy becomes tack free,
about four hours, apply a second coat of epoxy with a brush. When
that becomes tack free (another 4 hours), look it over. If you can
still see cloth dimples, apply a third coat immediately. You will
save yourself a lot of work and get a higher quality finish by
applying these additional coats without allowing the epoxy to cure
more than 6 hours between coats. This hull has 3 coats of epoxy on it
and gave me plenty of material to wet sand without getting into the
fabric.
Fairing bulkheads
posted 2003 Dec 28
After planing, I spent some time sanding down to get things a
bit smoother. I was mostly trying to eliminate the rough feel of the
edges between the strips; it takes a lot to get rid of those edges,
however, so I figured I would go ahead and fair things out.
Bram's instructions aren't very clear about the order in which you
put the epoxy on; it implies you start with a straight epoxy sealer
coat and then put the fairing compound on. The strip-built boat says
to scrape, plane, sand, fair and then seal. That's what I choose to
do.
For five squirts of epoxy, I needed around 6-7 heaping teaspoons of
407 to get a heavy cream consistency epoxy. I spread the compound
over a large part of the surface. The notches between the strips were
filled, and in places there was a very thin film of fairing compound
over the surface itself. I hit almost all of the strips. For strips
which were low, I put a large amount of compound in the low spot to
bring it up to the level of the surrounding strips. 407 is a
pink-purple colour, but it will never show anyway. For the entire
board, I used 8 squirts of epoxy.
I made a couple rookie mistakes:
- my first batch of epoxy was too much. I mixed five squirts, and
should have started with three. By the end of the batch, the epoxy
was pretty hard.
- I turned on a heater at the start of the process and let it run
after I was done. The result was that the air trapped in the wood
expanded and blew bubbles in the fairing compound. I should have
turned it on long before I started and then turned it off when I was
done; the air would then contract, thus no bubbles.
- it's really important to take off the extra spills. In my case,
there were a couple "lines" of compound which weren't filling
anything, I just didn't take them up. However, the epoxy doesn't
flow, so they stay exactly where you left them, and it dries so hard
they are very hard to sand down.
Once the fairing compound was dry (overnight), I went back and
sanded more. I used 40-grit paper on my random orbital sander.
Sanding at right angles to the direction of the strips seemed most
effective. I had to turn my sander up to "maximum" to be able to make
much of a dent - the epoxy is very hard. Tipping the sander on it's
side helped take off some of the "mountain ranges" of epoxy blobs in
certain spots.
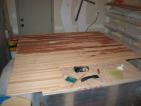
Once things were sanded down a bit more, I mixed up some straight
epoxy and spread it over the entire surface. I needed 9 (4+3+2)
squirts to cover the whole thing.
Further research says that the Gougeon
method of fairing is to cover the surface in plain epoxy, and
while it's still wet (gelled if you're working overhead), go back and
cover the required spots in fairing compound. Having done both, I can
see why this is preferred - the initial epoxy application fills in
some of the smaller holes so you don't have to go back and do as much
work with the fairing compound. I'll try this on the other side.
Building bulkheads
posted 2003 Dec 22
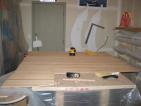
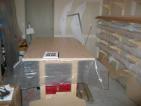
The next steps are to build the bulkheads, partial bulkheads, and
tee soldiers. To do this, you build a special plywood, with glued
together strips laminated with kevlar/carbon hybrid and epoxy.
Normally the lowest-quality strips would go into the bulkheads, but
in looking through one of the packages of wood, I can't find any knots
or blemishes, so I just cut whatever was there. I cut 26 strips - 24
into thirds, and the last two into 20" pieces. Each strip is about
16'6" long, so each third is 65" long. With 72 of these, I have a
flat board 65" tall by 54 1/2" wide.
Because the strips must run vertically in the bulkheads, stations 6
and 8 (the two bulkhead stations) must fit across the width of the
board. Station 8 is about 69" wide, so to accommodate the extra width,
I cut another two strips into 20" pieces and glued those on to build
another 15" of width.
When gluing strips, you press them together tightly and squeeze all
the glue out from between the strips, then staple the strip down to
your workbench. The perfect glue line squeezed out should be a thin
sliver of glue. Any more than this and you'll spend a lot of time
with a paint scraper pulling the extra glue off (what I did). To get
the perfect glue line, hold the glue bottle vertically and use the
edge to control how much glue can escape - you should have a bead of
glue down the middle of the cove as it comes out, not touching the
edges of the cove.
For most of the board I used too much glue, and so had to scrape it
all off. First, the best time to do this scraping is after the glue
has started to set, but before it's become rock solid - if it's still
white in the middle but yellow around the edges, it's a good time to
scrape. Second, once it's dried, scraping glue sounds different than
wood - glue has a plasticy "screetch" to it. Keep scraping until you
don't hear that sound. The plane has a much worse time taking the
glue globs off, so the scraper is best here.
After this, plane the surface down.
[Update 2008 Dec 20: I was talking to
Matt Broughton about how to go about building these bulkheads, and an
idea came up. Because you're building on a flat surface and don't
need to shape the bulkheads, it might be easier to just rip the cedar
for these bulkheads yourself, and save the money on buying strips.
Get a couple 2x8s of cedar planking at the local Orange Borg, rip it
into 1/2” thick strips, and glue together edge-wise. There's no
bead and cove necessary, and the widths don't have to be perfect so no
planing is involved (in fact, having more width is probably better
because you save the glue weight). Doing this saves on the cost of
the strips. Even I would consider doing this next time - the effort
involved is minimal.]
Strongbacks cut
posted 2003 Dec 15
I've finally completed the messy task of cutting the strongbacks.
What I did was take the 1/4" hardboard templates I built, clamp them down to the
particle board, then use a template router bit to rout out the actual
pattern. When you're done, you have an exact duplicate of the
hardboard pattern.
Doing the actual routing just means clamping together the pattern
and the board, and continually moving the particle board around to
expose another six inches to rout, while ensuring there is enough
support for the weight of the router. The pattern should always be
securely clamped to the board by at least one clamp. I used between
two and four clamps on a pattern, two holding the pattern on, the
others holding the board to the table. I also had two spring clamps
which I used to clamp the particle board to the workbench.
Tips & tricks:
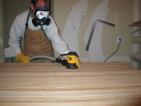
- This is messy. Essentially the router bit removes 3/8" of
material all the way around the edge of the pattern. That's a lot
of dust. There's no dust control on a hand-held router. Make
sure you put up plastic sheeting, because dust will be
everywhere. Wear your mask.
- You only need two sheets of particle board (and likewise you
only needed two for the hardboard). With a little creative
fitting, you can squeeze everything on two sheets. Sheet #1:
stations 1/2, 1, 2, 3, 4, 8, 9, 10, 11. Sheet #2: stations 1, 2,
5, 6, 7, 12, 13, 14. (notice the repeats. ;-)
- Put the patterns down with the paper squashed between the
hardboard and the particle board (paper side down). I tried doing
it with paper side up for one station (the first, station 10) and
found that the router caught the paper and ripped a bunch off.
Another option is to spray the templates over with polyurethane
(smelly, but protects them from everything).
- Be sure to have stations 10 & 6 at the bottom of the two
sheets of particle board - I forgot about 6, so I only have the
negative of station 10. I'll probably have to rout another
negative for 6 (or come up with another approach). These negs
are useful when it comes time to build the boat support.
- Be absolutely sure that when you're routing, the router is
flat on the template. I ruined a couple templates this way - the
router bit sneaked up on me and ground out a chunk in the pattern
as well as the particle board.
- Before taking the router out of it's slot after doing a chunk,
wait for it to stop completely. I pulled it out early for one and
it bounced around against the sides, ruining another template.
I botched three stations - 1, 2 & 6, and had to create new ones
from hardboard. 2 & 6 Bram sent me new copies, 1 I used the kinko's
copy of (it's narrow enough that the horizontal inaccuracies are
acceptable).
To transfer the control lines (centerline, waterline, and the
positions of the strongback holes) from the templates to the particle
board, I drilled out 1/64" holes at all the corners. At first, I
tried to put a marker with a 1/4" long nib down the hole and through
to the pattern. This didn't work out very well, because there's
usually a little extra wood at the exit point of the drill hole, and
also because the holes fill up with dust from the router. What I did
instead was use small finishing nails to transfer the points. This
worked great, and seemed more accurate to boot - you can tell the
nails are vertical, and they lined up more accurately than some of the
marker points I had transferred. They even create a short pilot hole
so that when it comes time to saw out the strongback holes, they will
be more accurate.
Greg suggested that it was worth creating another template
1/4" shorter for the interior bulkheads. I'm thinking it might
be easier and faster to just take the current station template and
shift it down 1/4" when routing the top edge of the bulkheads. This
way, the offsets for the step-up/step-down will be correct as well.
[Update 2006 Aug 28: I was watching
How It's Made
and they were building something which followed a process similar to
this. Their trick was to scribe the outer edge of the template, use a
jigsaw to cut to within 1/4” of the scribe line, and then use a
router to trim off the excess and get a perfect shape. Duh. Don't do
this.
Another thought: If you did do the jigsaw method, it would be a
*lot* easier to manage if you could use a router table with a large
"table" surface and just slide the piece around. With two people
man-handling each station, it seems like it would be a lot easier,
instead of positioning and re-positioning the piece you're working
on.]
More construction notes
posted 2003 Dec 5
Class rules
are complete.
Here's some more construction notes which have come up from the list
(click here to see other notes):
- (link)
On page 44 the manual tells you to cut the strips 64" long. That
is correct. On page 45 the manual tells you to cut them off at 55"
overall. That is the length I used on the first boat but decided to
make them a bit longer on the second one. My preference is that the
final length should be 62 inches so that they go from about 1/2"
aft of station 8 to station 13. This is not a class controlled
length but rather a preference. I recommend that you make them
62" long.
- (link)
Station 10 is 74" wide at the widest point.
- (link)
An interesting note on why it's a good idea to get to weight minus
tolerance - if you undershoot, then weights will be added to bring
you up to weight, not weight minus tolerance.
- (link)
It's a good idea when you bond deck & hull together that you
include some "proof" that it happened on a certain day (important
for measurement).
- (link) Bram posted a PDF indicating
that it was worth making the stations, tee soldiers, and
centerboard trunk 1/4" shorter than the stations. Take this from
the TOP of the bulkheads and soldiers. In email, Greg suggested
creating a duplicate hardboard pattern for the bulkhead stations
(6 & 8), take 1/4" from the top of the duplicates, and then using
those shortened patterns to rout the bulkheads.
There is a tendency to cut the stations just a little
bigger than the patterns, and the bulkheads a little bigger than
the stations. When you add this growth to the growth caused by the
hybrid and epoxy, it is very likely that your bulkheads will be
1/4" larger than they need to be (you will be at the maximum of
the depth measurement at the centerboard trunk). I think everyone
will save time by simply cutting your bulkheads, centerboard
trunk, and soldiers about 1/4" short. That 1/4" should be taken
off the top of the bulkheads etc. Remember, the bonding flanges
will easily deal with 1/8" of fill anyway. This will save having
to cut them down after they are installed, as I've had to do on
both boats so far.
More interesting links
posted 2003 Dec 4
A few interesting links. First, there is the Cherub
class, which is interesting because many of the boats are
home-built. Lots of good reading there. Another good page is there
links
page.
Another interesting class is the Merlin Rocket. The Rocket
is a class which has been around since 1946 in England; the boats used
to be constructed as a clinker hull, and more modern versions are
built with multi-chine plywood construction. They're also pretty
fast, and less wet than the modern trapeze boats. They've a very
appealing look about them. Here is a
link for plans; they are expensive at £80.
Finally, there's the International 14
site. Bram has been racing the I-14s.
Page 56 of 62
« First
…
«
54
55
56
57
58
»
…
Last »